
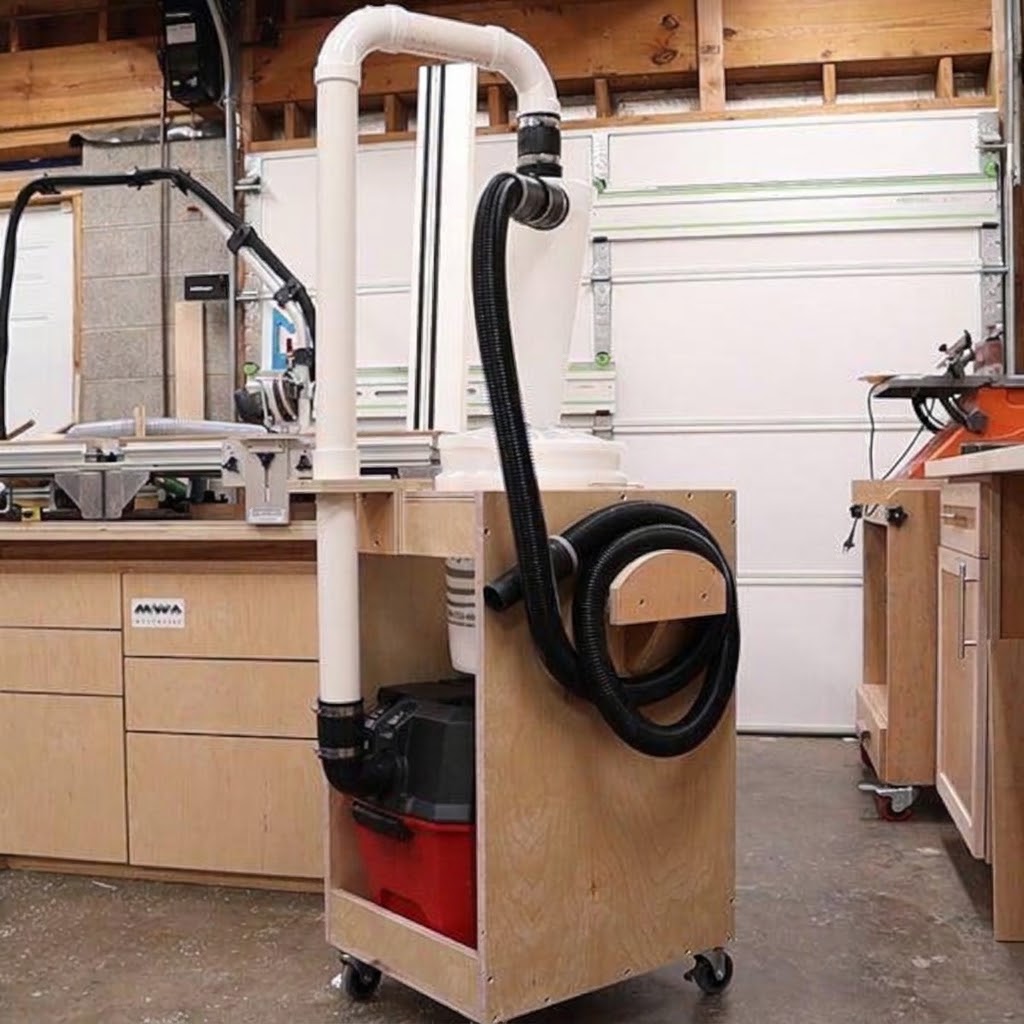
A DIY shop vac dust collection cart is a practical way to organize a shop vacuum, cyclone dust separator, collection bucket, hoses, and accessories in one mobile unit. Instead of moving a vacuum and separator separately around your workshop, you can mount the equipment on a sturdy rolling cart and move the complete setup wherever you need it.
This project is especially useful in small woodworking shops where floor space is limited. A well-designed cart can make dust collection easier to manage, keep hoses from becoming tangled, and provide convenient storage for frequently used attachments.
In this guide, you’ll learn how to plan, build, and assemble a mobile shop vac dust collection cart. The instructions cover material selection, suggested dimensions, cutting the plywood, installing casters, mounting the vacuum and separator, routing hoses, and testing the finished system.
The design is adjustable, so you can adapt it to different shop vac sizes and cyclone separator models.
1. Why Build a Mobile DIY Shop Vac Dust Collection Cart?
A shop vacuum is useful for collecting sawdust, wood chips, and workshop debris, but using it with a separate dust separator can create an inconvenient setup.
The vacuum, separator bucket, hoses, and accessories may take up separate areas of the workshop. Moving everything from one tool to another can become frustrating, particularly when you work with several machines.
A mobile cart brings these components together.
Some of the main advantages include:
- Improved mobility: Move the vacuum and separator together instead of carrying them separately.
- Better organization: Keep hoses, adapters, and vacuum accessories in one place.
- Convenient dust disposal: Position the collection bucket where it can be removed and emptied easily.
- Reduced floor clutter: Store the vacuum and separator in a compact footprint.
- Flexible workshop use: Connect the system to compatible tools such as a table saw, miter saw, router, or sander.
A cart does not automatically improve the airflow or filtration of a shop vacuum. Its main purpose is to make the equipment easier to organize and use.
2. Understand How the DIY Shop Vac Dust Collection Cart Works
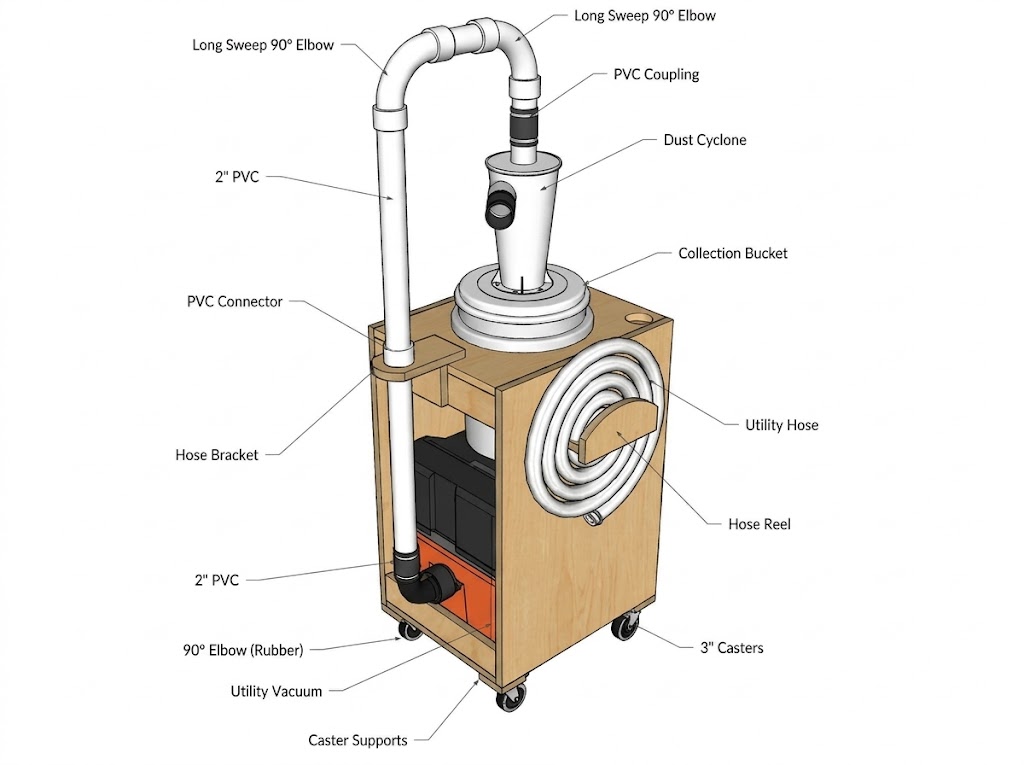
Before cutting any wood, understand how the components connect.
A typical two-stage shop vac dust collection system uses a cyclone separator between the woodworking tool and the vacuum.
The basic airflow path is:
Woodworking tool → Cyclone separator → Shop vacuum
The tool sends sawdust and debris into the separator. The cyclone separates much of the heavier material and drops it into a collection bucket. The remaining air travels through the outlet hose to the shop vacuum, where the vacuum filter captures finer particles.
The cart supports the vacuum, separator, and bucket while keeping the hoses and accessories organized.
Main components
1. Shop vacuum
The vacuum creates the airflow that pulls dust through the hose and separator. Choose a vacuum that fits the available cart space and has compatible hose connections.
2. Cyclone dust separator
The separator sits between the tool and the vacuum. It helps keep larger amounts of debris out of the vacuum tank and reduces how quickly the filter loads.
3. Collection bucket
A compatible bucket or collection container sits beneath the separator. It should be easy to remove without dismantling the cart.
4. Plywood cart
The cart supports the equipment and provides a stable platform for the vacuum and separator.
5. Casters
Heavy-duty swivel casters allow the entire setup to move around the workshop. Locking casters help prevent unwanted movement during use.
6. Hoses and fittings
These connect the tool, separator, and vacuum. The connections should fit securely and avoid unnecessary restrictions or sharp bends.
3. Choose the Right Cart Design
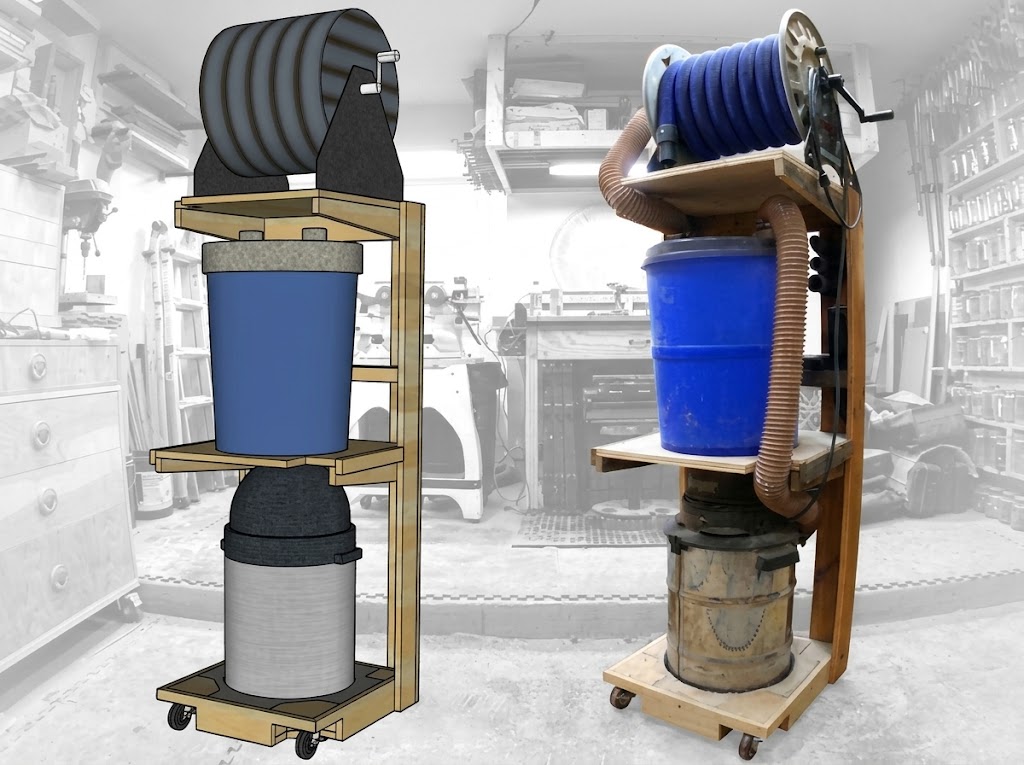
There is no single cart layout that works for every workshop. The best design depends on the size of your vacuum, separator, bucket, and available floor space.
Here are three practical designs to consider.
Design A: Side-by-side cart
In this arrangement, the shop vacuum and separator sit next to each other on the same base.
Advantages:
- Easy access to both components.
- Simple construction.
- Lower overall height.
- Convenient bucket removal.
The disadvantage is that the cart needs more floor space.
Design B: Stacked cart
A stacked design places the separator and collection bucket above or alongside the vacuum using a supporting frame or shelf.
Advantages:
- Smaller floor footprint.
- More vertical storage space.
- Convenient hose and accessory organization.
However, a tall cart needs a wider and more stable base. Make sure the bucket and separator are securely supported, and do not place a heavy container where it could make the cart tip over.
Design C: Enclosed storage cart
An enclosed cart uses plywood panels to create a cabinet around the vacuum and accessories.
Advantages:
- Neater appearance.
- Additional storage.
- Protection from accidental impacts.
- Opportunity to add a dedicated hose compartment.
The cabinet must still provide appropriate airflow and access to the vacuum’s cooling openings, filter, controls, and tank.
Which design should you choose?
For a first project, a low-profile side-by-side cart is a sensible choice. It is relatively easy to build, offers good stability, and makes it easier to remove the collection bucket.
This guide uses a side-by-side layout as its main example.
4. Materials and Tools You Will Need
Prepare the materials before starting construction. The exact quantities and dimensions depend on the equipment you plan to mount.
Materials list
| Material | Suggested quantity | Purpose |
|---|---|---|
| 3/4-inch plywood | 1 sheet (4 × 8 ft) | Main cart structure |
| Heavy-duty swivel casters | 4 | Mobility |
| Locking casters | 2 of the 4 | Prevent movement |
| Wood screws | As required | Assembly |
| Wood glue | 1 bottle | Stronger joints |
| Corner braces or plywood supports | As needed | Reinforcement |
| Foam weatherstripping | As needed | Sealing removable connections |
| Rubber straps or hold-downs | As needed | Securing equipment |
| Cyclone separator | 1 | Dust separation |
| Compatible collection bucket | 1 | Collecting debris |
| Flexible dust collection hose | As required | Connecting components |
| Hose clamps | As required | Securing hose connections |
You may use MDF for some cart designs, but plywood is generally a better choice for a mobile workshop cart because it holds screws well and is easier to reinforce.
Tools list
- Table saw or circular saw with a suitable guide.
- Drill and driver.
- Measuring tape.
- Combination square.
- Pencil.
- Jigsaw or router with a circle-cutting jig.
- Drill bits and countersink bit.
- Clamps.
- Sandpaper.
- Safety glasses and hearing protection.
A pocket-hole jig is optional. You can also assemble the cart with conventional screws and reinforced joints.
5. Measure Your Shop Vac and Separator Before Cutting
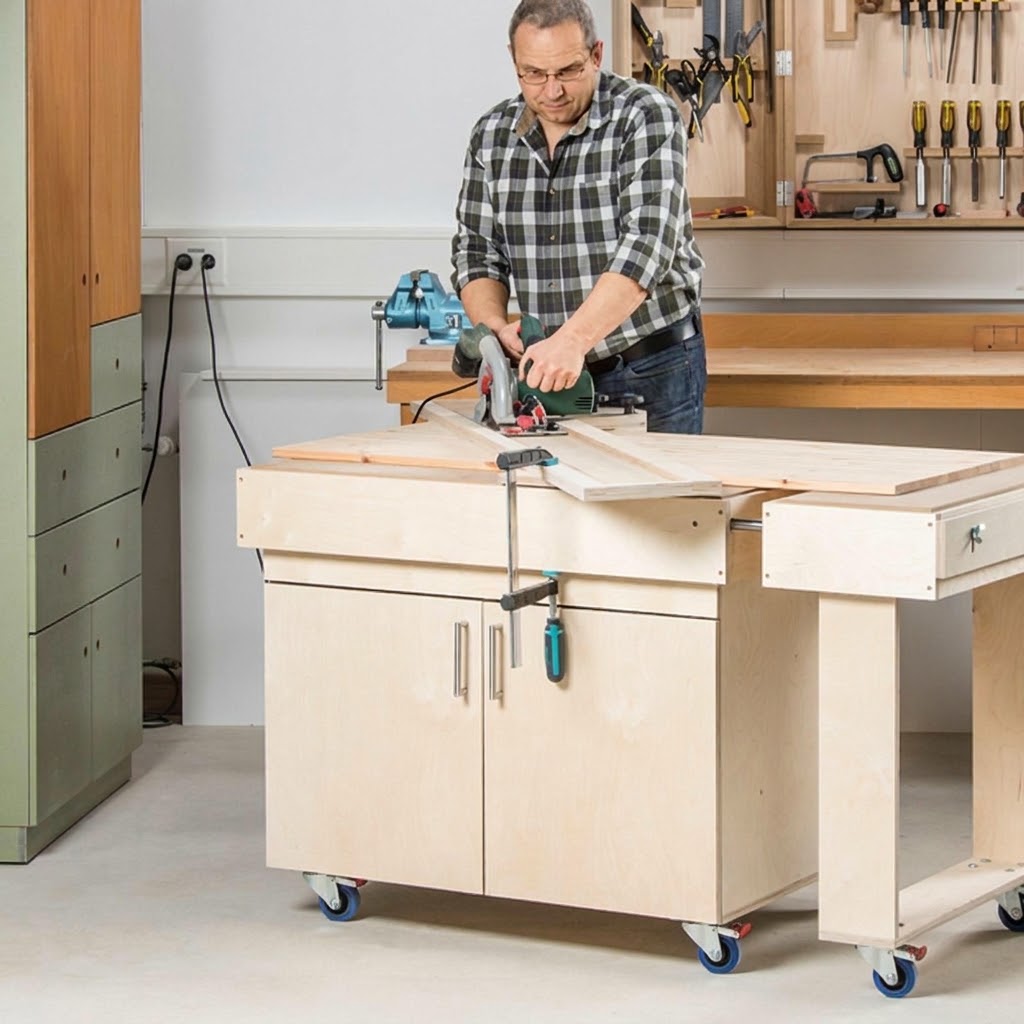
This is one of the most important steps in the project.
Do not build the cart around generic dimensions without checking your equipment first. Shop vacs differ in height, width, tank shape, handle position, wheelbase, and hose connection location. Cyclone separators also vary in height and mounting requirements.
Start by measuring these components.
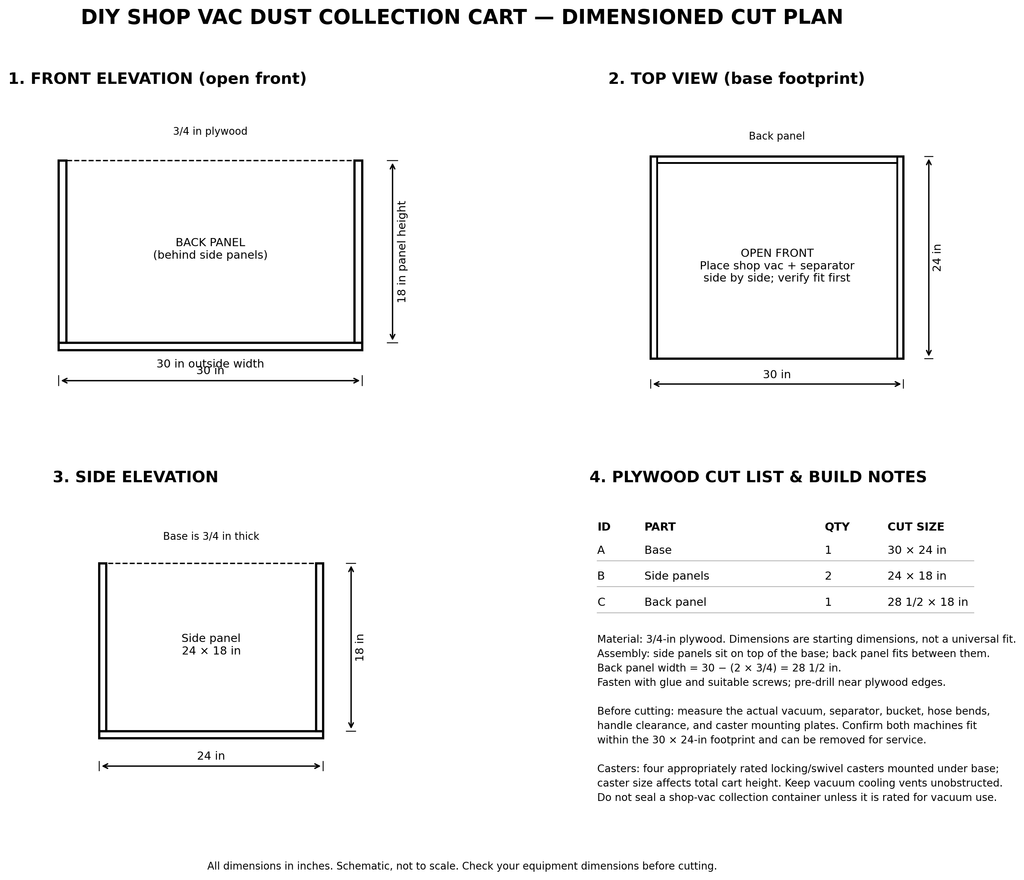
Image: DIY Shop Vac Dust Collection Cart: Plywood Cutting Plan and Dimensions
Measure the shop vacuum
Record:
- Overall width and depth.
- Height, including the handle if necessary.
- Wheelbase or bottom footprint.
- Location of the inlet and outlet.
- Access required to remove the tank.
- Space needed for the filter and cooling vents.
Measure the separator and bucket
Record:
- Separator diameter and height.
- Bucket diameter.
- Bucket height.
- Lid and separator mounting dimensions.
- Space needed to lift the bucket out.
- Hose inlet and outlet positions.
Suggested starting dimensions
For a compact side-by-side cart, you can use the following as a preliminary layout:
| Cart part | Suggested dimension |
|---|---|
| Base | 30 × 24 inches |
| Base thickness | 3/4 inch |
| Side panels, if used | 16–20 inches high |
| Top shelf, if used | 24 × 14 inches |
| Caster size | 3–4 inches |
These are starting dimensions, not a universal cut plan. Increase the base size if your vacuum, bucket, or separator needs more room.
Arrange the equipment on the floor or on a temporary piece of cardboard before cutting the plywood. Check that the bucket can be removed and the vacuum can be serviced without taking apart the cart.
6. Cut the Plywood Parts
Once the layout is finalized, prepare the plywood.
For a simple side-by-side cart, you will generally need:
- One base panel.
- Two side panels if you want to build a raised frame.
- A rear support panel or cross braces.
- A shelf or mounting platform if required.
- Additional blocks or strips for equipment restraints.
Mark each piece carefully with a measuring tape and square.
Cut the larger pieces first, then cut the smaller supports. Label the parts so you do not confuse them during assembly.
Important cutting considerations
- Use a straightedge or track guide to keep long cuts accurate.
- Support the plywood properly to prevent the offcut from pinching the blade.
- Sand rough edges before assembly.
- Keep the base large enough for the casters and the equipment footprint.
- Avoid cutting openings until you have checked the actual separator and bucket measurements.
If you are using a circular opening to support a bucket, measure the bucket’s outside diameter and the separator’s required mounting arrangement. Do not assume that a hole should support the bucket by its rim unless the bucket design and load distribution make that safe.
7. Assemble the Main Cart Frame
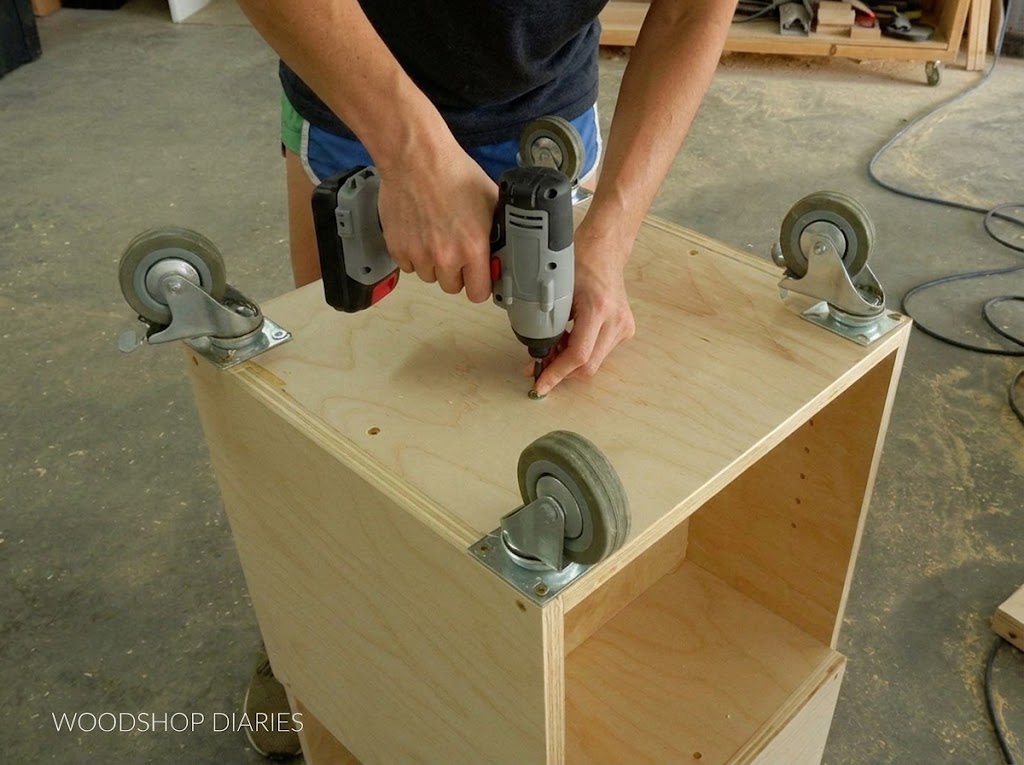
Place the base panel on a flat work surface.
If you are building a simple open cart, attach the side panels and rear support pieces to the base. Use wood glue and screws, with pilot holes to reduce the risk of splitting the plywood.
If you prefer a cabinet-style cart, assemble the side and rear panels first, then attach the base.
Assembly process
- Position the side panels along the base.
- Check that the panels are square.
- Apply wood glue to the mating surfaces.
- Drill pilot holes.
- Install the screws.
- Attach the rear support or cross braces.
- Check the frame for wobbling.
- Add reinforcement where the casters and equipment will be mounted.
The cart should remain square and stable before you install the wheels.
If the design includes a shelf, reinforce it underneath so it does not sag under the weight of the separator or bucket.
8. Install the Casters
Casters determine how easily the cart moves and how safely it stays in place.
For most compact carts, four swivel casters are a practical option. Use at least two locking casters so you can prevent the cart from rolling during operation.
How to install the wheels
- Turn the cart upside down.
- Position one caster near each corner.
- Check that the mounting plates do not extend beyond the base.
- Mark the screw holes.
- Drill pilot holes.
- Attach the casters using suitable bolts or screws.
- Add washers and backing plates where needed.
- Turn the cart upright and test its movement.
Choose casters with a combined rated load capacity that comfortably exceeds the total weight of the cart, vacuum, separator, bucket, and collected debris.
The mounting hardware must also be suitable for the plywood thickness. Do not rely on short screws that barely engage the material.
Test the cart
Push the empty cart across the workshop floor. Check that:
- All wheels rotate freely.
- The cart does not rock.
- The casters do not interfere with the frame.
- The locking mechanisms are easy to reach.
- The cart remains stable when pushed from different directions.
9. Mount the Shop Vacuum Securely
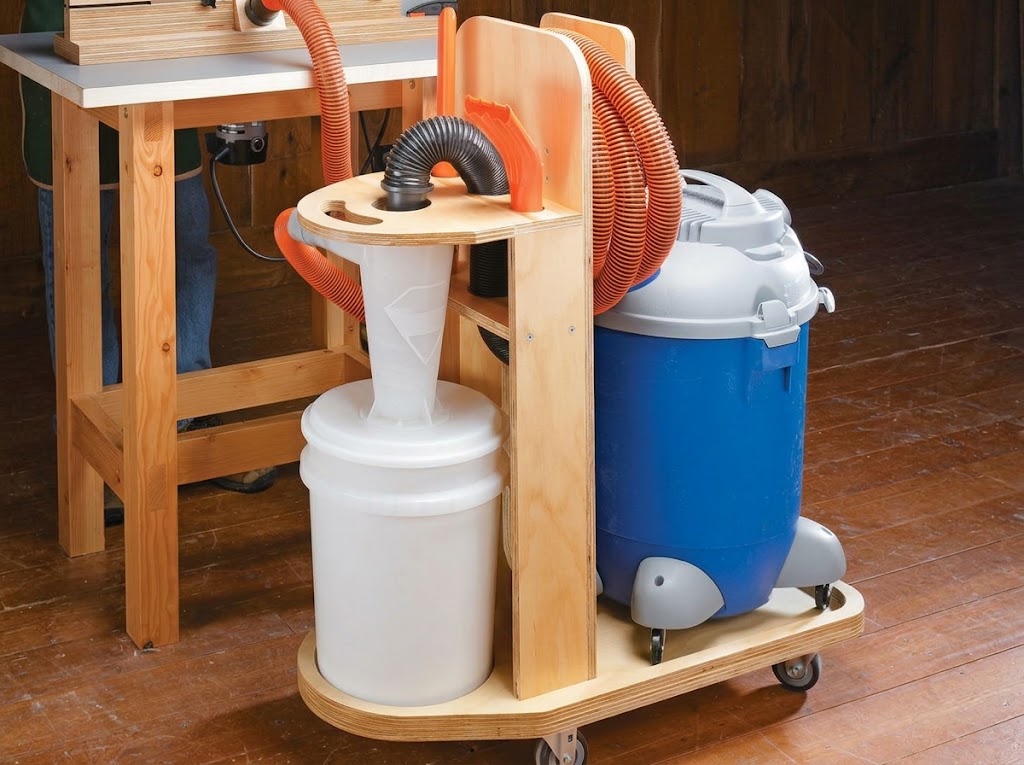
Place the shop vacuum on the base and check its position before attaching any restraints.
The vacuum should be easy to remove for cleaning, filter replacement, and maintenance.
Positioning the vacuum
Place it where:
- The hose inlet is easy to access.
- The power cord can reach a suitable outlet.
- The filter and tank can be removed.
- Cooling vents remain unobstructed.
- The vacuum does not interfere with bucket removal.
Secure the vacuum
You can use wooden retaining blocks, removable straps, or a purpose-built mounting arrangement.
A simple approach is to attach small wooden blocks around the vacuum’s base. Leave enough clearance to remove the vacuum when necessary.
Do not block the vacuum’s air intake, exhaust, cooling openings, or service panels.
If your vacuum has an integrated wheeled base, check whether it can be secured without damaging its original housing.
10. Install the Cyclone Separator and Collection Bucket
The cyclone separator is an important part of the system. It captures much of the heavier debris before it reaches the vacuum filter.
Position the separator so its inlet and outlet connections are accessible and its collection bucket can be removed easily.
Position the separator
For a side-by-side cart, the separator can sit next to the vacuum. A separate supporting platform or mounting frame may be necessary, depending on the separator design.
Make sure the bucket sits level and is supported properly.
Secure the separator
Use the mounting method recommended by the separator manufacturer.
For a removable separator assembly, you can use a properly sized support ring or retaining blocks. These should prevent the unit from moving without making bucket removal difficult.
Check the bucket seal
The bucket lid must seal properly. Air leaks around the lid or separator connections can reduce separation performance.
Use compatible gaskets or weatherstripping where appropriate. Do not cover the separator’s inlet or outlet openings.
Prevent bucket collapse
A thin collection bucket may deform under vacuum pressure. Use a container designed for the separator and vacuum arrangement. If the bucket is not rated for the pressure involved, do not assume that adding a thicker lid will make it safe.
Check the container regularly for deformation, cracks, and loose connections.
11. Connect the Hoses and Dust Collection Fittings
Correct hose routing is essential. A poorly arranged system can be difficult to move, may leak air, or can restrict airflow.
The standard connection order is:
Woodworking tool → Separator inlet → Separator outlet → Shop vac inlet
The separator’s inlet and outlet must be connected according to the manufacturer’s markings and instructions.
Connect the tool hose
Connect the hose from the woodworking tool’s dust port to the separator inlet.
Use a hose and adapter that fit the tool’s dust port. Some tools use different hose diameters, so you may need a reducer or adapter.
Connect the vacuum hose
Connect the separator outlet to the shop vacuum inlet.
Use the correct hose size and avoid loose connections. A poorly fitted connection can allow air leaks and reduce system performance.
Organize the hose routing
Keep the hoses:
- Away from caster wheels.
- Clear of sharp corners.
- Away from moving machine parts.
- Long enough for normal tool movement.
- Free from unnecessary tight bends.
Do not make the hoses so short that they pull the cart over when you move a tool.
A dedicated hose holder on the side of the cart can keep the hose off the floor when it is not being used.
12. Add Storage for Hoses and Accessories
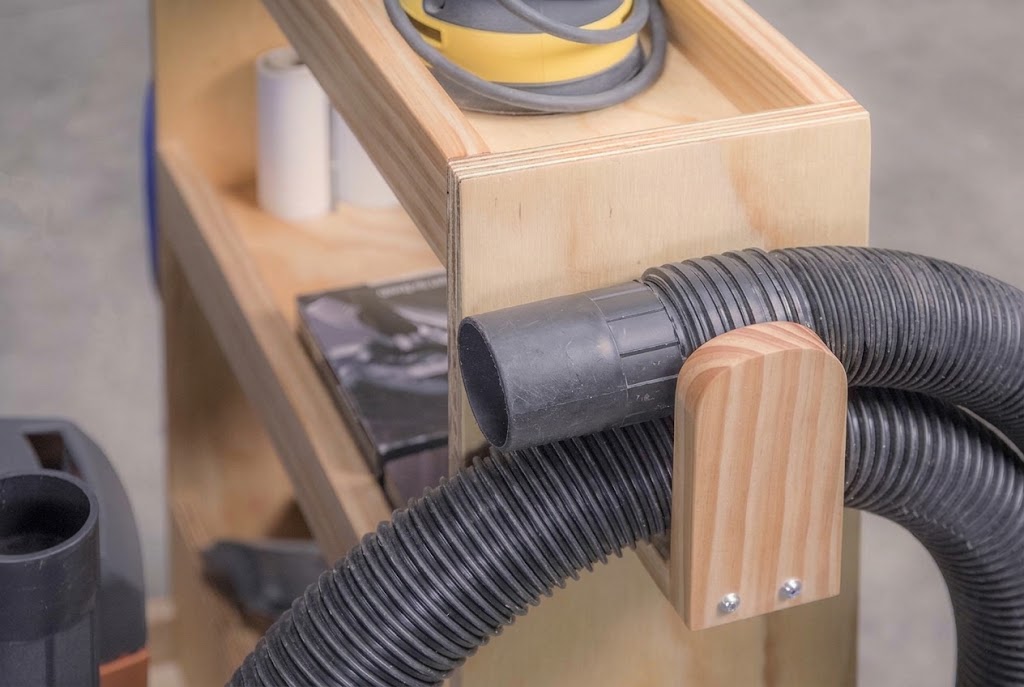
One of the biggest advantages of a custom cart is the ability to store accessories in one place.
You can add simple storage features without making the cart unnecessarily complicated.
Useful storage additions
Hose hooks: Attach large hooks to the side of the cart to hold flexible hoses.
Accessory holders: Add holes or brackets for common vacuum attachments.
Power cord storage: Install a simple cord wrap or hook to keep the electrical cable organized.
Adapter storage: Use a small compartment or removable box for reducers and fittings.
Tool accessories: Add a small shelf for crevice tools, floor nozzles, and cleaning attachments.
Keep all storage features clear of the wheels and vacuum cooling openings.
Avoid storing heavy items high on the cart because this can increase the risk of tipping.
13. Optional Upgrade: Add a Top Shelf
A top shelf can make the cart more useful, especially in a small workshop.
You can use it to hold lightweight accessories, sanding supplies, or frequently used fittings.
However, the shelf should not interfere with the separator, bucket, or vacuum maintenance.
If you add a shelf:
- Measure the available space.
- Cut a plywood panel to fit.
- Install supporting cleats or braces.
- Attach the shelf securely.
- Check that it does not obstruct the equipment.
- Keep heavy objects off the upper surface.
Do not use the shelf as a workbench unless the cart has been specifically designed and reinforced for that purpose.
14. Test the Finished DIY Shop Vac Dust Collection Cart
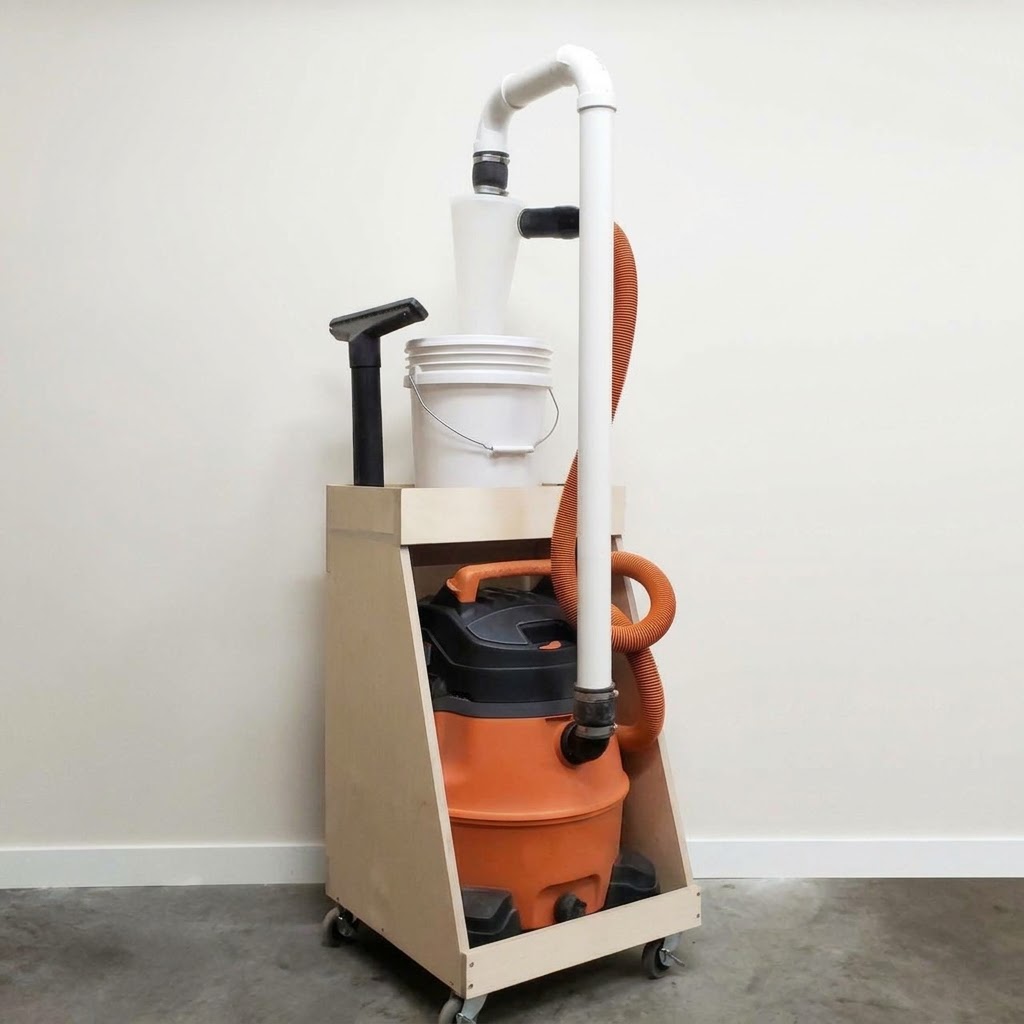
Before connecting the cart to a woodworking machine, inspect the entire assembly.
Initial inspection
Check:
- All screws and fasteners are tight.
- Casters are secure.
- Locking wheels work correctly.
- The vacuum is restrained.
- The separator is mounted securely.
- The collection bucket is properly seated.
- Hoses are connected to the correct ports.
- No cooling vents are blocked.
- The power cord is in good condition.
Run a basic test
- Move the cart to a clear, level area.
- Lock the casters.
- Connect the vacuum to a suitable electrical outlet.
- Switch on the vacuum without a woodworking tool connected.
- Listen for unusual noises.
- Check the hoses and separator connections for leaks.
- Inspect the bucket for deformation.
- Turn the vacuum off before adjusting any connections.
Next, connect the system to a compatible tool and test it with a small amount of ordinary workshop debris.
Observe whether the debris reaches the separator and whether the vacuum filter remains properly seated and unobstructed.
Never put your hand near a running machine’s blade, cutter, or moving parts to test dust collection.
15. Common Problems and How to Fix Them
Even a well-built cart can have problems if the separator, vacuum, hoses, or fittings are not compatible.
Problem 1: The cart wobbles
Possible causes:
- Base is too small.
- Equipment is positioned too high.
- Casters are poorly mounted.
- Frame joints are loose.
Solutions:
- Widen the base if necessary.
- Keep heavy components low.
- Reinforce the frame.
- Check caster mounting hardware.
Problem 2: The collection bucket collapses
Possible causes:
- Bucket is not suitable for vacuum pressure.
- Container walls are too thin.
- Airflow is restricted downstream.
- The system is operating outside the container’s intended use.
Solutions:
- Use a container designed for the separator and vacuum system.
- Check the filter and hose for blockages.
- Follow the separator manufacturer’s instructions.
- Stop using any container that shows signs of deformation.
Problem 3: Dust reaches the shop vacuum too quickly
Possible causes:
- Separator is incorrectly connected.
- The lid or hose connections leak.
- The bucket is too full.
- The separator is incompatible with the application.
Solutions:
- Check the inlet and outlet orientation.
- Inspect all seals.
- Empty the bucket before it becomes overfilled.
- Check the separator’s instructions and compatibility.
Problem 4: Suction seems weak
Possible causes:
- Clogged vacuum filter.
- Blocked hose.
- Leaking connections.
- Undersized or restrictive fittings.
- Excessively long hose runs.
Solutions:
- Inspect and clean the filter according to the vacuum manufacturer’s instructions.
- Check for blockages.
- Secure loose connections.
- Use compatible hose diameters.
- Keep the hose routing as direct as practical.
Problem 5: The cart is difficult to move
Possible causes:
- Casters are too small.
- Wheels are not rated for the load.
- Hose or power cord catches on nearby objects.
- Weight is distributed unevenly.
Solutions:
- Use appropriately rated casters.
- Reposition equipment to improve balance.
- Add hose and cord storage.
- Check the floor for obstructions.
16. Tips for Getting Better Performance From Your Cart
Building the cart is only part of the job. Good equipment arrangement and regular maintenance also matter.
- Empty the separator bucket before it becomes too full.
- Inspect the vacuum filter regularly.
- Use the correct hose diameter for the tool and vacuum.
- Seal compatible connections properly.
- Avoid unnecessary hose length and sharp bends.
- Keep the vacuum cooling vents unobstructed.
- Check the cart’s wheels and fasteners periodically.
- Keep the collection bucket accessible for inspection and emptying.
A shop vacuum and cyclone separator are useful for many small-shop cleanup and tool-extraction tasks, but they are not a substitute for a properly designed dust collection system where higher airflow is required.
Fine wood dust can remain airborne even when visible chips are collected. Use appropriate dust-control measures, ventilation, and respiratory protection based on the work being performed. Do not rely on a shop vacuum alone to protect against hazardous airborne dust.
17. Frequently Asked Questions
Can I build a shop vac dust collection cart from one sheet of plywood?
Yes. A compact cart can often be built from one sheet of 3/4-inch plywood, depending on its design and the size of the vacuum and separator. Measure your equipment first and prepare a cut layout to reduce waste.
Should the shop vac and cyclone separator be mounted side by side?
Side-by-side mounting is a good choice for a first build because it keeps the center of gravity relatively low and makes the collection bucket easier to access. A stacked design saves floor space but needs careful support and stability planning.
Do I need a cyclone separator for my shop vac cart?
No. You can build a cart for a shop vacuum alone. However, a compatible cyclone separator can collect much of the heavier debris before it reaches the vacuum, reducing how quickly the filter loads.
What size casters should I use?
Three- or four-inch casters are a reasonable starting point for many compact carts. The correct size and load rating depend on the total weight, floor condition, and cart design. Use locking casters to keep the cart stationary during operation.
Can I use a regular five-gallon bucket as a dust collection container?
Only if it is compatible with the separator and vacuum arrangement. Some ordinary buckets can deform under suction. Follow the separator manufacturer’s recommendations and inspect the bucket for deformation during use.
Can I connect a table saw to this cart?
You can connect a table saw if the vacuum, hose, and separator are suitable for the saw’s dust port and the required airflow. Some table saws produce more dust and require more airflow than a typical shop vacuum can provide. A dedicated dust collector may be more appropriate.
How do I keep the cart from tipping over?
Use a sufficiently wide base, keep the heaviest equipment low, distribute the weight evenly, and avoid placing heavy accessories on high shelves. Secure the vacuum and separator so they cannot shift when the cart moves.
Is a shop vac dust collection cart suitable for a small workshop?
Yes. A compact mobile cart can be particularly useful in a small workshop because it keeps the vacuum, separator, hoses, and accessories together and can be moved between compatible tools.
Conclusion
A DIY shop vac dust collection cart can make a small woodworking workshop more organized and convenient. By combining the vacuum, cyclone separator, collection bucket, hoses, and accessories in one mobile unit, you can reduce clutter and move your dust collection equipment more easily.
Start by measuring your equipment and choosing a stable cart design. Build a sturdy plywood frame, install appropriately rated casters, secure the vacuum and separator, and route the hoses carefully. Finally, test the system and inspect all connections before using it with your woodworking tools.
The best cart is not necessarily the largest or most complicated one. It is the one that fits your equipment, remains stable, allows easy bucket removal, and makes everyday workshop cleanup more convenient.
Read more
1 thought on “DIY Shop Vac Dust Collection Cart: Step-by-Step Build Guide”