
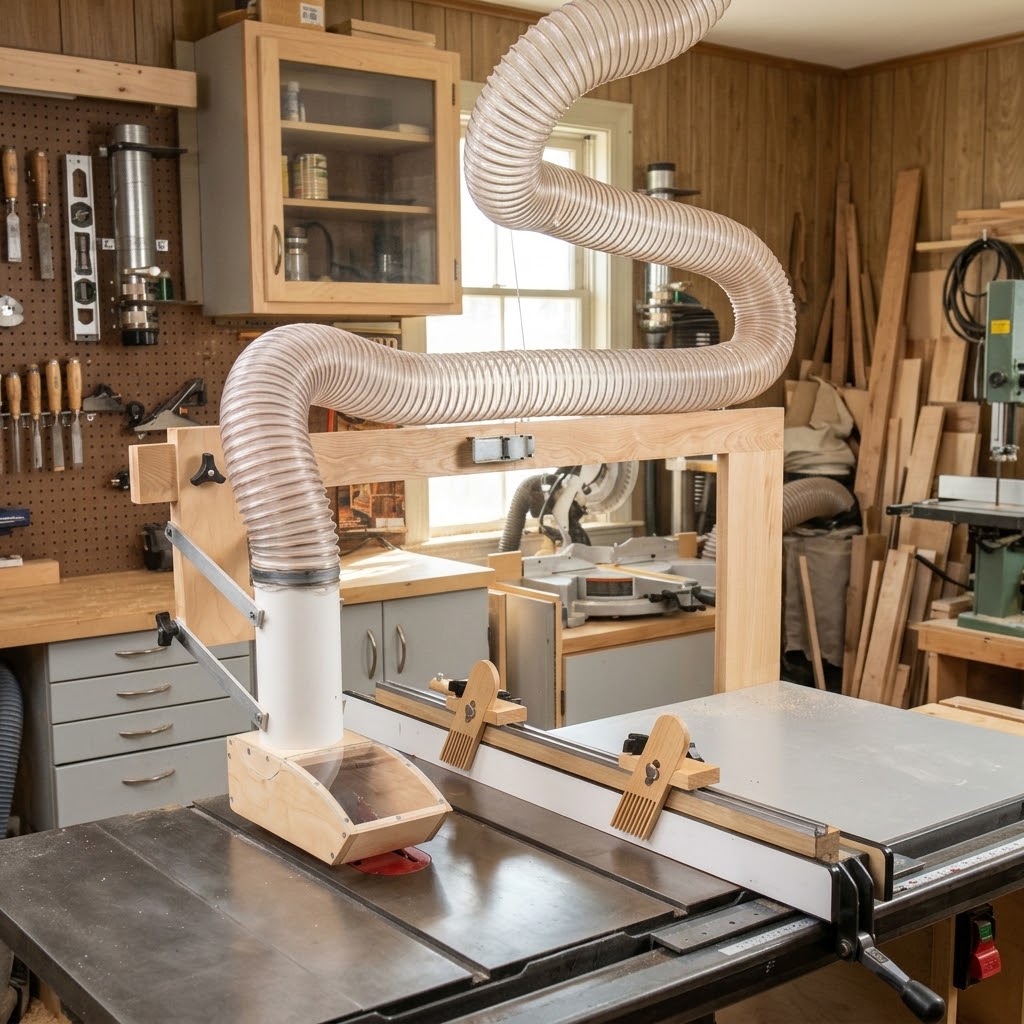
A DIY table saw dust collection system can help capture the sawdust and wood chips that spread throughout a workshop during cutting. Even when a table saw has a built-in dust port, fine particles and debris can escape through the blade opening, cabinet gaps, and the area around the blade guard.
A well-planned DIY table saw dust collection system can help capture more of that debris before it spreads throughout your workshop. You don’t necessarily need an expensive commercial setup. Depending on your saw and dust collector, you may be able to improve collection with a lower dust hood, a better hose connection, a partially enclosed cabinet, or an additional pickup near the blade guard.
The key is to build a system that matches your table saw, provides suitable airflow, and does not interfere with the blade, motor, riving knife, or other safety components.
In this guide, you’ll learn how to plan a DIY table saw dust collection setup, choose the right hood and hose, connect the system to a shop vacuum or dust collector, and explore several practical workshop designs.
Why Build a DIY Table Saw Dust Collection System?
Many table saws include a dust port, but the built-in collection arrangement does not always capture all the sawdust produced during cutting.
Contractor-style and portable saws can be especially challenging because their bases may have large openings. Dust can escape before it reaches the collection port. Cabinet saws may have a more enclosed base, but dust can still escape above the table or through openings around the blade.
A DIY system lets you address the collection problems specific to your machine.
Main benefits of a DIY setup
1. Better collection around the blade
A properly positioned hood can help direct sawdust toward the extraction hose instead of allowing it to accumulate inside the saw or spread across the workshop.
2. Fewer uncontrolled cabinet openings
On some saws, carefully designed removable panels can help direct more of the available airflow toward the collection port.
3. More suitable hose connections
You can adapt the system to the hose and dust collector you already own, provided the connection and airflow requirements are compatible.
4. Flexible workshop design
A DIY setup can be built around a mobile table saw, contractor saw, cabinet saw, or integrated workbench.
5. Lower project cost
You may be able to reuse suitable materials, fittings, and collection equipment rather than purchasing a complete commercial system.
How Does Table Saw Dust Collection Work?
A table saw produces dust in more than one location.
The blade carries wood particles through the cut and throws some of them upward and backward. Other dust and chips fall through the throat plate opening and enter the blade housing or cabinet.
This means a complete collection arrangement may need more than one pickup point.
The two main dust collection areas
| Collection area | What it captures | Typical solution |
|---|---|---|
| Below the table | Dust and chips falling into the blade housing | Lower dust hood or cabinet port |
| Above the table | Dust thrown upward and backward by the blade | Blade-guard pickup or overhead hood |
The lower dust port is usually the starting point for a DIY table saw dust collection project. An upper pickup can be added if the saw and collector support it.
The National Institute for Occupational Safety and Health (NIOSH) has published guidance on table saw dust control that illustrates an auxiliary exhaust hood above the blade. It emphasizes capturing dust close to where it is generated.
Source: NIOSH – Control of Wood Dust From Table Saws.
For a dedicated explanation of the upper pickup, see our guide to Overhead Dust Collection for a Table Saw.
DIY Table Saw Dust Collection: Choose the Right Design
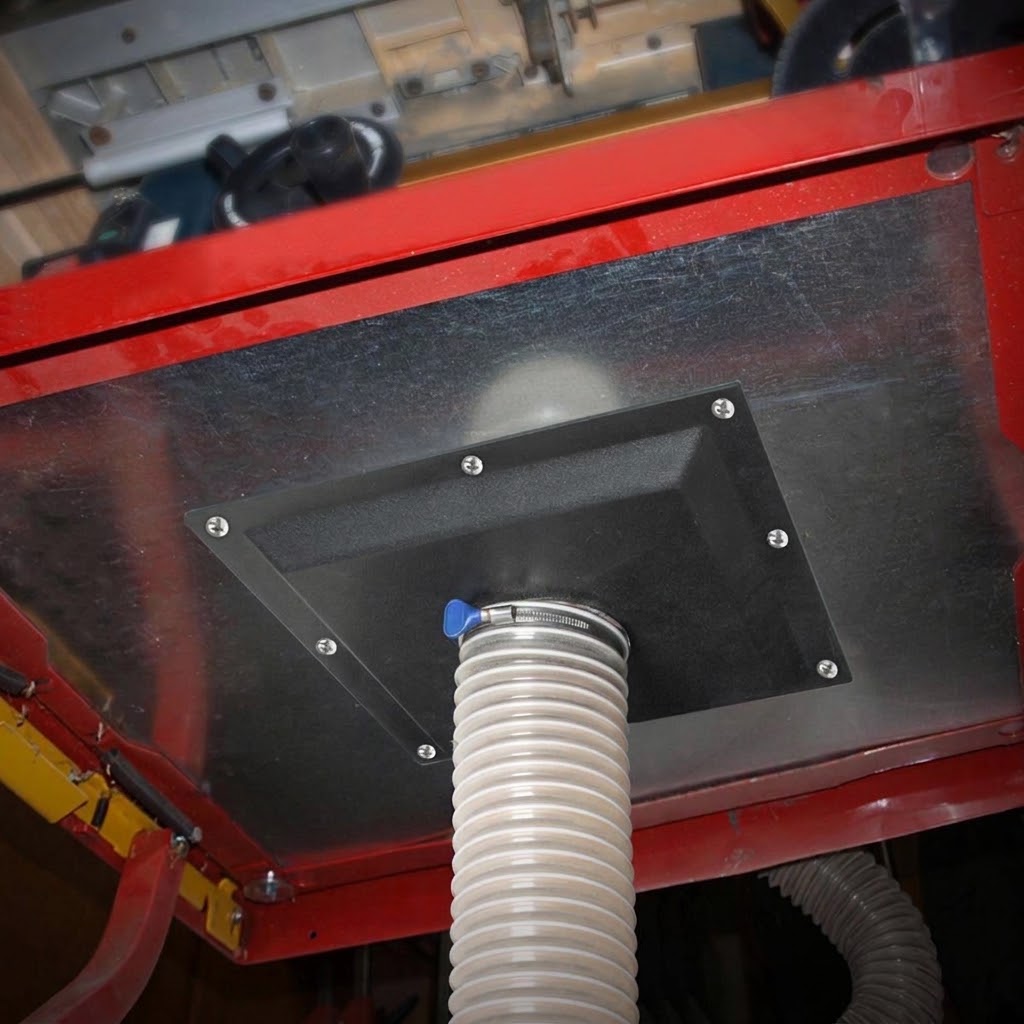
Before buying materials, identify the type of saw you have and the collection problem you want to solve.
A portable saw with a small dust port needs a different approach from an older contractor saw with an open base. A cabinet saw may already have a useful lower collection port but need an improved hose connection or an upper pickup.
Here are four practical designs to consider.
1. DIY dust hood underneath the table saw
A lower dust hood collects debris falling through the blade opening and directs it toward a hose connection.
It can be installed inside a suitable saw cabinet or beneath the table, depending on the machine’s design.
Common materials include:
- A compatible plastic or metal dust hood
- A suitable hose connector
- Flexible dust collection hose
- Mounting brackets or fasteners
- Appropriate sealing material
The hood should be positioned to collect dust without interfering with the blade, arbor, motor, belt, or adjustment mechanisms.
Best for: Table saws with a lower collection opening but no effective hood or duct connection.
2. DIY enclosure for a contractor-style table saw
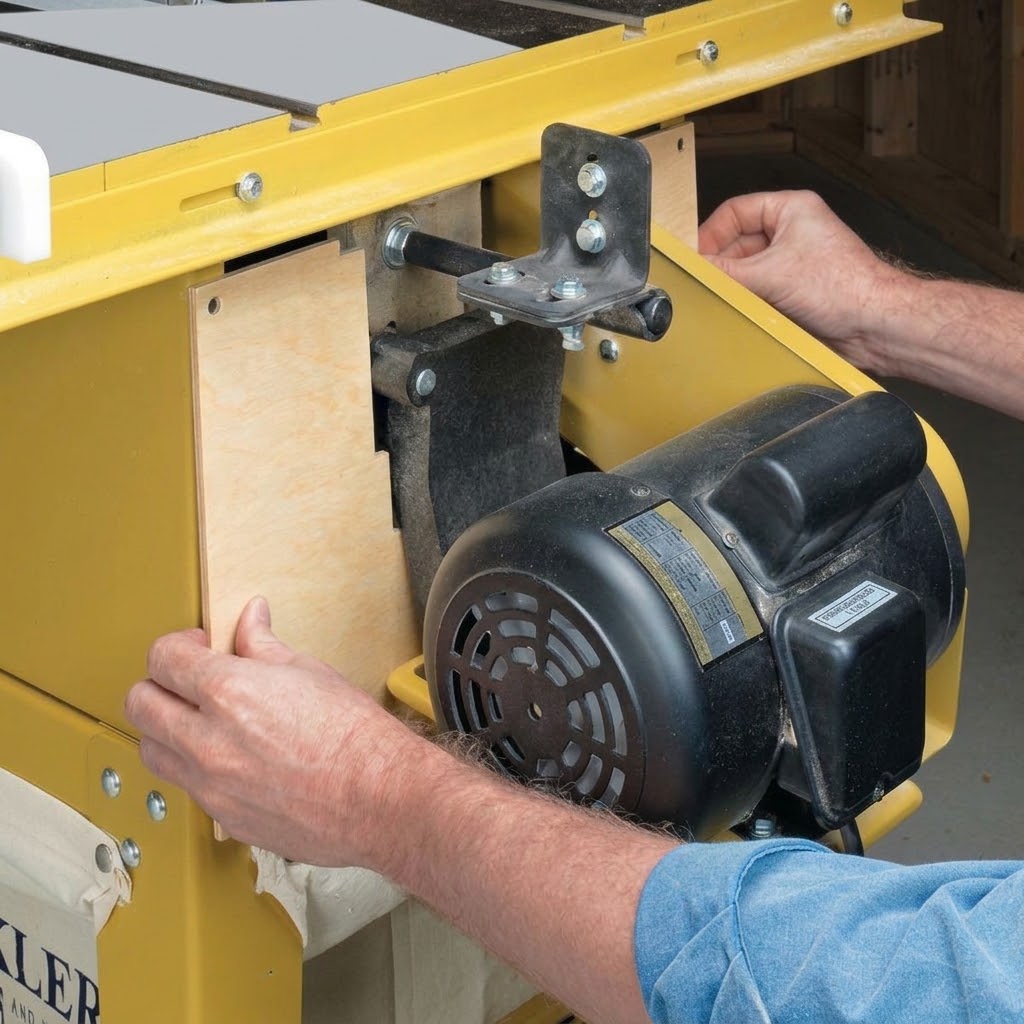
Some contractor-style saws have an open or partially open base. This can allow dust to escape through the rear and sides instead of traveling toward the collection port.
A removable enclosure can help control the airflow.
A typical design uses panels fitted around suitable openings, with access points for the motor, belt, and maintenance.
However, don’t seal the saw completely. The motor, belt, and moving components may require ventilation and clearance. Follow the saw manufacturer’s requirements and preserve all necessary openings.
Best for: Older contractor saws and workshop-built table saw stands with uncontrolled openings.
3. DIY blade-guard dust collection
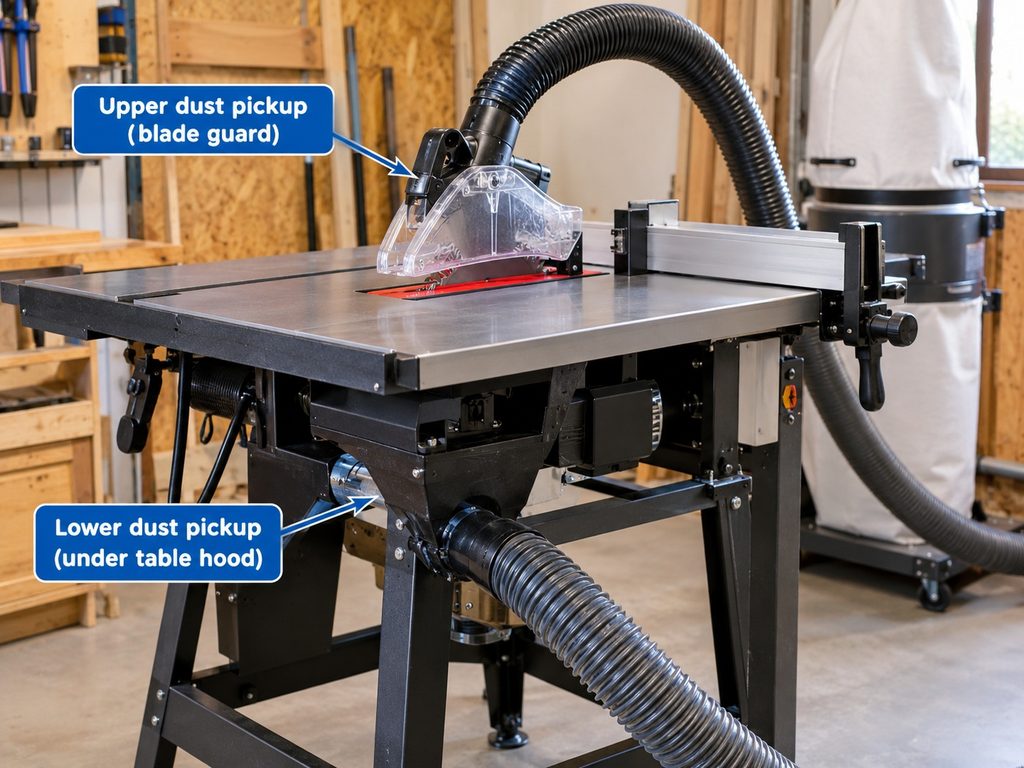
An upper pickup captures dust thrown above the tabletop.
Some blade guards include a dust port. Other systems use a purpose-designed auxiliary hood mounted above the blade.
This arrangement is useful when dust continues to escape even after improving the lower cabinet collection.
The hood must be compatible with the saw and must not interfere with the factory blade guard, riving knife, workpiece, or operator.
Best for: Workshops where a lower dust port is already connected but airborne dust remains a problem.
4. Combined upper and lower dust collection
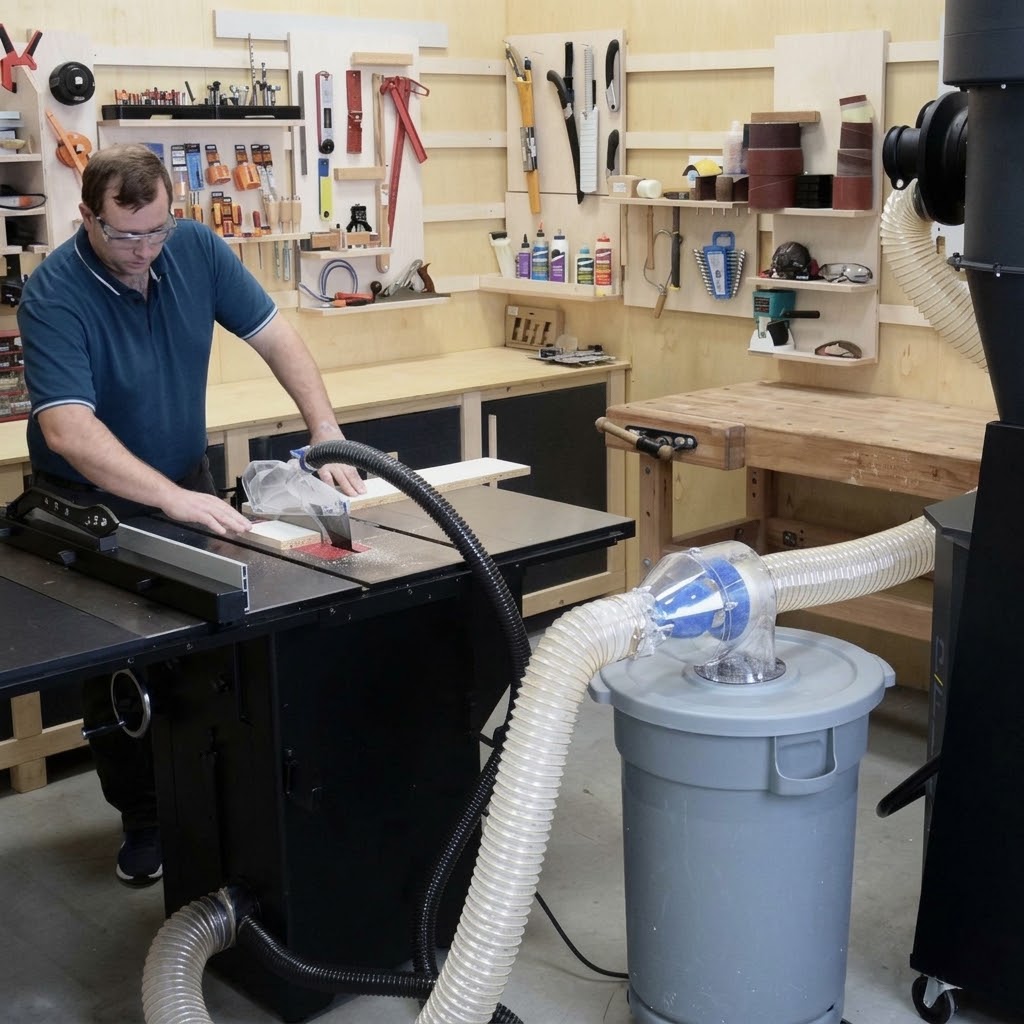
A combined setup uses one collection point below the table and another above the blade.
The two pickups address different dust sources. This is often a more complete approach than relying on the lower port alone.
Depending on the collector’s capacity and the design of the ductwork, both pickups may connect to one machine using suitable branches and blast gates. Alternatively, separate extraction units may be used.
Best for: Frequent table saw users who want to improve collection both above and below the table.
Materials and Tools for a DIY Table Saw Dust Collection Project
The materials depend on the design you choose. You do not need every item listed below.
| Material or component | Purpose |
|---|---|
| Plywood or suitable sheet material | Removable enclosure panels or support structures |
| Dust collection hood | Directs dust toward the extraction port |
| Flexible hose | Connects the hood to the collector |
| Hose adapter | Connects different compatible port sizes |
| Ducting or pipe | Provides a fixed collection route |
| Clamps | Secure hose connections |
| Suitable brackets | Support the hood or ductwork |
| Removable fasteners | Allow access for maintenance |
| Appropriate sealing material | Reduces unwanted air leakage around suitable panels |
Tools you may need
- Measuring tape
- Pencil and marking square
- Drill and suitable drill bits
- Screwdriver or driver
- Jigsaw or other appropriate cutting tool
- Clamps
- Safety glasses and hearing protection
The exact tools depend on the saw and the construction method. Disconnect the saw from power before measuring, modifying, or installing any collection components.
How to Plan a DIY Table Saw Dust Collection System
A good result starts with careful planning. Measure the machine and understand how the dust moves before building a hood or enclosure.
Step 1: Inspect your table saw
Start by identifying the existing collection points.
Check:
- The location and size of the lower dust port
- Whether the saw has a factory blade-guard dust port
- Whether the base is enclosed or open
- The position of the motor and drive belt
- The blade height and bevel adjustment mechanisms
- The location of the riving knife and blade guard
- The available space beneath and behind the saw
Take photographs and measurements of the existing arrangement. This makes it easier to plan a hood and hose route without interfering with the machine.
Step 2: Identify where dust escapes
Run your normal collection setup and inspect where dust accumulates after the saw has been safely switched off and disconnected from power.
Look for:
- Dust inside the lower cabinet
- Sawdust around the rear of the saw
- Debris around the throat plate
- Dust on the tabletop and fence
- Fine particles escaping around the blade guard
This helps you decide whether the main problem is below the table, above it, or around the cabinet.
Step 3: Choose the collection design
Choose a design that addresses the actual problem.
For example:
- If dust accumulates inside the cabinet, consider improving the lower hood and collection connection.
- If dust escapes through large cabinet openings, consider suitable removable panels while preserving required ventilation and access.
- If dust is thrown above the table, consider a compatible blade-guard pickup.
- If both areas produce significant dust, plan a combined system.
Avoid building several unnecessary components before you know which collection problem you need to solve.
Step 4: Check your dust collector
Identify the airflow requirements of the hood and the performance of your existing collector.
A small shop vacuum may be suitable for a small-port pickup. A larger hood or duct system may need a dedicated woodworking dust collector.
Check the manufacturer’s specifications rather than choosing based only on horsepower or an advertised maximum airflow figure.
Step 5: Plan the hose route
Keep the hose route as direct as practical.
Consider:
- Total hose length
- Hose diameter
- Number of bends
- Reducers and adapters
- Available space around the saw
- Access for maintenance
- Whether the hose can interfere with the workpiece
Avoid unnecessary sharp bends and restrictive fittings. These increase resistance and can reduce the airflow available at the hood.
How to Build a DIY Lower Dust Collection Hood
A lower dust hood is a practical starting point for many table saw dust collection projects.
The exact construction depends on the machine. Some saws accept a commercially available hood, while others need a custom enclosure or adapter.
The following steps describe a general installation approach rather than universal cutting dimensions.
Step 1: Measure the collection opening
Disconnect the saw from power.
Measure the opening where the hood will sit. Check the clearance around the blade housing, motor, belt, and adjustment mechanisms.
Do not assume that a hood designed for another saw will fit yours.
Step 2: Select a suitable hood
Choose a hood that fits the available space and has a connection compatible with your extraction system.
Consider the shape of the hood and how it will direct dust toward the outlet.
A poorly shaped hood may leave large dead areas where dust accumulates.
Step 3: Prepare the mounting arrangement
Use suitable brackets or mounting points to support the hood securely.
The hood should not move or vibrate during normal operation.
Avoid drilling into structural parts of the saw unless the manufacturer permits it.
Step 4: Connect the hose
Attach the hose to the hood’s outlet using a compatible connector and suitable clamp.
The connection should be secure and should not have a large internal step or restriction.
Step 5: Check the surrounding gaps
Look for gaps around the hood that allow dust to escape before reaching the collection hose.
Suitable removable panels or sealing material may help direct airflow, but don’t block motor ventilation or necessary access openings.
Step 6: Inspect the complete assembly
Before reconnecting power, check that the hood and hose do not interfere with any moving components.
Move the blade through its permitted height and bevel adjustments by following the manufacturer’s procedure. Confirm that the motor, belt, and other mechanisms have adequate clearance.
If anything binds or interferes, correct the design before using the saw.
How to Enclose a Contractor Table Saw for Better Dust Collection
Contractor-style saws can be more difficult to collect dust from because many have open areas around the base.
A suitable enclosure can help direct more of the available airflow toward the dust port.
What should an enclosure include?
A practical design may include:
- Removable side or rear panels
- A suitable opening for the dust collection connection
- Access for motor and belt maintenance
- Clearance for blade height and bevel adjustments
- Required motor ventilation
- A removable panel for cleaning
Some woodworkers use plywood or MDF for removable panels. Magnets, suitable fasteners, or other secure mounting methods can make access easier.
Important: Don’t make the cabinet airtight
An enclosure is not simply a sealed box.
The motor and drive components may need airflow, and the saw needs adequate clearance for operation and maintenance.
The goal is to control unwanted dust escape while preserving required ventilation and access—not to eliminate every opening.
A useful example is the contractor saw modification described by WOOD Magazine, which combines a blade-guard adapter, cabinet enclosure panels, and a lower dust hood.
Reference: Improve Your Contractor Saw’s Dust Collection From the Top Down.
Choosing the Right Hose for Table Saw Dust Collection
The hose is an important part of the system because it affects how much air reaches the collection hood.
A hose that is too small, too long, or full of sharp bends can restrict airflow. A large hose is not automatically better either—the collector and hood must be designed to work together.
Common hose sizes
| Nominal hose size | Common use |
|---|---|
| 1.25 inches | Some compact vacuum accessories and small pickups |
| 1.5 inches | Some shop-vac and dust-extraction systems |
| 2.5 inches | Many shop-vac hoses and small collection connections |
| 4 inches | Many woodworking dust collectors and larger machine ports |
These are common sizes, not a universal specification for table saws.
Shop-vac hose or 4-inch dust collection hose?
A shop vacuum generally provides strong suction through a smaller hose. A dedicated dust collector is generally designed to move a larger volume of air through larger ductwork.
| Feature | Shop-vac hose | Larger dust collection hose |
|---|---|---|
| Typical size | Smaller | Larger |
| Airflow design | High suction through smaller passages | Higher-volume air movement |
| Common use | Small ports and compact tools | Larger machine ports |
| Main consideration | Restrictions and filter condition | Collector capacity and duct design |
Match the hose to the hood and collector specifications. Avoid reducing a large collection system to a very small hose unless the manufacturer specifically supports that arrangement.
For more information, read Dust Collection System With Shop Vac: How to Set Up a Small Workshop.
Can You Use a Shop Vac for DIY Table Saw Dust Collection?
Yes, a shop vacuum can be useful for certain table saw setups, particularly where the saw has a small collection port.
It may work well for a compact portable saw or a small auxiliary pickup, depending on the hood design and the vacuum’s performance.
However, a typical shop vacuum may not provide enough airflow for a large lower hood or a 4-inch collection connection.
Before connecting a shop vac, consider:
- The size of the saw’s dust port
- The hood’s airflow requirements
- Hose length and restrictions
- Filter condition
- Whether the vacuum is designed for continuous operation
- Whether a separator is needed to reduce debris reaching the filter
A cyclone separator can help collect larger chips and debris before they reach the vacuum filter. It does not increase the vacuum’s airflow or replace suitable filtration.
Read our guide to How Does a Cyclone Dust Separator Work? for more information.
How to Connect Upper and Lower Table Saw Dust Collection
If your saw has both a lower cabinet port and an upper blade-guard port, you may be able to connect both to one dust collector.
A typical arrangement uses a suitable Y-fitting, separate branches, and blast gates.
Each branch can be controlled so that airflow is directed where it is needed.
However, the collector must be capable of supplying the required airflow through the complete system.
Before combining the pickups, check:
- The airflow requirements of the upper and lower hoods.
- The collector’s actual performance under operating conditions.
- The diameter and length of each hose.
- The resistance created by fittings and bends.
- Whether the manufacturer’s instructions permit the connection.
If the collector cannot supply both pickups adequately, using separate extraction units may be more practical.
For more details about the upper pickup, see Overhead Dust Collection for a Table Saw.
DIY Dust Collection for Portable and Jobsite Table Saws
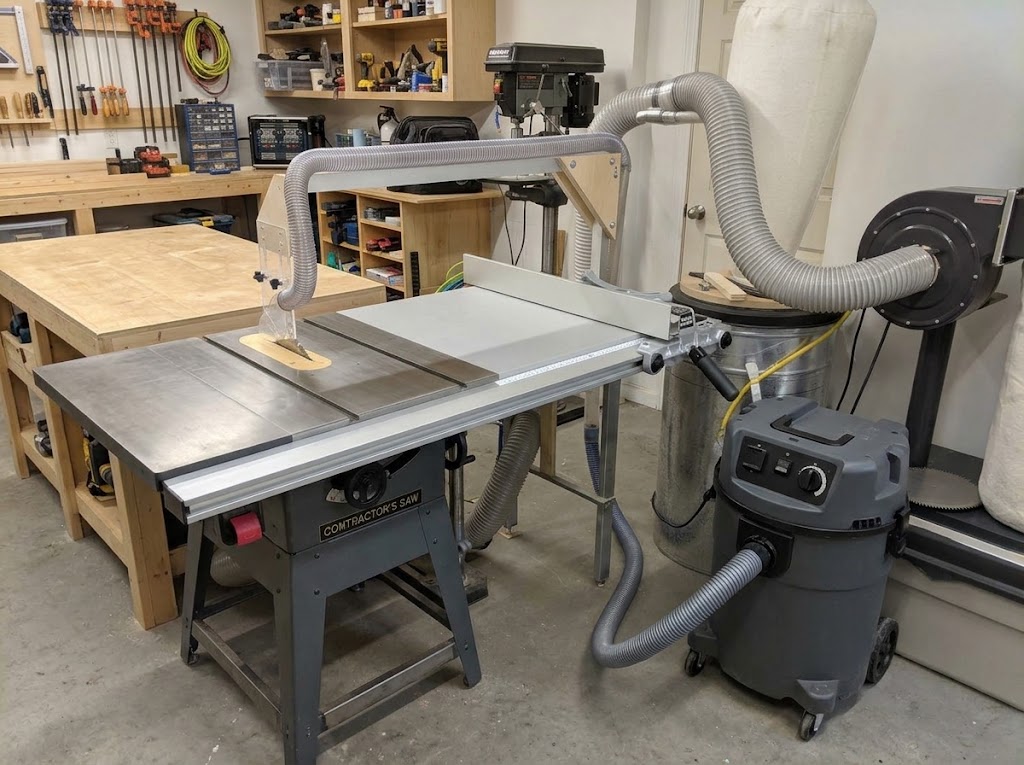
Portable and jobsite table saws present different dust collection challenges than larger cabinet or contractor saws. Their compact design, smaller dust ports, open or partially enclosed bases, and limited space can make it harder to capture sawdust effectively.
However, you can improve dust collection on a portable table saw without building a large permanent enclosure. The goal is to collect debris near the blade, reduce dust escaping through openings, and connect the saw to a suitable shop vacuum or dust collection system.
1. Start With the Factory Dust Port
Before building a custom hood or enclosure, check the table saw manufacturer’s dust collection recommendations.
Many portable saws have a rear or underside dust port designed for connection to a shop vacuum or dust collector.
Check the following:
- Dust port diameter and shape.
- Whether the port is located at the rear, bottom, or inside the blade housing.
- Whether the manufacturer’s manual specifies a minimum extraction requirement.
- Whether the port remains accessible when the saw is mounted on its stand.
Use a hose and adapter that fit securely. Avoid forcing an oversized hose onto a small port or using an improvised connection that can detach during operation.
2. Build a Simple Lower Dust Collection Enclosure
If your portable saw has an open stand or partially enclosed base, some sawdust may escape before reaching the factory dust port.
A removable lower enclosure can help direct more debris toward the existing collection connection.
A basic DIY design may include:
- Plywood or suitable sheet material for removable panels.
- A removable access panel for cleaning.
- A properly sized opening for the factory dust port.
- Clearance around the motor, belt, adjustment mechanisms, and cooling vents.
The enclosure should not be airtight. It needs to allow appropriate airflow while directing debris toward the extraction port.
Important: Do not cover motor cooling vents, restrict moving components, or modify the saw’s safety features. Follow the manufacturer’s clearance and ventilation requirements.
3. Connect a Shop Vac to the Portable Saw
For many small jobsite saws, a shop vacuum is a practical starting point.
A suitable connection can collect dust through the factory port without requiring a large stationary dust collector.
When setting up the connection:
- Measure the saw’s dust port.
- Choose a compatible hose and adapter.
- Keep the hose as short and direct as practical.
- Avoid sharp bends and crushed sections.
- Secure the hose so it cannot pull loose or interfere with the saw stand.
A shop-vac cyclone separator can also be placed between the saw and vacuum to collect larger debris before it reaches the vacuum filter.
4. Add an Overhead Dust Pickup When Practical
The factory dust port generally focuses on collection below the table. Fine dust can still escape above the table, particularly when cutting material that throws particles upward.
An overhead hood or compatible blade-guard collection system can provide an additional pickup point.
For a portable saw, consider:
- A support that does not interfere with the folding stand.
- A hood that maintains clear visibility of the blade and workpiece.
- A flexible hose with enough movement for the full cutting operation.
- A mounting arrangement that does not obstruct long workpieces.
An overhead pickup should only be used with a properly designed and compatible blade guard. Never remove the factory guard or riving knife to make room for a homemade hood.
5. Keep the Setup Portable and Easy to Maintain
One advantage of a jobsite table saw is that it can be moved between work areas. A complicated permanent enclosure can defeat that advantage.
Consider a removable collection arrangement:
- Use quick-release hose connections where suitable.
- Keep the vacuum or separator on a separate mobile cart.
- Provide enough hose length for normal saw movement without creating trip hazards.
- Make the lower collection area accessible for cleaning.
- Check that the setup does not affect folding legs, transport handles, or storage.
Common Portable Table Saw Dust Collection Problems
| Problem | Possible solution |
|---|---|
| Dust escapes from the rear | Check the factory port connection and hose fit |
| Dust leaks through the stand | Consider a removable lower enclosure |
| Fine dust escapes above the blade | Investigate a compatible overhead pickup |
| Shop-vac filter clogs quickly | Consider a cyclone separator before the vacuum |
| Hose repeatedly disconnects | Use a properly fitted adapter and secure routing |
| Saw becomes difficult to move | Use removable connections and a separate mobile vacuum cart |
Example Portable Table Saw Setup
A practical small-workshop arrangement could use:
- A portable table saw with its factory dust port.
- A compatible shop-vac hose and adapter.
- A cyclone separator between the saw and vacuum.
- A removable lower enclosure, if the saw design allows it.
- An approved overhead blade-guard collection system, if compatible.
This arrangement provides a way to improve collection while keeping the saw reasonably portable. Actual performance will depend on the saw’s dust-port design, extraction airflow, hose restrictions, and how effectively the upper and lower pickup points capture debris.
Five DIY Table Saw Dust Collection Ideas for Small Workshops
Not every workshop needs the same collection arrangement. These ideas can help you plan a system around your available space and equipment.
1. Compact dust hood for a portable table saw
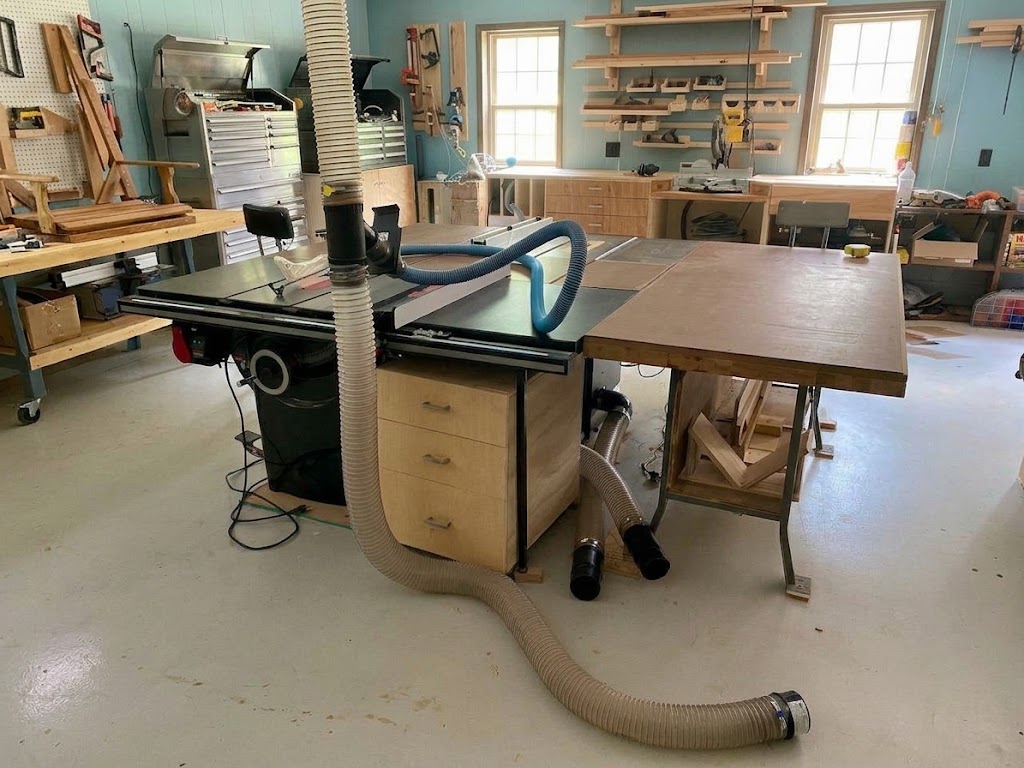
A portable saw with a small dust port may benefit from a compatible lower hood and a short shop-vac hose.
Keep the hose supported so it does not pull on the saw or interfere with the stand.
This is a practical starting point if you have limited space and already own a suitable shop vacuum.
2. Removable contractor saw enclosure
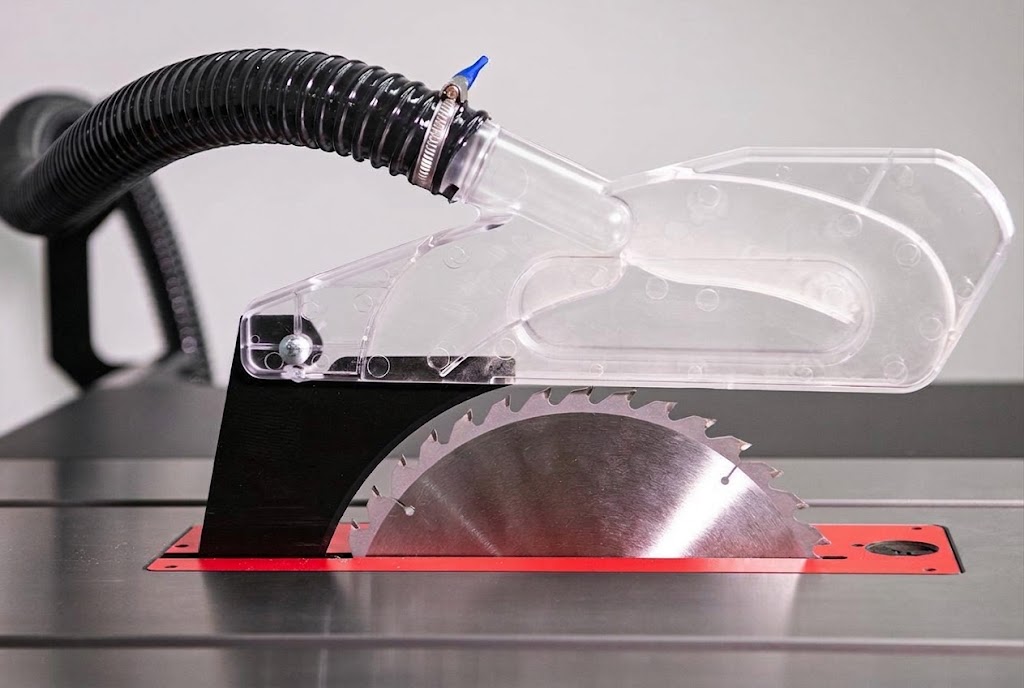
A contractor saw with an open base may benefit from removable panels that help direct dust toward the collection hood.
The panels should allow access to the motor, belt, and adjustment mechanisms while preserving required ventilation.
3. Table saw with a lower hood and upper pickup
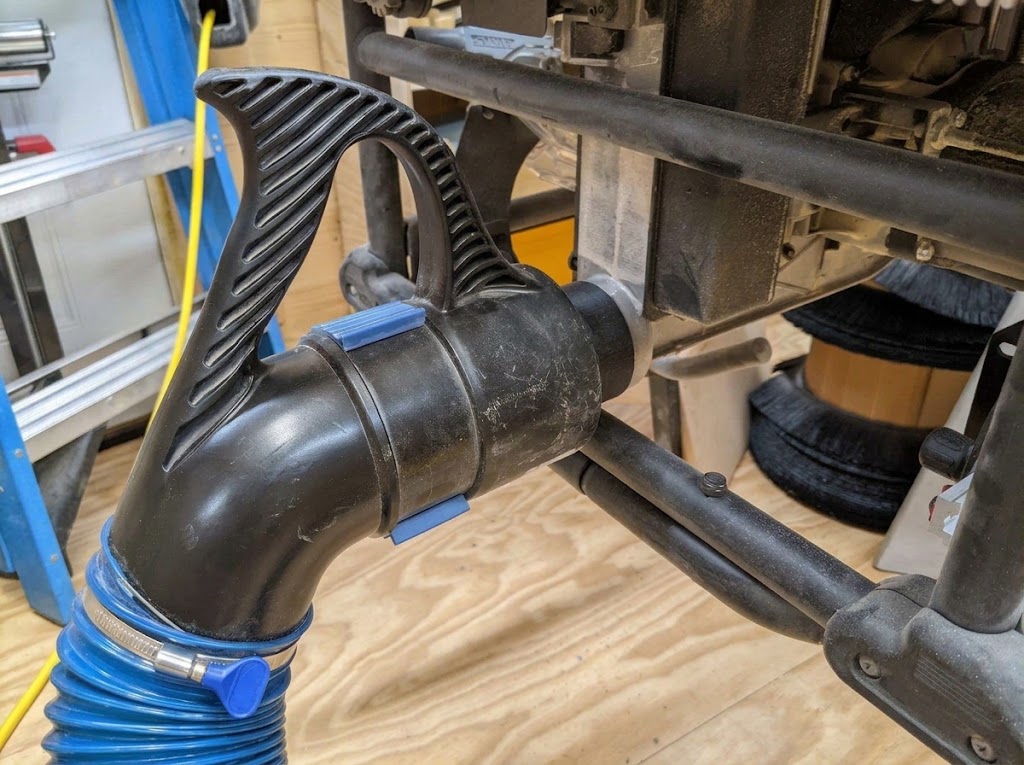
A combined system uses one pickup beneath the saw and another at the blade guard or overhead hood.
This is a more comprehensive arrangement, but it needs a collector capable of supplying adequate airflow to the connected pickups.
4. Mobile table saw dust collection cart
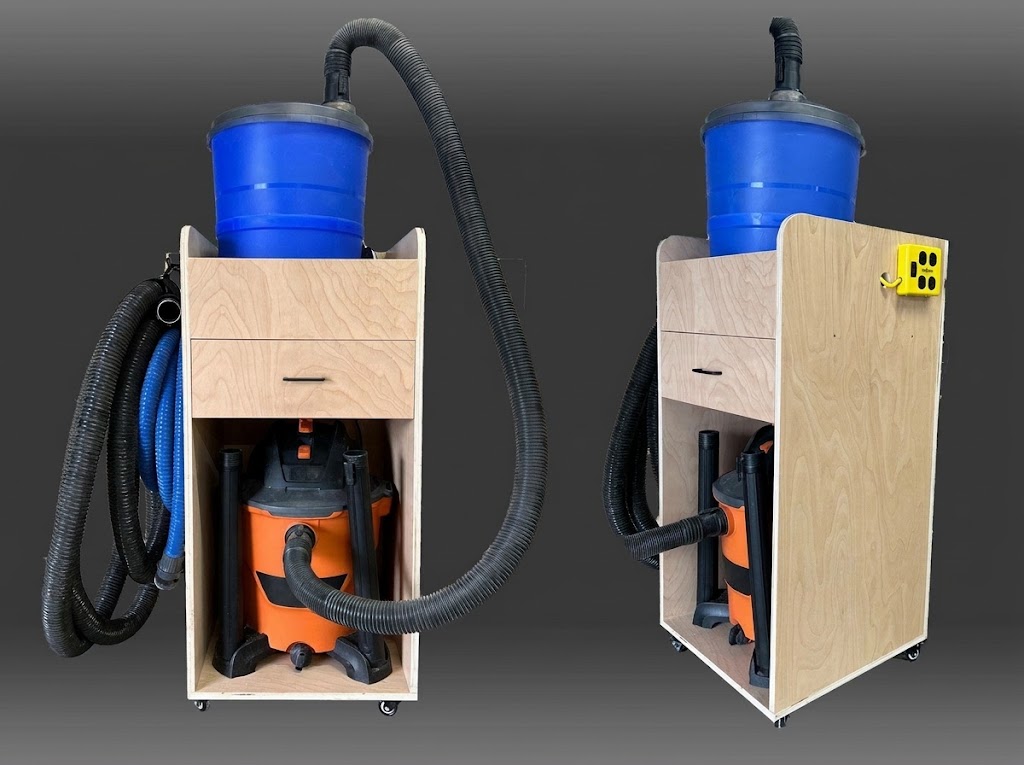
A mobile cart can provide space for a shop vacuum, separator, hose storage, and accessory connections.
It is useful for small workshops where the saw and extraction equipment need to move together.
Make sure the cart remains stable and that the hose cannot become entangled with the saw or workpiece.
5. Integrated table saw workbench
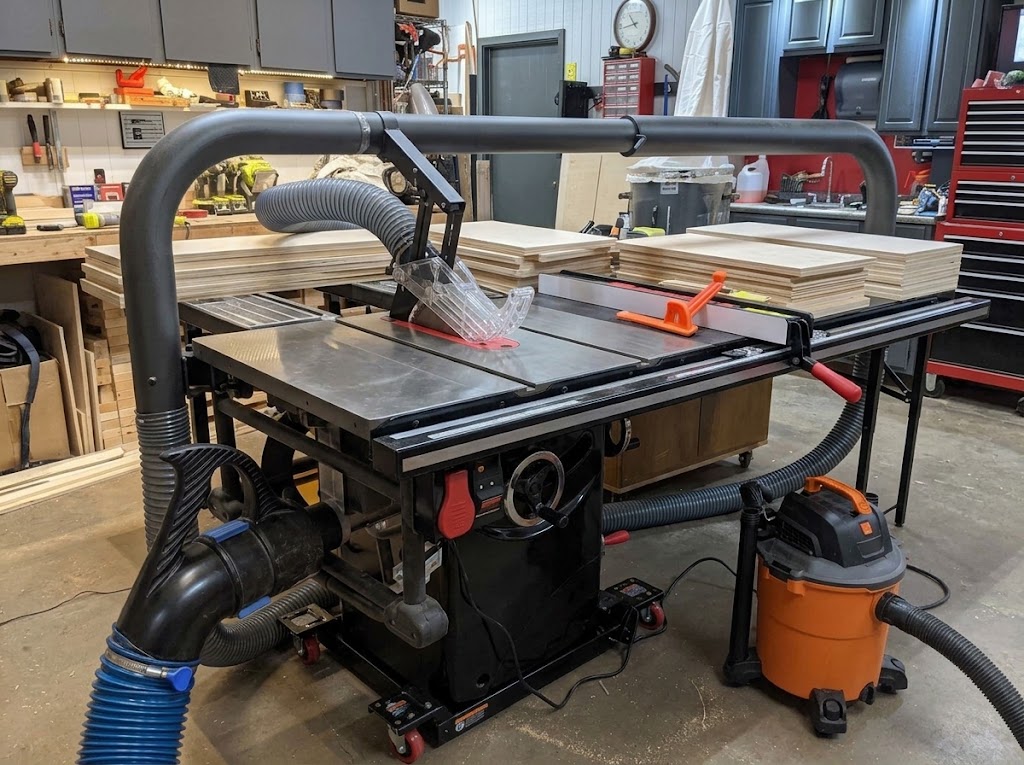
A table saw built into a workbench can have a dedicated space for the lower collection hose, separator, and accessories.
Plan the collection route before building the bench. Leave enough room for maintenance, motor ventilation, and the saw’s full range of movement.
If you want to build a complete mobile setup, our future guide to DIY shop-vac dust collection carts will cover that project in more detail.
Common DIY Table Saw Dust Collection Problems
Even a well-planned system can perform poorly if the hood, hose, or collector is not properly matched.
Dust escapes from the cabinet
Possible causes:
- Large uncontrolled openings
- A poorly positioned hood
- Insufficient airflow
- Loose or unsuitable hose connections
What to check:
Inspect the cabinet and collection hood. Consider suitable removable panels and a better collection route without blocking ventilation.
The dust hood fills with chips
Possible causes:
- A restrictive hood opening
- A blocked hose
- A poor connection
- Insufficient airflow
What to check:
Inspect the hood, hose, and collector. Remove accumulated debris with the machine disconnected from power.
The shop vacuum loses suction
Possible causes:
- A clogged filter
- A full collection container
- A blocked hose
- A restrictive adapter
- A leak in the collection route
What to check:
Clean or replace the filter according to the manufacturer’s instructions. Empty the container and inspect the complete hose route.
Dust collection becomes worse when both pickups are open
Possible causes:
- The collector cannot supply both branches
- The branch sizes are unsuitable
- The ductwork has excessive resistance
- The blast gates are poorly positioned
What to check:
Review the collector’s capacity and the airflow requirements of each pickup. A shared connection does not guarantee adequate airflow at both locations.
The enclosure interferes with the saw
Possible causes:
- Poor measurements
- Panels positioned too close to moving components
- Inadequate access for blade adjustment
- Blocked motor ventilation
What to check:
Disconnect power and inspect the enclosure. Modify or remove any component that interferes with normal operation.
Safety Considerations for DIY Table Saw Dust Collection
A dust collection improvement should never make a table saw less safe.
Before using a DIY system, make sure:
- The factory blade guard and riving knife remain installed whenever the operation allows.
- The hood and hose cannot contact the blade.
- The enclosure does not interfere with the motor, belt, or adjustment mechanisms.
- Required ventilation openings remain unobstructed.
- The support structure is secure.
- The hose does not obstruct the workpiece or operator.
- Power is disconnected before cleaning, adjusting, or repairing the system.
A dust collection hood is not automatically a safety guard. Do not remove required guarding simply to fit a homemade collection attachment.
Wood dust is also a health hazard. OSHA recommends suitable local exhaust ventilation to capture dust close to the source. Dust collection should be combined with appropriate housekeeping and respiratory protection where necessary.
Sources:
- OSHA – Wood Dust: Health Hazards
- OSHA – Wood Dust: Possible Solutions
- NIOSH – Control of Wood Dust From Table Saws
Never use compressed air to blow accumulated wood dust around the workshop. Fine wood dust can also present a combustible-dust hazard, so follow appropriate dust handling and equipment guidance.
Frequently Asked Questions
What is the best DIY dust collection system for a table saw?
The best design depends on your saw. A lower dust hood is a useful starting point for many machines. Contractor-style saws may benefit from suitable removable enclosure panels, while a blade-guard pickup can address dust escaping above the table.
How do I collect dust from a table saw?
Start by connecting the saw’s lower dust port to a compatible shop vacuum or dust collector. Check the hood, hose, and collector for restrictions. If dust continues to escape above the blade, consider a compatible upper pickup.
Can I build a table saw dust collection hood?
Yes. You can build or adapt a suitable hood using appropriate materials and fittings. Measure the saw carefully and make sure the hood does not interfere with the blade, motor, belt, guard, or adjustment mechanisms.
Do I need a 4-inch hose for table saw dust collection?
Not always. Some portable saws and small collection ports use smaller hoses, while many dedicated woodworking dust collectors use 4-inch connections. Follow the hood and collector manufacturers’ requirements.
Can I use a shop vac instead of a dust collector?
A shop vac can work with compatible small-port setups. It may not provide enough airflow for larger hoods or ductwork. Check the system’s airflow requirements before choosing the vacuum.
Should I seal the back of a contractor table saw?
Suitable removable panels can help direct dust toward the collection port. However, do not seal required motor ventilation openings or restrict the movement of the motor, belt, or adjustment mechanisms.
Does a cyclone separator improve table saw dust collection?
A cyclone separator can collect larger chips and debris before they reach the vacuum filter. It can help reduce filter loading, but it does not increase the airflow available from the vacuum.
Is a lower dust hood enough?
A lower hood can collect dust falling into the saw cabinet, but it may not capture particles thrown above the table. An additional compatible upper pickup can improve collection at that source.
Final Thoughts
A DIY table saw dust collection system does not need to be complicated. Start by identifying where dust escapes, then choose a hood, hose, and collector that address the problem without interfering with the saw.
For many small workshops, improving the lower dust hood and hose connection is a practical first step. Contractor-style saws may also benefit from a carefully designed removable enclosure. If dust continues to escape above the table, consider adding a compatible blade-guard or overhead pickup.
The most important thing is to match the system to your machine. Check airflow requirements, preserve necessary ventilation, keep all safety components in place, and make sure every part of the installation is secure.
A well-planned collection setup can make workshop cleanup easier and help reduce exposure to airborne wood dust.
Suggested article to read: