
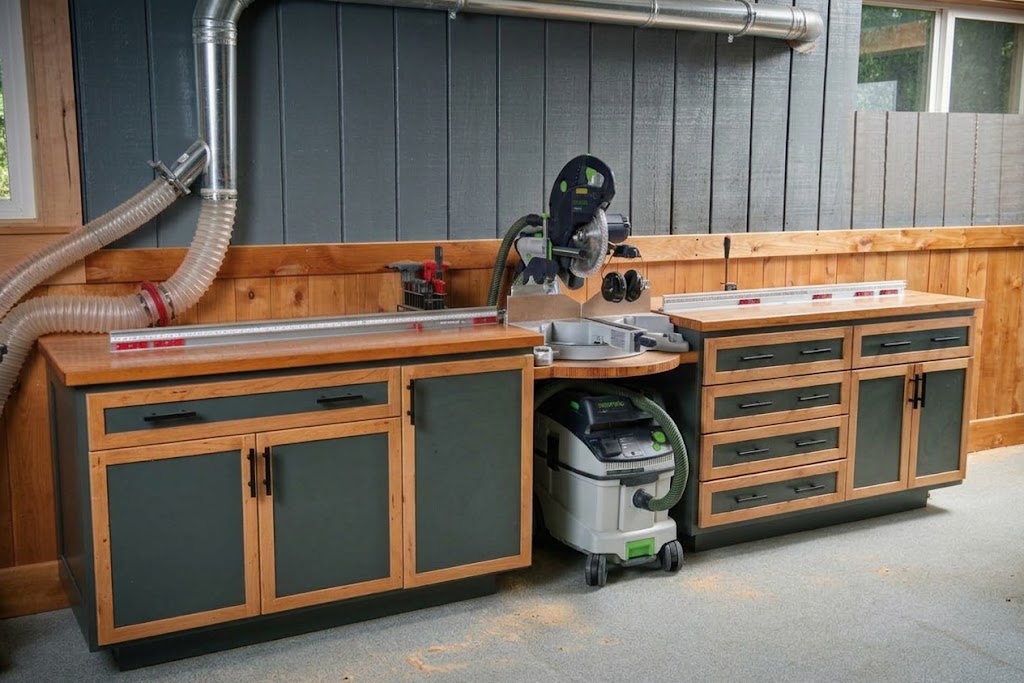
A miter saw is one of the most useful tools in a woodworking shop, but it can also create a surprisingly large mess. Sawdust and chips escape around the blade, fly behind the saw, and collect across the workbench and floor. A dust bag or a hose connected to the factory port can catch some of the debris, but it often leaves plenty behind. Building a miter saw station with dust collection gives you an opportunity to solve two workshop problems at once. You get a stable work surface for supporting long boards, a convenient place to store tools and accessories, and a dedicated area for capturing sawdust.
The key is to plan the dust collection while designing the station—not add it as an afterthought. The saw needs enough room to move, the hood needs to intercept airborne dust, and the collection system needs a suitable airflow path.
In this guide, you’ll learn how to plan a DIY miter saw station, choose a design, build an integrated dust enclosure, connect a shop vacuum or dust collector, and avoid common mistakes.
1. Miter Saw Station Design Ideas
Before choosing materials, decide what kind of station works best in your workshop. A permanent cabinet, mobile cart, and compact garage station can all support dust collection, but each requires a slightly different layout.
Permanent Miter Saw Station
A permanent station is a good choice if you have a dedicated woodworking area and use your miter saw regularly.
It typically includes:
- A central platform for the miter saw
- Long work surfaces on both sides
- A rear dust hood or enclosure
- Cabinets or drawers underneath
- A fixed hose connection to the workshop dust collection system
The main advantage is stability. You can build the station around the saw’s dimensions and leave enough room for long workpieces.
A permanent design also makes it easier to install a larger rear enclosure and route a dust collection hose through the cabinet.
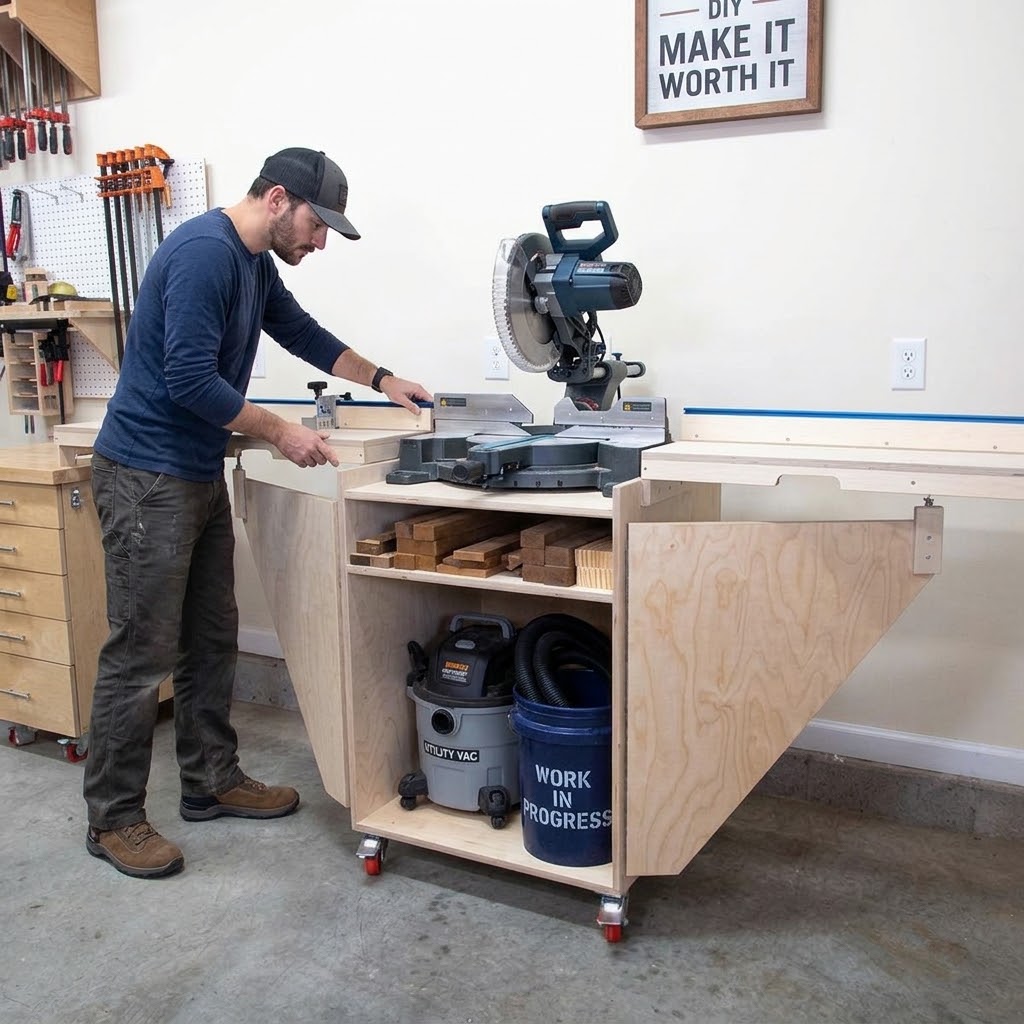
Mobile Miter Saw Station
A mobile station is useful in a garage or small workshop where floor space is limited.
A typical mobile design has a plywood cabinet, locking casters, a saw platform, and folding or removable workpiece supports. You can roll it into position when needed and move it away when the project is finished.
For dust collection, consider adding a dedicated compartment for a shop vacuum or a hose connection at the rear. Keep the vacuum accessible so you can empty it and clean its filter without dismantling the station.
Lock all casters before operating the saw. The station should remain stable under cutting loads.
Cabinet-Style Miter Saw Station
A cabinet-style station places the saw between two storage units. The cabinets support the work surfaces and provide room for drawers, shelves, and dust collection components.
A rear enclosure can sit between the cabinets, while a collection hose passes through the back or underneath the saw platform.
This layout can make good use of workshop space, but avoid allowing the storage compartments to interfere with the dust chamber. Keep the dust pathway separate from drawers and other stored items.
Compact Garage Miter Saw Station
If you have limited room, a compact station can be built against a wall or on a narrow rolling base.
Useful features include:
- Fold-down side extensions
- A removable dust hood
- A small storage compartment
- A short, accessible hose connection
- A station that can be moved away from the wall for cleaning
A compact station still needs enough clearance for the saw’s full range of movement. Do not reduce the enclosure or work surface so much that it restricts safe operation.
2. Plan Your Miter Saw Station Before Building
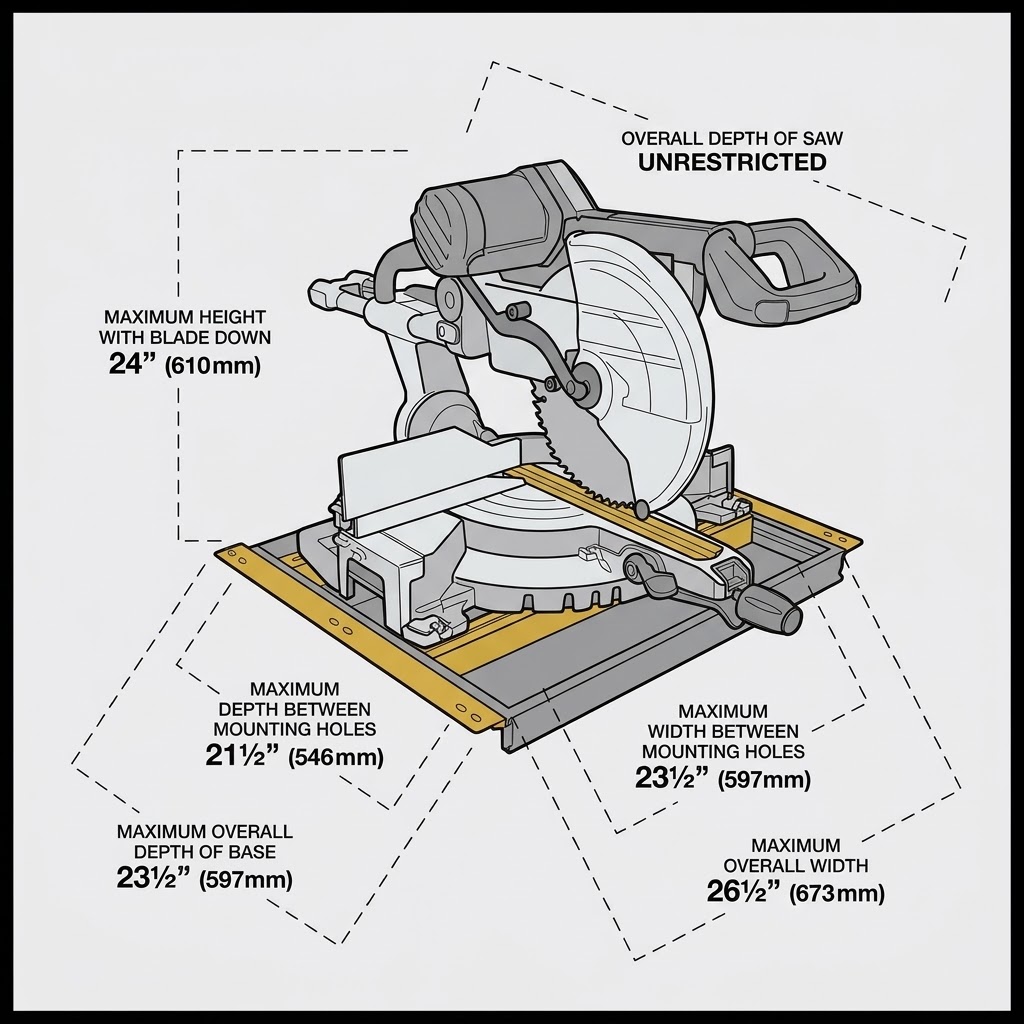
A good station starts with accurate measurements. Avoid copying the dimensions of another person’s project without checking whether they suit your saw and workshop.
Measure Your Miter Saw
Measure the saw itself, including the base, fence, handles, motor housing, and rear rails.
Then check its movement:
- Move the saw head fully forward and backward if it is a sliding model.
- Test the maximum left and right miter positions.
- Raise and lower the head through its full range.
- Check both bevel directions if your saw has a bevel function.
- Identify where the dust port and power cord sit during operation.
Pay particular attention to sliding rails. Some saws need substantial clearance behind the machine, while forward-rail or glide-style models may sit closer to a wall.
The station must accommodate the saw’s complete movement—not just its position during a straight 90-degree cut.
Choose the Workbench Height
The top of the miter saw bed should align with the surrounding work surfaces.
This is important because the station extensions need to support long boards without lifting or bending them as they pass the saw.
To establish the correct height:
- Place the saw on a temporary platform.
- Measure from the floor to the top of the saw bed.
- Account for the thickness of the final worktop.
- Adjust the platform until the saw bed and side surfaces are level.
- Check the alignment with a long straightedge.
Include the height of any casters when designing a mobile station.
Plan the Extension Wings and Fence
The side surfaces should support the material you commonly cut. If you work with long trim, boards, or framing lumber, provide enough support on both sides of the blade.
A continuous fence can help with positioning and repeatable cuts. However, it should not interfere with the saw’s fence, miter movement, or bevel operation.
Consider adding:
- Adjustable stop blocks
- T-track for repeatable cuts
- Removable fence sections
- Fold-down extensions
- Replaceable sacrificial fence material
Do not let the fence or stop system create a pinch point or obstruct the workpiece.
Decide Where the Dust Hood Will Go
The hood should sit behind the saw, where it can intercept dust thrown away from the blade.
Before building it, check that:
- The saw head can travel without hitting the hood.
- The hood does not obstruct the fence.
- The saw can reach its required miter and bevel positions.
- The collection port can be connected without a sharp hose bend.
- The hood can be opened or removed for cleaning.
A useful approach is to make a temporary cardboard mock-up. Position it behind the saw, move the saw through its full range, and adjust the shape before cutting plywood.
3. How to Build an Integrated Dust Collection Enclosure
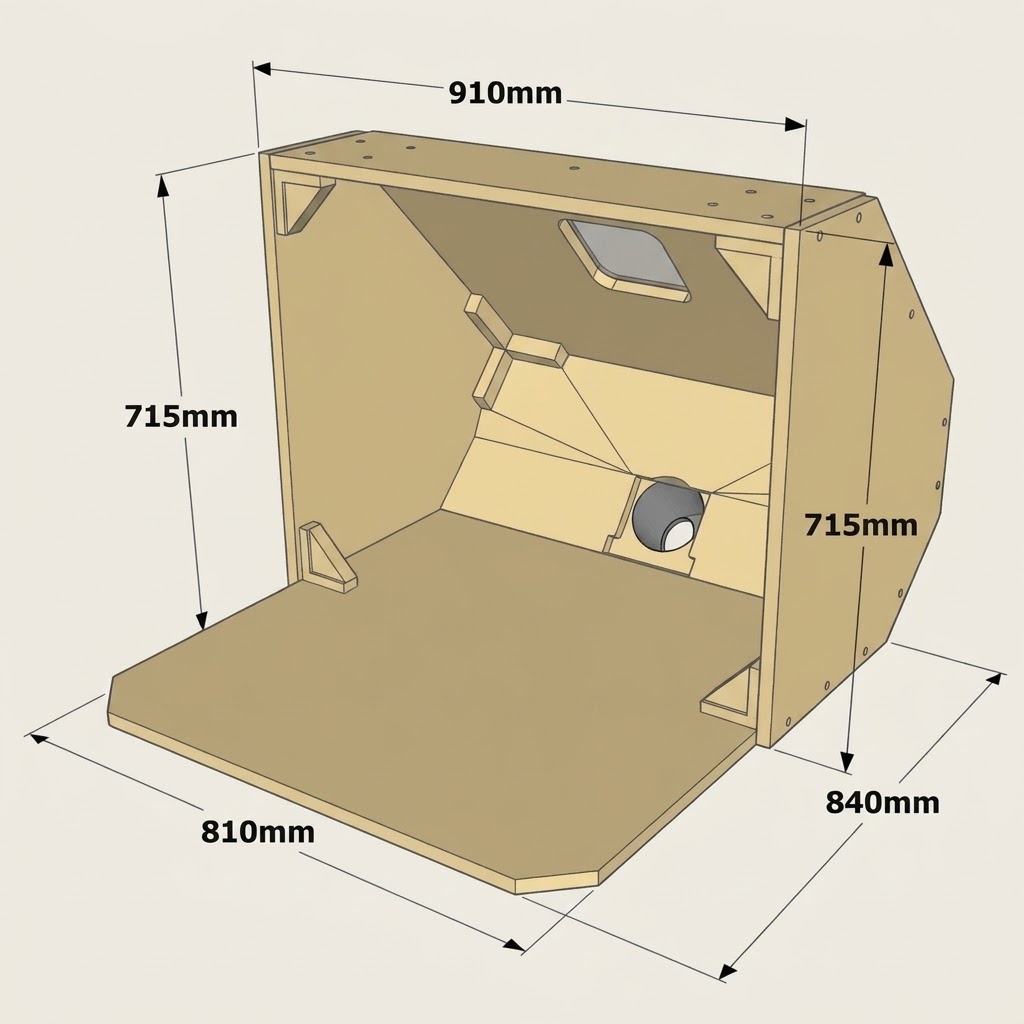
The rear enclosure is one of the most important parts of a miter saw station with dust collection.
A factory dust port collects debris from a limited area near the blade. A rear hood provides a larger space to intercept chips and dust that escape beyond that port.
The goal is not to seal the saw inside a box. The saw needs to move freely, and the enclosure needs to remain open enough to allow the workpiece and saw head to operate safely.
Materials to Consider
For a basic plywood enclosure, you may need:
- 1/2-inch or 3/4-inch plywood or suitable sheet material
- Wood screws
- Wood glue
- A compatible dust collection port or fitting
- Flexible dust collection hose
- Sealing material for unnecessary gaps
- A removable access panel, if needed
Choose material thickness based on the enclosure’s size and how it will be supported. The panels should remain rigid under normal use and should not collapse under the suction of the connected collector.
Step 1: Build the Rear Panel
Start with a rear panel that spans the dust-catching area behind the saw.
The panel should be wide enough to cover the area where debris is likely to escape. Its height and position depend on the saw’s head movement, blade size, and maximum bevel angle.
Do not place the panel so close to the saw that it interferes with the motor housing, rails, or handles.
Step 2: Add the Side Panels
Attach side panels to help contain debris thrown toward either side of the blade.
The panels should extend far enough to provide useful containment without restricting access to the saw or the workpiece.
If the saw has a wide miter range, test the enclosure at both extreme angles before permanently fastening the panels.
You can make one or both side panels removable if the design needs additional clearance for certain cuts.
Step 3: Add a Sloped Collection Floor
A sloped floor can help chips move toward the collection opening instead of accumulating in the corners.
Avoid creating a deep, flat-bottomed chamber where debris can collect away from the hose connection.
The slope should be gradual enough that dust and chips can move toward the outlet without creating unnecessary obstructions. Keep the inside surfaces smooth and accessible for cleaning.
Step 4: Install the Dust Collection Port
Place the port where it can draw debris from the enclosure without being blocked by the floor, side panels, or stored items.
The correct port size depends on the collector, hose, and enclosure design. Do not assume that one diameter works for every miter saw station.
Make the connection accessible. You will need to inspect it for blockages and remove accumulated chips from time to time.
Step 5: Test the Saw Before Finalizing the Enclosure
Before connecting the dust system, test the saw through its full range of motion.
Check:
- Full sliding travel
- Maximum left and right miter positions
- Maximum bevel positions
- Handle and motor clearance
- Workpiece access
- Fence alignment
Make any necessary adjustments before using the station.
For a more detailed hood-focused build, see the DIY miter saw dust collection hood guide.
4. How to Connect Dust Collection to Your Miter Saw Station
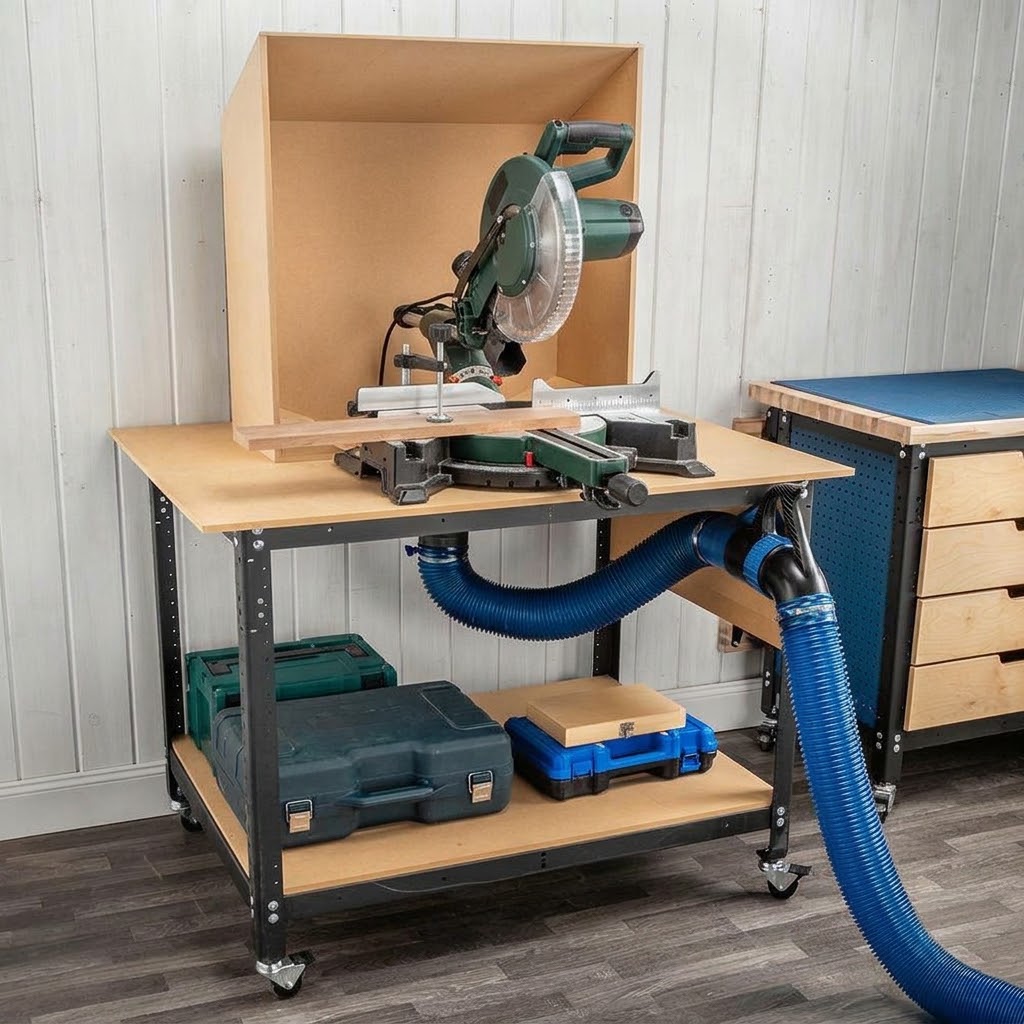
Once the enclosure is built, choose a collection system that matches the ports and airflow requirements.
There are two common approaches: a shop vacuum or dust extractor, and a larger dust collector.
Option 1: Shop Vacuum or Dust Extractor
A shop vacuum is convenient for a compact station. It uses a relatively small hose and can connect directly to many factory dust ports.
A practical setup may include:
- A shop vacuum or dust extractor
- A compatible hose
- A port adapter
- A filter suitable for the type of dust being collected
- A cyclone separator, if appropriate
- An automatic switch, if compatible with the equipment
A shop vacuum can work well for collecting debris through the saw’s factory port. However, it may not move enough air through a large rear hood to capture all the dust thrown from the blade.
Do not assume that connecting a vacuum to the enclosure will solve every dust problem. Test the actual setup and observe where debris escapes.
For a complete explanation of connecting a vacuum to workshop tools, read how to set up a dust collection system with a shop vac.
Option 2: Dust Collector
A dust collector is often a better match for a larger hood or enclosure with a wider collection port.
Dust collectors are designed to move larger volumes of air through larger ductwork than many standard shop vacuums. Their suitability still depends on the collector’s specifications, duct layout, hood design, and the resistance created by the system.
A typical setup includes:
- A dust collector
- A suitable duct or hose
- A connection at the rear enclosure
- A blast gate, if the collector serves multiple machines
- A suitable filter and dust container
A larger collector does not automatically guarantee good capture. A poorly designed hood, restrictive hose, or long duct run can reduce performance.
Shop Vac vs. Dust Collector: Which Should You Choose?
| Feature | Shop vacuum or extractor | Dust collector |
|---|---|---|
| Typical hose size | Smaller | Larger |
| Airflow approach | Higher static pressure through smaller hoses | Higher volume through larger ductwork |
| Best use | Factory dust port and compact connections | Larger rear hood or enclosure |
| Workshop space | Usually compact | Often needs more space |
| Setup | Convenient for mobile stations | Convenient for permanent systems |
| Main limitation | May struggle with a large open hood | Needs suitable ductwork and hood design |
For a small mobile station, a shop vacuum or extractor may be the simplest option. For a permanent station with a larger rear hood, a dust collector may be more appropriate.
Some workshops use separate connections for the factory port and the rear hood. This can provide a more targeted approach, but each connection needs an airflow source capable of serving it. Avoid simply splitting one hose into two branches and assuming both will receive adequate suction.
5. Plan Hose Routing, Ports, and Airflow
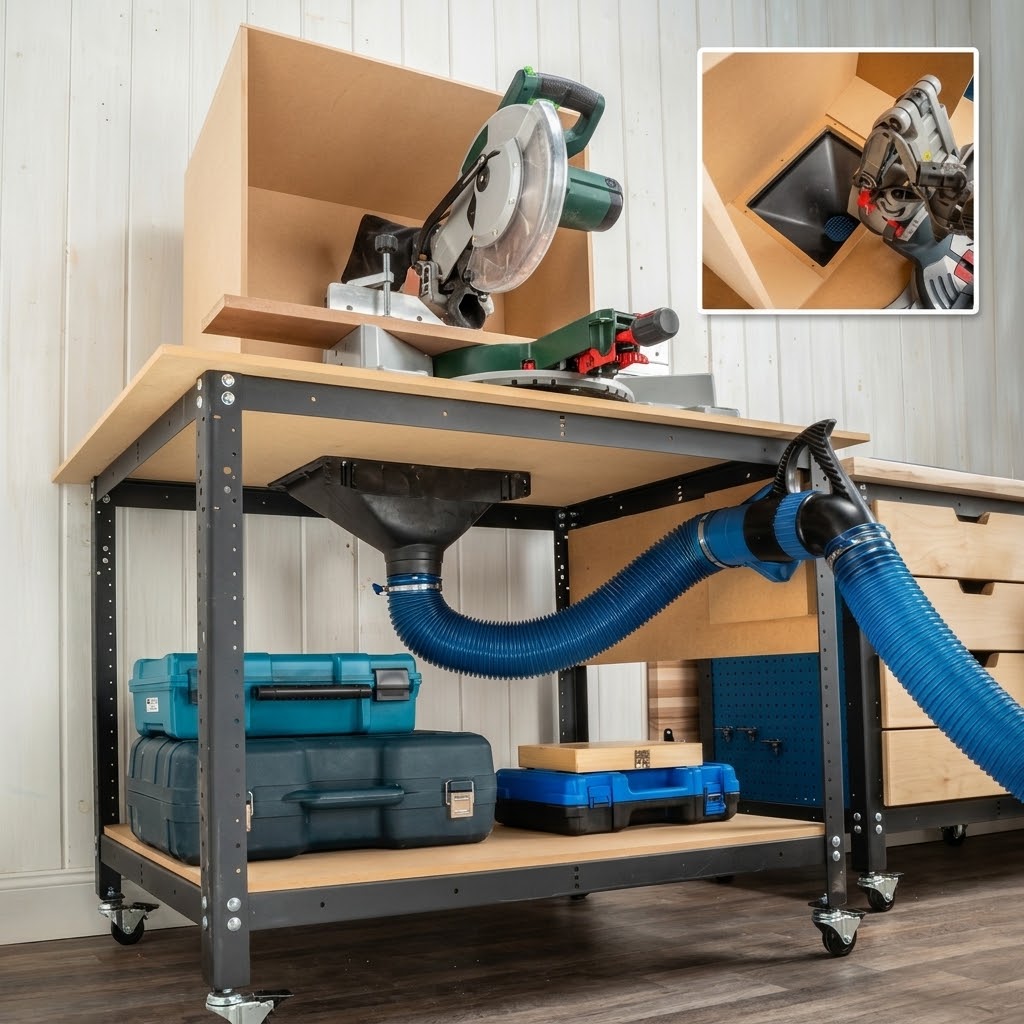
Even a well-built enclosure can perform poorly if the hose layout restricts airflow.
Plan the hose route while designing the cabinet, rather than trying to fit it into the finished station.
Keep the Hose Route Short and Direct
Use the shortest practical hose route that allows the saw to move safely.
Avoid:
- Unnecessary hose length
- Tight bends
- Kinks
- Crushed flexible hose
- Sudden diameter reductions
- Unnecessary adapters
Every restriction can affect airflow. Use hose and fittings compatible with the connected machine and collector.
Keep the Hose Away From Moving Parts
The hose should not interfere with the saw’s sliding rails, blade guard, motor housing, or workpiece.
Move the saw through its full range while watching the hose. Check that it does not stretch, snag, rub against sharp edges, or become trapped behind the machine.
If the saw moves significantly, use a flexible connection that can accommodate its travel without collapsing.
Use Adapters Only When Needed
Miter saw dust ports and collection hoses do not always have matching diameters.
A properly fitted adapter can make the connection easier and reduce air leakage. However, a smaller adapter can also become a restriction.
Measure both ends before buying or making an adapter. If you need a custom connection, see the guide to miter saw dust collection port size adapters.
You can also explore 3D-printed miter saw dust collection adapters and fittings if you want to make a custom connection for your setup.
Add a Blast Gate When Sharing a Dust Collector
If one dust collector serves several machines, a blast gate can help direct airflow to the tool in use.
Place it somewhere accessible so you can open and close it without reaching behind the station.
A blast gate does not increase the collector’s capacity. It simply helps control which branch is connected to the active system.
6. Add Storage Without Blocking Dust Collection
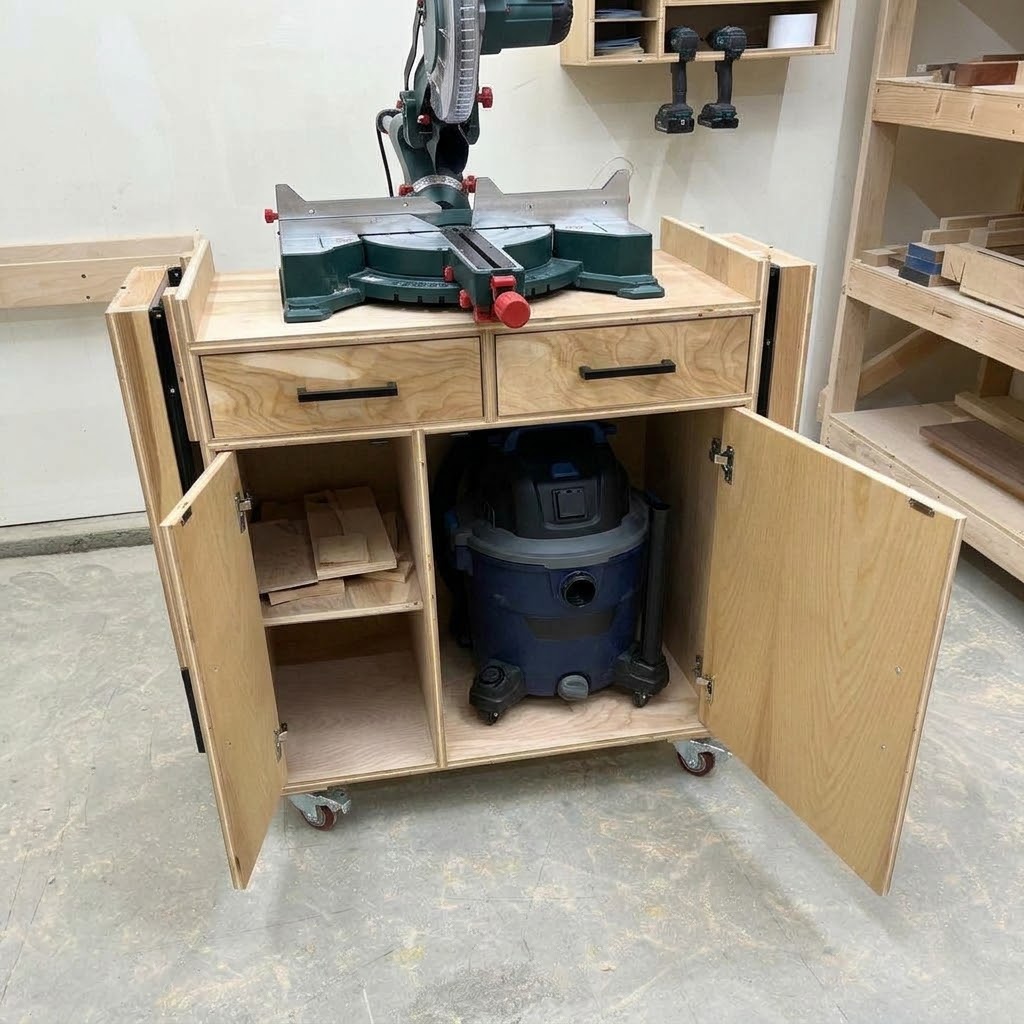
Storage is one of the main reasons to build a dedicated miter saw station. Drawers, shelves, and cabinets can make the workshop more organized, but they should not interfere with the dust enclosure.
Plan the storage and collection spaces separately.
Use the Space Under the Side Work Surfaces
The areas beneath the extension wings are suitable for drawers and cabinets.
You can store:
- Measuring tools
- Clamps
- Stop blocks
- Saw blades
- Safety equipment
- Small workshop accessories
Keep the storage away from the rear dust chamber and hose route.
Create a Separate Dust Collection Compartment
If you want to keep a shop vacuum inside the station, provide a dedicated compartment.
Allow enough space to remove the vacuum, empty its container, clean its filter, and access the hose connection.
Do not fully enclose a vacuum without considering its cooling and ventilation requirements. Follow the manufacturer’s instructions for clearance and operation.
Make the Dust Tray Accessible
A removable tray or cleanout panel can make maintenance easier.
Some dust may settle inside the enclosure even when the collector is running. A removable tray lets you clear accumulated chips without taking apart the station.
Keep the tray secure during operation so it cannot shift or create a gap in the enclosure.
7. Mobile vs. Permanent Miter Saw Station: Which Is Better?
The best design depends on your workshop layout and how often you move the saw.
| Consideration | Mobile station | Permanent station |
|---|---|---|
| Workshop space | Can be moved when not in use | Uses a fixed area |
| Stability | Requires locking casters and a rigid base | Easier to anchor and level |
| Dust collection | Often uses a shop vacuum or flexible hose | Can connect to fixed ductwork |
| Storage | Usually more compact | More room for cabinets and drawers |
| Workpiece support | May use folding extensions | Can have long fixed work surfaces |
| Maintenance | Easy to move for cleaning | May require access panels or cleanout doors |
Choose a mobile station if you share workshop space or need to move the saw between projects.
Choose a permanent station if you have a dedicated workshop area and want longer work surfaces, larger storage cabinets, and a fixed dust collection connection.
Either design can work well. The important part is making the collection system accessible and keeping the saw stable during use.
8. Common Miter Saw Station Dust Collection Mistakes
A station can look well-built and still collect dust poorly. These are some common design problems to avoid.
Making the Hood Too Small
A small hood may not intercept dust thrown from the blade, especially when cutting at an angle or using a sliding saw.
The enclosure needs to cover the saw’s dust-throw area while leaving room for the full range of movement.
Do not choose its dimensions based only on the saw’s width. Test the actual saw in its operating positions.
Blocking the Saw’s Sliding or Bevel Movement
A rear panel or side wall can interfere with the saw’s rails, motor housing, or handles.
Always test the full range of movement before final assembly. A hood that works for straight cuts may not work for bevel or miter cuts.
Relying Only on the Factory Dust Port
The factory port is useful, but it does not necessarily capture all the dust thrown from the blade.
A rear hood provides additional containment. For better results, design the port connection and hood together rather than relying on one small hose to capture everything.
Using a Restrictive Hose
Long hoses, sharp bends, crushed sections, and undersized adapters can reduce airflow.
Keep the route practical and use fittings that match the collector and tool requirements.
Leaving Too Many Unnecessary Gaps
Large gaps in the enclosure can reduce the effectiveness of the collection system.
However, the goal is not to make an airtight box around the saw. The opening must allow safe operation and normal movement.
Seal unnecessary construction gaps, but do not obstruct the blade, guard, workpiece, or moving components.
Making the Enclosure Difficult to Clean
Sawdust and chips can accumulate inside the hood and around the collection port.
Provide access for inspection and cleaning. A removable panel, tray, or accessible hose connection can make routine maintenance much easier.
Ignoring Fine Dust
A rear hood and shop vacuum can reduce visible debris, but they do not guarantee that all fine airborne dust is captured.
Use suitable filtration, maintain the collection equipment, provide appropriate workshop ventilation, and wear respiratory protection when the task requires it. Do not treat a DIY dust hood as a substitute for proper dust control and personal protection.
9. How to Test and Improve Your Miter Saw Station Dust Collection
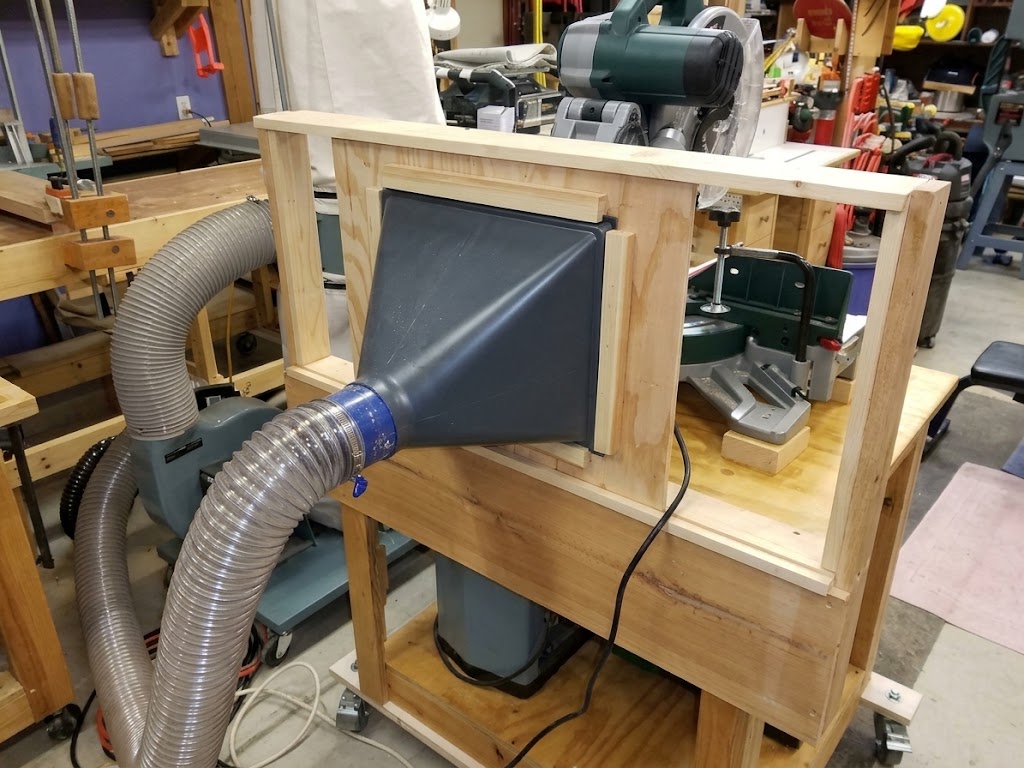
After assembly, test the station before relying on it for regular work.
Start with a small test cut using a suitable piece of scrap material. Keep the workpiece secure and follow the saw manufacturer’s operating instructions.
Observe the dust movement from a safe position. Do not put your hands near the blade or reach into the enclosure while the saw is running.
Check these areas:
- Behind the blade: Is the hood intercepting the dust thrown backward?
- At the factory port: Is the hose connection secure and free of blockage?
- Around the sides: Does dust escape when making angled cuts?
- Under the saw: Is debris accumulating where it cannot reach the collection port?
- Along the hose: Does the hose kink or move into the saw’s travel path?
Make one adjustment at a time. You may need to change the hood position, improve the hose route, remove a restriction, or adjust the collection connection.
If dust still escapes, revisit the enclosure design rather than assuming a more powerful collector alone will fix the problem.
For additional troubleshooting ideas, read how to improve dust collection on a miter saw.
10. Frequently Asked Questions
Does a miter saw need a dust collection station?
A dedicated station is not essential for every user, but it can make a workshop cleaner and more organized. It provides a stable work surface and gives you room to install a rear hood or enclosure that captures dust beyond the saw’s factory port.
Is a shop vacuum enough for miter saw dust collection?
A shop vacuum can collect debris through the factory dust port, especially on a compact setup. However, it may not provide enough airflow for a large open rear hood. Choose the vacuum, hose, and enclosure based on the connection and collection requirements.
How big should a miter saw dust hood be?
There is no universal hood size. Its dimensions depend on the saw’s blade, sliding travel, miter range, bevel movement, and the area where dust escapes. Measure the saw and test a temporary hood shape before building the permanent enclosure.
Should I connect the dust hood or the factory port?
They capture dust from different areas. The factory port collects debris near the blade, while the rear hood helps contain material thrown away from the saw. If your equipment and airflow capacity allow it, using both collection points can be useful. Make sure the system is designed to supply adequate airflow to each connection.
Can I build a mobile miter saw station with dust collection?
Yes. A mobile station can include a rear hood, a shop vacuum compartment, and a flexible hose connection. Use locking casters, keep the base stable, and make sure the hose cannot snag when the station or saw moves.
Does a larger dust collector always improve miter saw dust collection?
No. A larger collector may move more air, but capture also depends on hood shape, port placement, hose diameter, duct layout, and restrictions. Improve the collection design and airflow path before assuming that a larger machine is the only solution.
Do I still need a dust mask or respirator?
Yes, appropriate respiratory protection may still be necessary. Even a well-designed collection system can leave fine airborne dust. Use suitable filtration and follow relevant safety guidance for the materials and work being performed.
Final Thought
A well-designed miter saw station should do more than provide a place to mount your saw. It should support long workpieces, keep tools organized, allow safe saw movement, and provide a practical way to control dust.
Start by measuring your saw and planning the work surface. Then design a rear enclosure that accommodates the full miter and bevel range, choose a suitable shop vacuum or dust collector, and route the hose without unnecessary restrictions.
Most importantly, test the system with the saw in different cutting positions. A station that combines a properly designed hood with a suitable collection system can make a meaningful improvement to workshop cleanliness while creating a more useful place to work.