
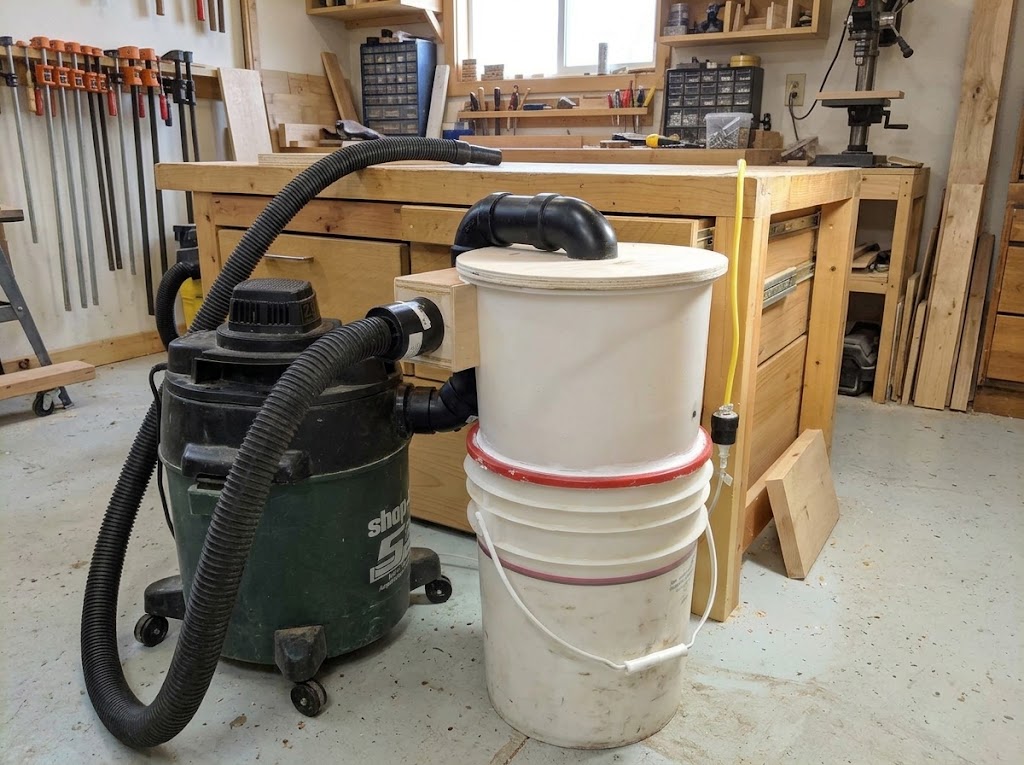
If you use a shop vacuum for woodworking, sanding, routing, or other workshop projects, a DIY cyclone dust separator can help improve dust collection and reduce how often you need to empty the vacuum. Sawdust can quickly fill the collection bin and clog the filter, interrupting your work and reducing suction.
A DIY cyclone dust separator helps solve this problem by removing much of the sawdust and larger debris before the air reaches your vacuum. Instead of sending everything directly into the vacuum, the separator directs incoming air into a swirling path that encourages heavier particles to drop into a separate collection container.
The good news is that you do not need an industrial dust collection system to build a useful separator for a small workshop. With a suitable cyclone insert, an airtight container, compatible hoses, and a few basic tools, you can assemble a practical system at home.
This guide explains how to choose a design, gather the materials, assemble the separator, seal the connections, test its performance, and troubleshoot common problems. It also explains when a simple bucket separator is not the right solution.
Important: A cyclone separator is not a substitute for a suitable dust filter or source-capture system. Fine wood dust can remain airborne and create respiratory hazards even when most visible sawdust is collected.
What Is a DIY Cyclone Dust Separator?
A DIY cyclone dust separator is a homemade device installed between a dust-producing tool and a shop vacuum or compatible dust collector.
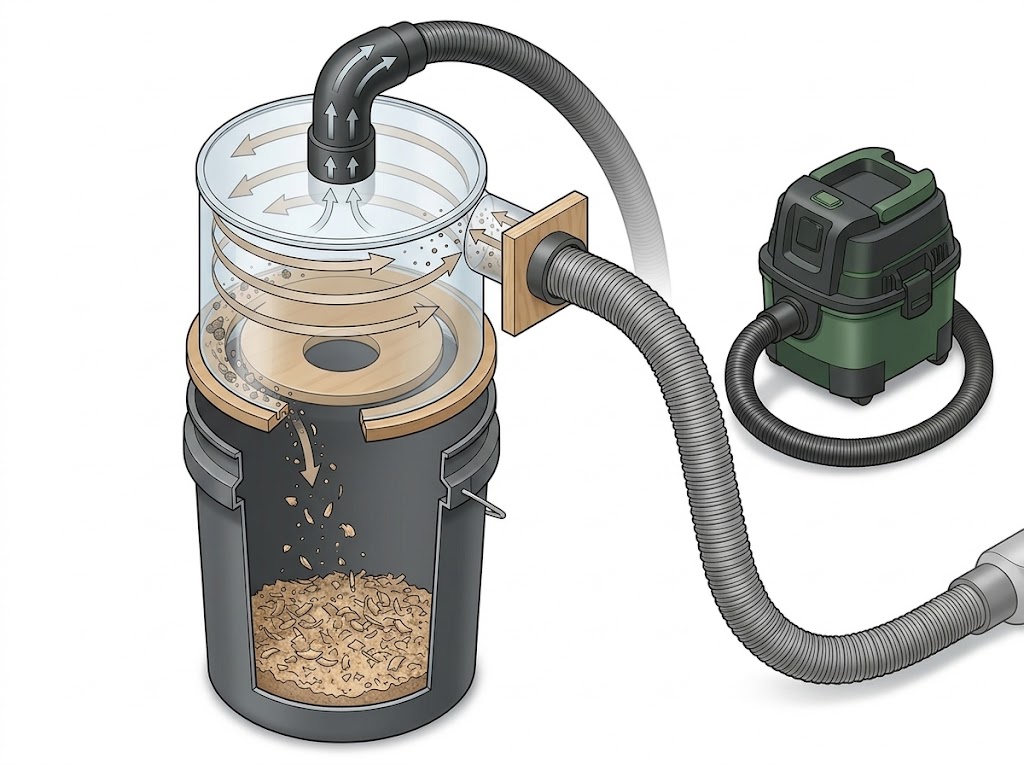
It uses swirling airflow to separate a large proportion of the heavier particles from the moving air. The separated debris falls into a collection container, while the air continues toward the vacuum’s filter.
A typical setup has four main parts:
- Inlet: Directs dust-laden air into the separator.
- Cyclone chamber: Creates the swirling airflow that separates particles.
- Clean-air outlet: Connects the separator to the vacuum or dust collector.
- Collection container: Holds the separated sawdust and debris.
For a small woodworking shop, the easiest approach is usually to mount a compatible cyclone insert on a bucket or other suitable container. More advanced builders can fabricate a cyclone body, but designing its geometry correctly takes more work.
How Does a Cyclone Dust Separator Work?
Before building one, it helps to understand the airflow path.
- Dust enters the separator. A hose carries air, sawdust, wood chips, and other debris from the tool into the inlet.
- The air begins to rotate. The inlet directs the airflow around the cyclone chamber rather than straight toward the outlet.
- Heavier particles move toward the outer wall. Their inertia makes it difficult for them to follow the tighter path of the air near the center.
- The particles move toward the collection area. The chamber’s shape and airflow guide separated debris downward.
- The air exits through the clean-air outlet. The remaining air travels to the shop vacuum or dust collector, where the filter captures particles that escaped separation.
The vacuum or dust collector creates the airflow; the cyclone itself does not generate suction.
For a deeper explanation of particle separation and airflow, see our guide: How Does a Cyclone Dust Separator Work?
Choose the Right DIY Design
Not every homemade dust separator uses the same mechanism. Choose the design based on your tools, budget, and intended use.
Option 1: Bucket-mounted cyclone separator
This design uses a commercially made cyclone insert mounted on a bucket or reinforced collection container.
Best for: Beginners, hobbyist woodworkers, and people using a shop vacuum.
Advantages:
- Relatively straightforward assembly.
- Fewer difficult shapes to fabricate.
- Easier to inspect and maintain.
- Typically simpler to seal than a fully homemade cyclone body.
Limitations:
- The insert adds cost.
- Hose adapters may be required.
- The container and lid must withstand the vacuum’s negative pressure.
This is the recommended starting point for most readers.
Option 2: Homemade cyclone body
A fabricated cyclone body may use a cylindrical chamber, conical lower section, tangential inlet, and central outlet. The builder creates the chamber from suitable sheet material, plastic, or other materials compatible with the intended application.
Best for: Experienced DIY builders who have the tools and skills to fabricate accurate components.
Advantages:
- More freedom to customize the shape and size.
- Potentially useful for a larger or specialized setup.
- An opportunity to design a compact installation.
Limitations:
- Geometry has a significant effect on performance.
- Fabrication and sealing are more demanding.
- A poorly designed cyclone can restrict airflow or separate particles inefficiently.
Do not assume that a homemade cyclone will achieve a particular efficiency percentage without controlled testing.
Option 3: Thien-baffle separator
A Thien-baffle separator uses a circular baffle and a strategically shaped opening to help separate debris into a collection container. It is related to cyclone-style dust collection, but it is not identical to a conventional conical cyclone.
Best for: Builders who prefer woodworking and sheet-material fabrication.
Advantages:
- Can be made using common workshop materials.
- May be less demanding than fabricating a true cyclone body.
- Can be adapted to different collection containers.
Limitations:
- The baffle dimensions and opening matter.
- Performance depends on the complete system and its airflow.
- A design intended for a large dust collector may not suit a small shop vacuum.
Materials and Tools You Will Need
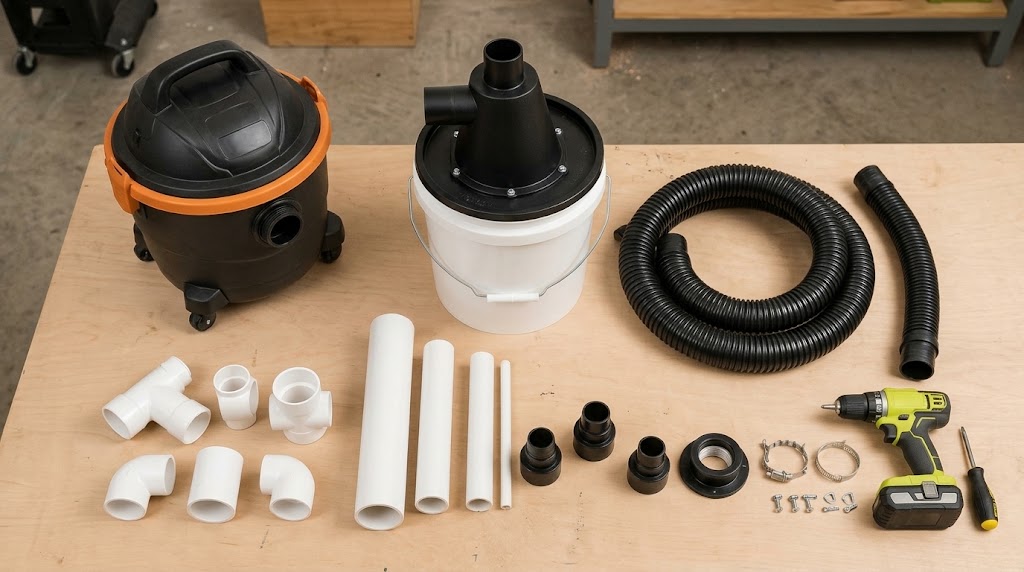
The following list is for the recommended bucket-mounted design using a compatible cyclone insert. Exact sizes depend on the insert, vacuum, hose, and collection container you select.
Materials checklist
- One cyclone separator insert or lid designed for your application
- One compatible bucket or reinforced dust collection container with a lid
- Suitable hose for the dirty-air inlet
- Suitable hose or adapter for the clean-air outlet
- Compatible hose clamps or mechanical fasteners
- Closed-cell foam gasket or suitable sealing material
- Compatible sealant, if required by the design
- Reinforcement for the container, if necessary
- Suitable fittings for connecting the separator to your tools and vacuum
Tools checklist
- Tape measure or ruler
- Pencil or marker
- Drill and suitable drill bits
- Hole saw or another appropriate hole-cutting tool
- Screwdriver
- Clamps
- Safety glasses
- Hearing protection when using noisy power tools
A jigsaw or other cutting tool may be needed depending on the insert and container.
Material selection matters. Choose components that can withstand the expected vacuum pressure, are compatible with the dust being collected, and can be securely joined. A thin, ordinary bucket is not automatically suitable just because it holds five gallons.
Step 1: Check Your Shop Vacuum and Collection Needs
Before cutting anything, identify the equipment the separator must work with.
Check these details:
Hose diameter: Measure the hose and the vacuum’s inlet and outlet connections. Do not assume that two fittings labeled with the same nominal size will fit together.
Airflow requirements: A separator adds resistance to the system. The hose, fittings, cyclone, and filter all affect the airflow available at the tool.
Type of debris: A small shop-vacuum separator may be suitable for sawdust and ordinary workshop debris, but not for every industrial dust, hot material, or hazardous substance.
Available space: Account for the container, cyclone, hoses, and access needed to empty the bin.
Collection volume: Choose a container that provides enough capacity without becoming awkward to handle or exceeding the structural limits of the setup.
If you plan to connect a table saw, planer, or other high-volume dust-producing machine, check whether your shop vacuum can provide the airflow that tool requires. A separator cannot compensate for an undersized vacuum.
Step 2: Prepare the Collection Container
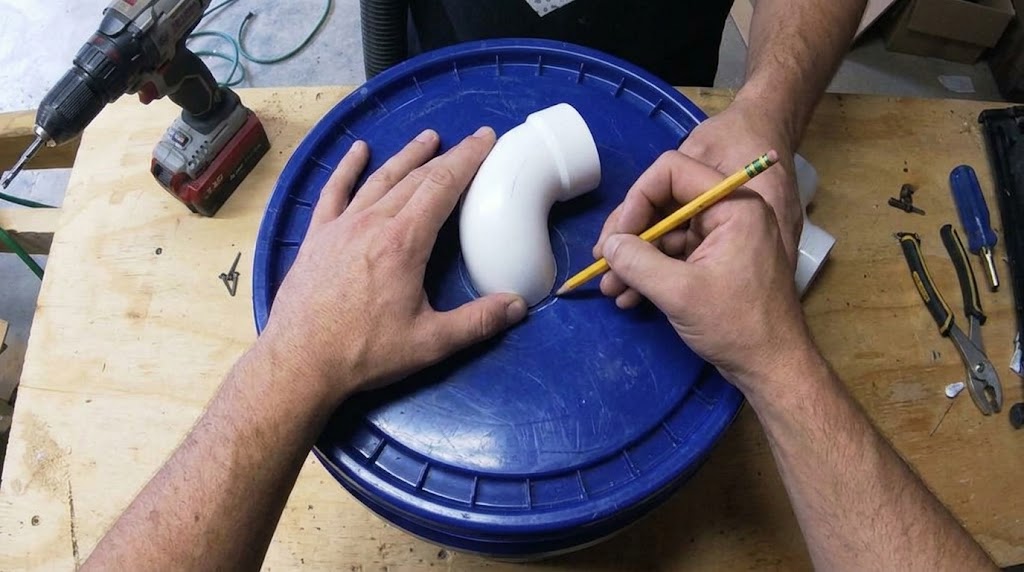
The collection container stores the dust separated by the cyclone.
Place the empty container on a stable surface and inspect its lid, rim, and walls. Look for cracks, thin areas, distorted edges, and damaged seals.
Next:
- Confirm that the cyclone insert fits the container’s lid or mounting plate.
- Mark the required mounting location.
- Check the manufacturer’s template or instructions before cutting.
- Cut only the opening required for the selected insert.
- Remove burrs and loose plastic or wood fragments.
- Test-fit the components before applying sealant or making permanent joints.
Do not cut a large hole simply because it makes assembly easier. The opening must support the insert correctly and leave enough material for secure fastening.
Do you need a five-gallon bucket?
Not necessarily. A five-gallon bucket is a convenient option for many small workshops, but a different container may be more appropriate if you need greater capacity.
The container’s strength is more important than its nominal volume. A container that collapses under suction can damage the separator, interrupt collection, and create a safety hazard.
Step 3: Install the Cyclone Insert
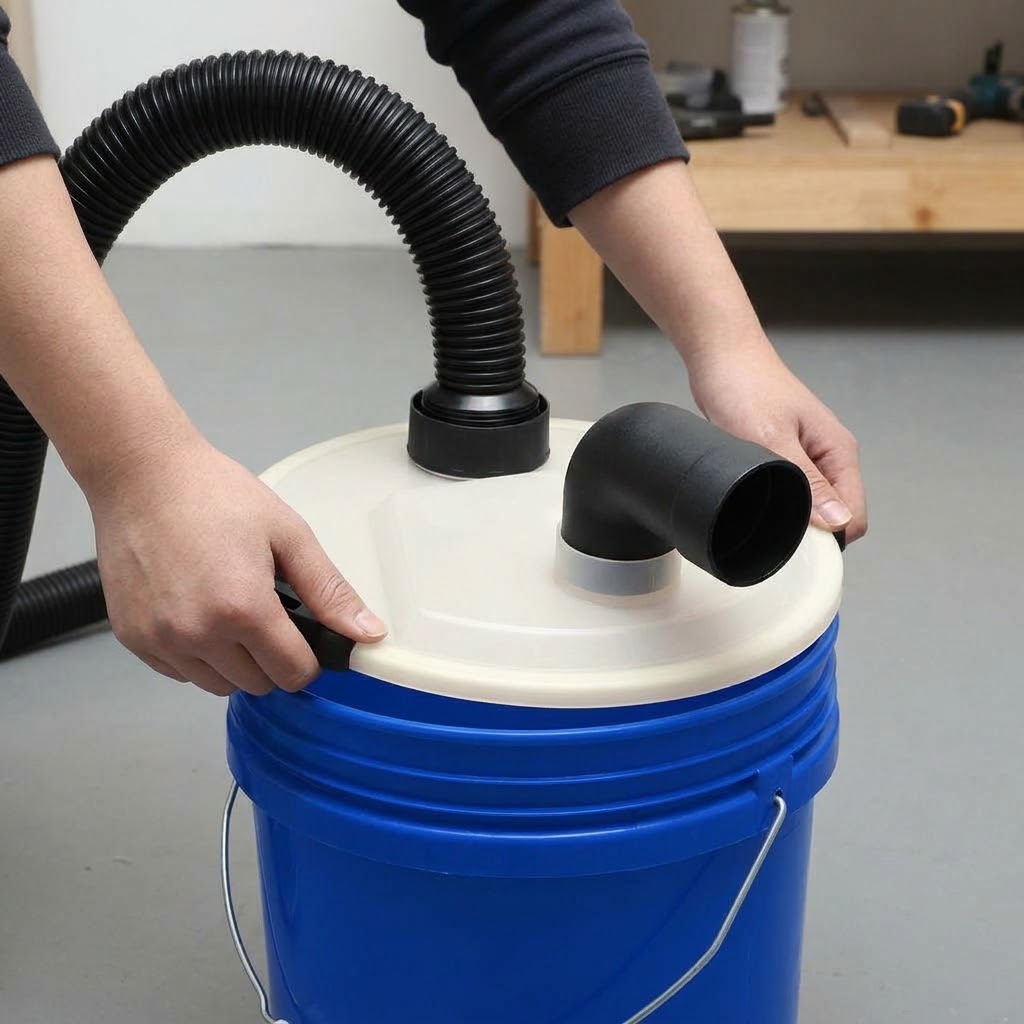
Follow the instructions supplied with your cyclone insert. The exact mounting arrangement varies by design.
- Position the insert over the prepared opening.
- Confirm that the inlet and outlet are oriented correctly.
- Check that the insert sits flat against its mounting surface.
- Install the specified fasteners or mounting hardware.
- Tighten the fasteners evenly without cracking or deforming the lid.
- Verify that the insert cannot rotate or shift during normal use.
Avoid forcing an incompatible fitting into place. If an adapter is needed, use one that fits securely and does not introduce an unnecessary restriction.
If you are fabricating a cyclone body instead of using an insert, do not treat these steps as a complete engineering specification. A fabricated cyclone requires a suitable design for the chamber, inlet, outlet, and collection region.
Step 4: Connect the Dirty-Air Inlet
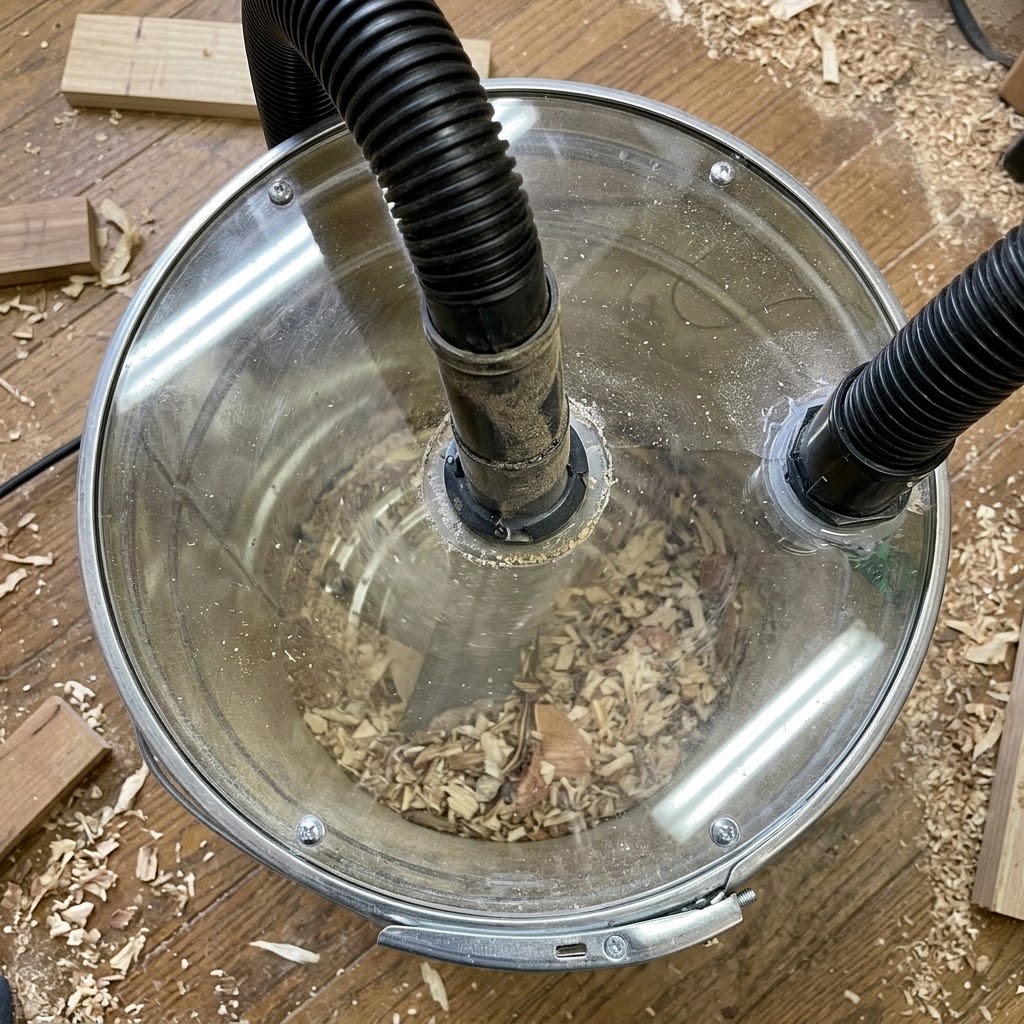
The inlet connects the dust-producing tool to the cyclone.
For a bucket-mounted insert, connect the tool hose to the designated inlet using the correct adapter and a secure fitting.
Check that:
- The hose cannot easily slip off.
- The connection does not have large gaps.
- The hose is not sharply kinked.
- The hose and fittings do not block the inlet.
- The hose route allows normal movement of the tool.
Use the inlet orientation specified for the separator. Conventional cyclone designs often introduce air tangentially to establish rotation, but the precise inlet geometry depends on the design.
Do not add extra elbows or narrow adapters without a reason. Every fitting can contribute to pressure loss, potentially reducing the suction available at the tool.
Step 5: Connect the Clean-Air Outlet to the Vacuum
The clean-air outlet carries the air leaving the cyclone toward the vacuum.
Connect the outlet to the shop vacuum’s intake using a compatible hose or adapter. Secure the joint and check that the hose is not pinched.
The basic airflow arrangement should be:
Dust-producing tool → cyclone inlet → separator chamber → clean-air outlet → shop vacuum and filter
The cyclone catches much of the heavier debris, but it does not capture every particle. The vacuum’s filtration system remains essential.
Keep the vacuum filter installed and use a filter appropriate for the dust and the vacuum. Do not remove a filter just because a separator has been installed.
Step 6: Seal Every Joint
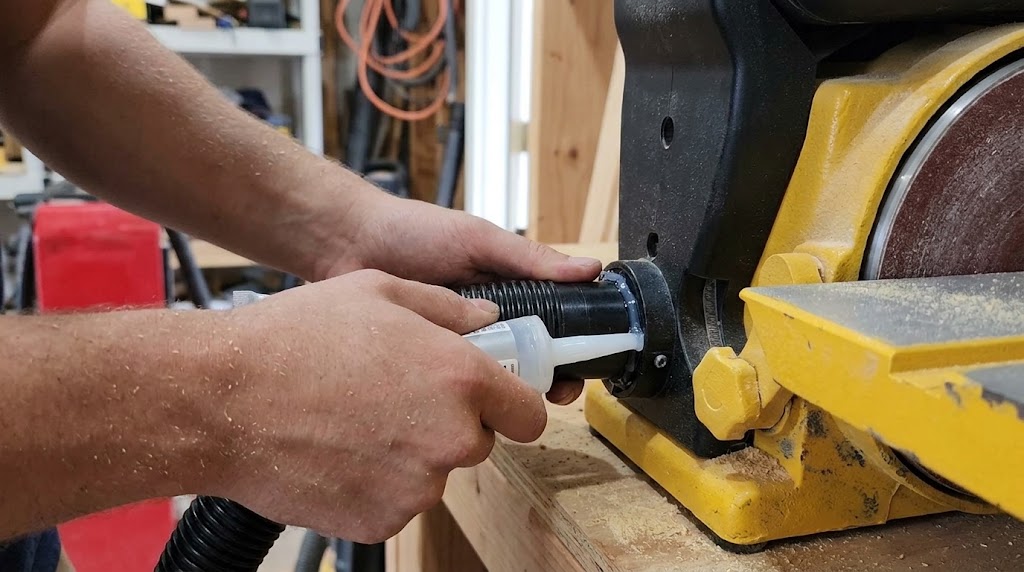
Air leaks are one of the most common causes of poor separator performance.
A leak can allow air to enter the system without following the intended path through the separator. Depending on its location and severity, this can reduce effective collection performance.
Inspect the following areas:
- Cyclone-to-lid mounting surface.
- Lid-to-container rim.
- Inlet connection.
- Clean-air outlet connection.
- Any seams in a fabricated chamber.
- Access panels or removable sections.
Use a compatible gasket or sealing method appropriate for the material. A compressible gasket is often helpful where the lid needs to be removed regularly.
If using sealant, follow the product’s application and curing instructions before operating the system.
How to check for leaks
With the system switched off and disconnected from power, inspect the seals and fittings. Correct loose connections before testing.
During a controlled test, listen for unexpected air leaks and inspect accessible joints. Switch off and unplug the equipment before tightening or adjusting anything.
Do not put your fingers, loose clothing, or tools near moving machinery or open suction ports during operation.
Step 7: Make Sure the Container Will Not Collapse
This is a critical step that is easy to overlook.
A shop vacuum creates negative pressure inside the separator and collection container. A container designed only for ordinary storage may buckle inward under that load.
Before use:
- Check whether the container is rated or otherwise suitable for the expected vacuum conditions.
- Inspect the lid and walls for flexing, cracks, or deformation.
- Use a suitably reinforced container if the design requires it.
- Ensure that any reinforcement does not obstruct the airflow or interfere with emptying the bin.
- Stop immediately if the container starts to deform.
Do not rely on a container’s appearance or wall thickness alone to establish that it is safe under suction.
If the container repeatedly collapses, replace it with a suitable reinforced vessel rather than trying to solve the problem by loosening the lid or introducing uncontrolled air leaks.
Step 8: Test the Separator Before Regular Use
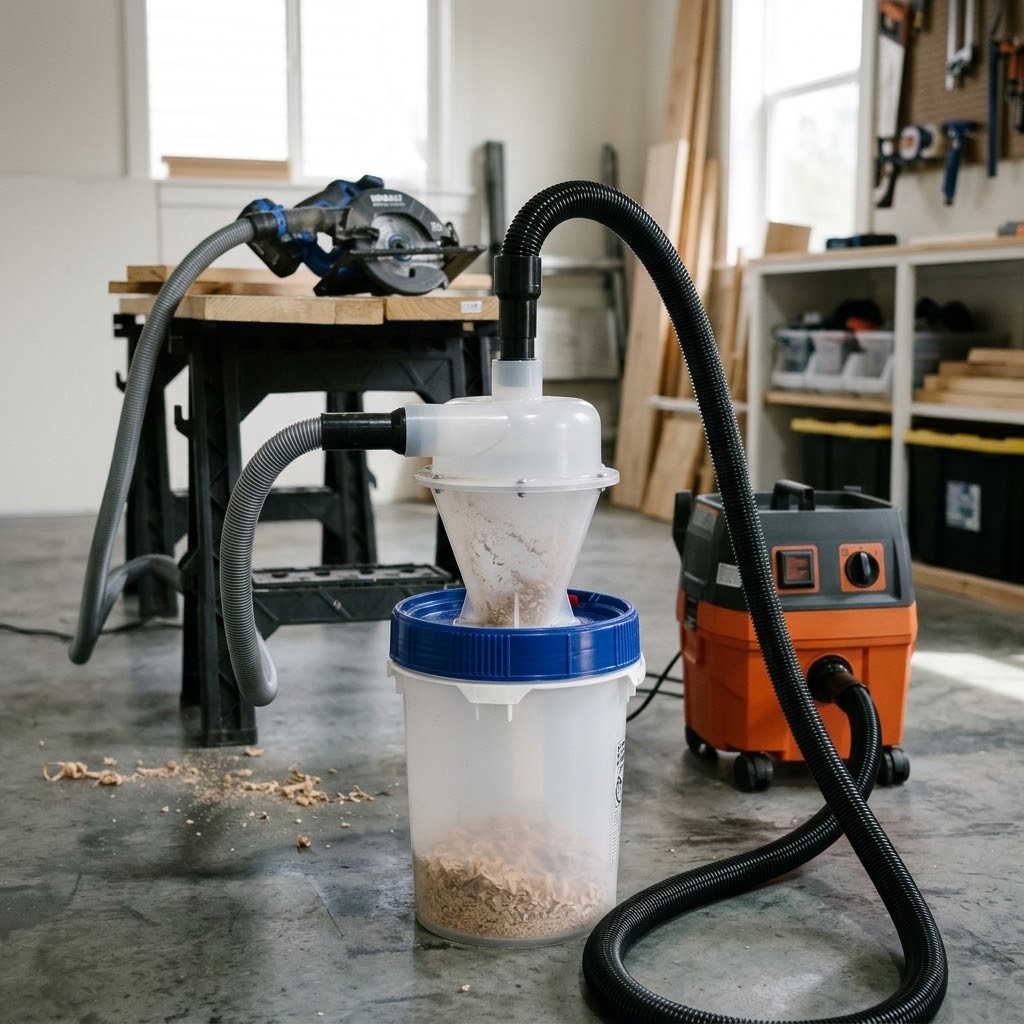
Do not begin with a full load of sawdust. Start with a brief, controlled test.
Initial inspection
With the system off, confirm that:
- All fasteners are secure.
- Hoses are connected to the correct ports.
- The lid is seated properly.
- The container is stable.
- The filter is installed.
- There are no visible cracks or loose components.
First startup
- Place the separator on a stable surface.
- Turn on the vacuum.
- Listen for abnormal noises.
- Watch the container for signs of deformation.
- Check accessible connections for unexpected leaks.
- Switch off the vacuum if anything appears unstable.
Low-volume collection test
If the initial test is satisfactory, collect a small amount of ordinary, dry sawdust or wood chips from a suitable source.
Afterward, switch off and unplug the equipment before inspecting the collection container and vacuum.
Look for these signs:
- Debris has accumulated in the separator.
- The container and lid remain intact.
- Hoses stay securely connected.
- The vacuum filter is not receiving an unexpectedly large quantity of coarse debris.
- Suction at the tool remains adequate for the intended job.
A visible pile of collected debris is evidence that separation is occurring, but it does not prove a particular separation efficiency.
Step 9: Evaluate Performance Properly
A separator that collects visible chips may still allow substantial fine dust to pass through. Do not judge its performance from appearance alone.
You can make a useful initial assessment by observing the amount of debris collected, checking the downstream vacuum bin and filter, and comparing suction before and after installation under consistent conditions.
However, these observations do not measure the separator’s particle-size-specific efficiency.
For a meaningful quantitative efficiency claim, you need a controlled test that accounts for the amount and size of particles entering and leaving the separator. Without that evidence, avoid advertising the homemade design as “99% efficient” or claiming that it removes all dangerous dust.
If you are collecting fine sanding dust, use appropriate filtration and suitable source capture. Consider a suitable ambient air-cleaning system when necessary, and do not rely on a cyclone alone to protect your lungs.
How Much Does a DIY Cyclone Dust Separator Cost?
The total cost depends on the separator design, the materials you already own, the collection container, the hose adapters, and the tools needed.
| Component | Main cost factors |
|---|---|
| Cyclone insert | Design, size, and manufacturer |
| Collection container | Capacity and resistance to vacuum pressure |
| Hoses and adapters | Diameter, length, and compatibility |
| Gaskets and sealant | Material and sealing requirements |
| Fasteners and reinforcement | Mounting method and container strength |
| Tools | What you already own versus what you need to buy |
Using an existing suitable container and workshop tools can reduce the initial expense. A fully fabricated cyclone may require additional materials, more time, and more testing.
Compare the complete cost with a ready-made separator before committing to a complicated build. Your time, reliability, filtration needs, and ease of maintenance all matter—not just the price of the bucket.
Common DIY Cyclone Dust Separator Problems and Fixes
| Problem | Possible cause | What to do |
|---|---|---|
| Weak suction at the tool | Excessive restriction, narrow fittings, clogged filter, or blocked hose | Check the entire airflow path and clean or replace the filter as appropriate |
| Dust enters the vacuum bin | Poor separation, leaks, incorrect connections, or unsuitable geometry | Inspect seals and orientation; verify that the insert matches the application |
| Container collapses inward | Container is not suitable for negative pressure | Stop using it and replace it with a suitable reinforced container |
| Dust escapes around the lid | Damaged gasket, uneven rim, or loose fasteners | Clean the mating surfaces and repair the seal |
| Hose keeps coming loose | Incorrect adapter size or inadequate retention | Fit a compatible adapter and secure the joint |
| Separator fills too quickly | High debris volume or insufficient container capacity | Empty the container more frequently or choose a suitable larger vessel |
| Fine dust remains in the air | Fine particles pass through the separator or escape source capture | Improve source capture and use suitable downstream and ambient filtration |
| Performance changes during use | Filter loading, blockage, full container, or hose damage | Switch off, unplug, and inspect the system |
Make changes one at a time where practical. This makes it easier to identify the actual cause rather than introducing new restrictions or leaks while troubleshooting.
DIY Cyclone Dust Separator vs. a Ready-Made Separator
A homemade separator can be a worthwhile project, but it is not automatically cheaper or better than a commercial product.
A DIY build makes sense when:
- You enjoy building and modifying workshop equipment.
- You already have compatible materials and tools.
- You want to customize the container or mounting arrangement.
- You are willing to test and maintain the system.
A ready-made separator may be better when:
- You want a more straightforward installation.
- You do not have the tools to fabricate accurate parts.
- You need a product with published specifications and installation guidance.
- You would rather spend your time on woodworking than troubleshooting a separator.
For a small workshop, the simplest reliable design is often the best starting point. A more complicated homemade cyclone is not necessarily more efficient.
Safety Considerations Before You Use Your DIY Cyclone Dust Separator
Wood dust is not merely a housekeeping problem. Exposure can cause respiratory effects, and some wood dusts are associated with serious long-term health risks. The Occupational Safety and Health Administration recommends controlling wood dust at its source using appropriate local exhaust ventilation and effective air cleaning.
Follow these precautions:
- Keep the vacuum’s filter installed and use appropriate filtration.
- Capture dust as close to the tool as practical.
- Wear suitable respiratory protection when required; a mask alone is not a substitute for effective dust control.
- Disconnect power before emptying the container, clearing a blockage, or adjusting the system.
- Never use an ordinary shop-vacuum separator to collect hot ash, sparks, or hazardous materials unless the equipment is specifically designed and approved for that use.
- Do not use the system for explosive or combustible industrial dust applications without an appropriately engineered and compliant system.
- Avoid blowing accumulated wood dust into the air with compressed air.
- Inspect hoses, electrical equipment, seals, and containers regularly.
Fine combustible dust can present fire and explosion hazards in some environments. A DIY bucket separator should not be treated as a substitute for a professionally designed industrial dust collection system.
Frequently Asked Questions
Can I make a cyclone dust separator from a five-gallon bucket?
Yes, a suitable five-gallon bucket can serve as the collection container for some shop-vacuum separator designs. It must have a compatible lid or mounting arrangement and be strong enough to withstand the expected vacuum pressure. Not every bucket is suitable.
Does a DIY cyclone dust separator increase shop-vacuum suction?
No. The separator does not generate suction. It adds resistance to the airflow path, so the suction available at the tool may decrease. A well-matched design aims to provide useful separation without excessive airflow restriction.
Will a cyclone separator collect fine sanding dust?
It may collect some fine particles, but a cyclone should not be expected to remove all fine dust. Particle size, density, airflow, and separator geometry affect performance. Appropriate downstream filtration and source capture remain important.
Is a two-bucket separator better than a single-bucket separator?
Not automatically. Two-bucket designs can provide a different chamber or collection arrangement, but performance depends on the geometry, seals, container strength, and airflow. A poorly designed two-bucket separator may perform worse than a well-designed single-container system.
Can I connect a cyclone separator directly to a table saw?
You can connect a compatible separator to a table-saw collection system, but a small shop vacuum may not provide enough airflow for effective collection at that machine. Check the machine’s dust collection requirements and use an appropriately sized system.
How often should I empty the separator?
Empty it before the debris reaches the level where it could obstruct the cyclone or be drawn toward the outlet. The appropriate interval depends on the container capacity, material, and amount of dust produced. Always switch off and disconnect power before emptying it.
How can I tell whether my separator is working?
Check whether debris collects in the container, inspect the vacuum bin and filter, and verify that airflow remains adequate. These are useful practical checks, but they do not establish a precise efficiency percentage.
Is a DIY cyclone dust separator worth building?
For many hobbyist woodworkers, it can be a useful way to reduce how much coarse debris reaches a shop-vacuum filter. Whether it is worthwhile depends on the total cost, the time required, the reliability of the design, and your dust-control needs.
Final Thoughts
Building a DIY cyclone dust separator can make workshop cleanup easier and help reduce the amount of larger debris that reaches your shop vacuum’s filter. The most important factors are choosing a suitable design, matching the connections to your equipment, creating reliable seals, and using a container that can withstand the vacuum’s pressure.
For most beginners, a compatible cyclone insert mounted on a suitable collection container is a sensible starting point. More advanced builders can explore fabricated cyclone bodies or Thien-baffle designs, provided they understand the additional design and testing requirements.
Most importantly, do not confuse visible sawdust collection with complete dust removal. Use suitable source capture and filtration, inspect the system regularly, and treat safety as part of the design—not as an afterthought.
Related reading: How Does a Cyclone Dust Separator Work?