
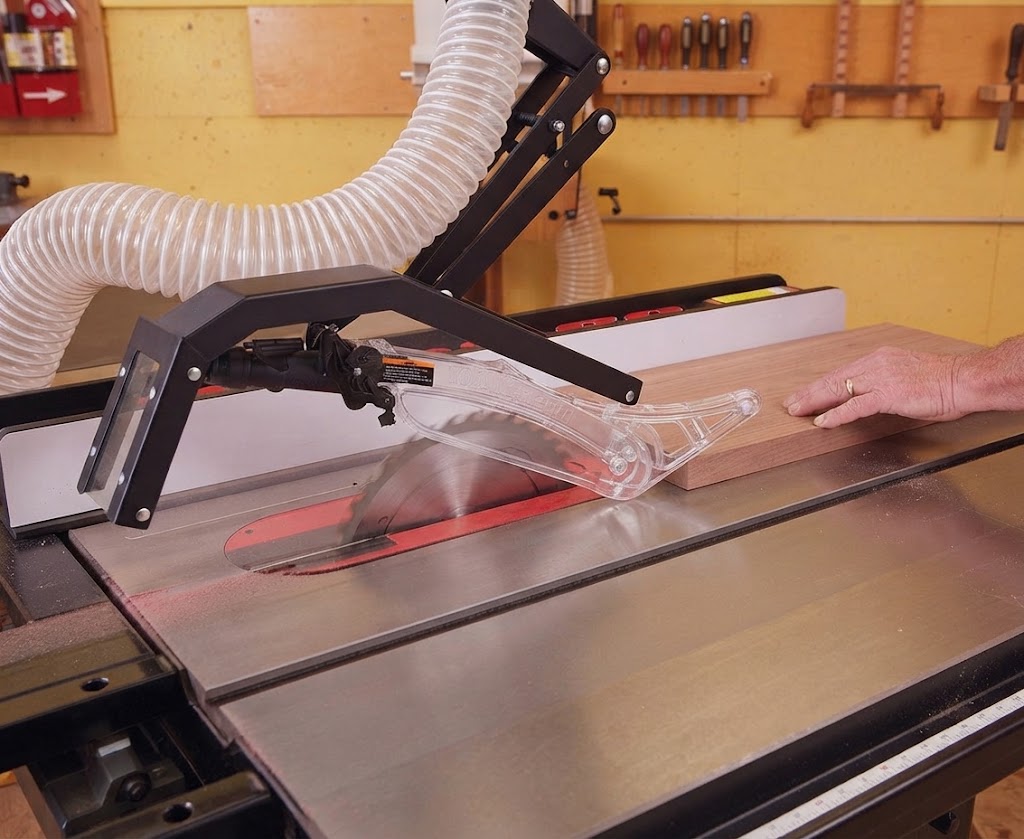
Overhead dust collection for a table saw can help capture fine sawdust that escapes above the tabletop during cutting. A table saw can send a surprising amount of dust into the air, even when its built-in dust port is connected to a shop vacuum or dust collector. The spinning blade throws dust both below the table and upward from the back of the blade. A collection system underneath the saw may capture some of it, but it cannot always catch the dust escaping above the tabletop.
That’s where overhead dust collection comes in.
An overhead dust collection system uses a hood, pickup, or special blade guard positioned above the saw blade. It captures dust close to where it becomes airborne and directs it through a hose to a shop vacuum or dust collector.
For small woodworking shops, this can be a useful upgrade—especially when a table saw produces persistent dust around the operator, fence, and surrounding workbench.
In this guide, you’ll learn how overhead table saw dust collection works, which designs are available, how to build a DIY setup, what to consider when choosing a hose and collector, and how to install the system without compromising safe saw operation.
What Is Overhead Dust Collection for a Table Saw?
Overhead dust collection is a system that captures sawdust from above the table saw blade rather than relying only on the dust port underneath the machine.
It usually consists of:
- An overhead hood or blade guard with a dust port
- A support arm or mounting structure
- A flexible dust collection hose
- A shop vacuum or dedicated dust collector
- A connection to the existing lower dust collection system, if the collector can handle both pickups
During a cut, the spinning blade carries wood particles upward and toward the back of the saw. An overhead pickup positioned close to the blade helps capture some of this airborne dust before it spreads around the workshop.
The system is sometimes called an overarm dust collector, overhead dust hood, or table saw overarm dust collection system.
Importantly, an overhead dust hood is not automatically a blade guard. A homemade hood designed only to collect dust should never be treated as a substitute for the manufacturer’s safety guard.
Why Does a Table Saw Need Overhead Dust Collection?
Many table saws have a dust port underneath the cabinet or near the bottom of the blade. Connecting that port to a dust collector is a good starting point, but it does not necessarily capture all the dust produced during a cut.
The blade rotates at high speed and can throw fine particles upward and backward. Some of this dust escapes around the blade guard, while other particles travel through openings around the tabletop and cabinet.
An overhead pickup addresses the dust that escapes above the table.
The National Institute for Occupational Safety and Health (NIOSH) has studied this problem. Its table saw dust-control research describes an auxiliary exhaust hood positioned above the blade. Laboratory testing reported that the hood reduced wood dust emissions by more than 90% on a typical table saw under the tested conditions. That result should not be treated as a guaranteed performance figure for every homemade or commercial setup.
Source: NIOSH – Control of Wood Dust From Table Saws.
Benefits of an overhead dust collection system
1. Captures dust above the blade
The main benefit is collecting dust close to the point where the blade throws it into the air.
2. Complements the lower dust port
A lower cabinet connection captures dust and chips beneath the table. An overhead pickup addresses particles escaping above it. Together, they provide more complete source collection than either pickup alone.
3. Helps keep the work area cleaner
A properly positioned hood can reduce the amount of sawdust settling on the tabletop, fence, nearby tools, and surrounding surfaces.
4. Can improve visibility
Less airborne dust around the cutting area can make it easier to see the workpiece and cutting line. It does not replace appropriate lighting or safe operating practices.
5. Can be adapted to different workshops
Overhead systems are available as commercial guards, floor-mounted arms, and DIY boom-mounted hoods. This gives small-shop owners several ways to approach the problem.
How Does an Overarm Table Saw Dust Collection System Work?
The basic principle is straightforward: position a dust pickup close to the blade, connect it to a suitable collector, and maintain enough airflow to carry the dust through the hose.
A typical system has five main parts.
| Component | Purpose |
|---|---|
| Overhead hood | Captures dust thrown above the table |
| Support arm | Holds the hood in position and allows adjustment |
| Flexible hose | Carries dust from the hood to the collector |
| Dust collector or shop vacuum | Produces the airflow needed for collection |
| Lower dust port | Collects dust and chips underneath the saw |
When the table saw is running, the overhead hood captures part of the dust plume and draws it through the hose. The collector then separates or filters the material.
The lower cabinet port continues to collect dust beneath the blade. Depending on the design, both pickups can connect to one collector or operate with separate machines.
Overhead pickup versus lower dust collection
| Feature | Overhead collection | Lower collection |
|---|---|---|
| Position | Above the blade | Under the tabletop |
| Main purpose | Capture dust thrown upward | Capture dust and chips below the table |
| Typical design | Hood or blade guard with a port | Cabinet enclosure and dust port |
| Main challenge | Maintaining clearance and access | Cabinet leaks and insufficient airflow |
| Best used | Alongside lower collection | Alongside overhead collection |
For a more complete explanation of the lower collection system, see our guide to How to Improve Dust Collection on a Table Saw.
Three Types of Overhead Dust Collection Systems
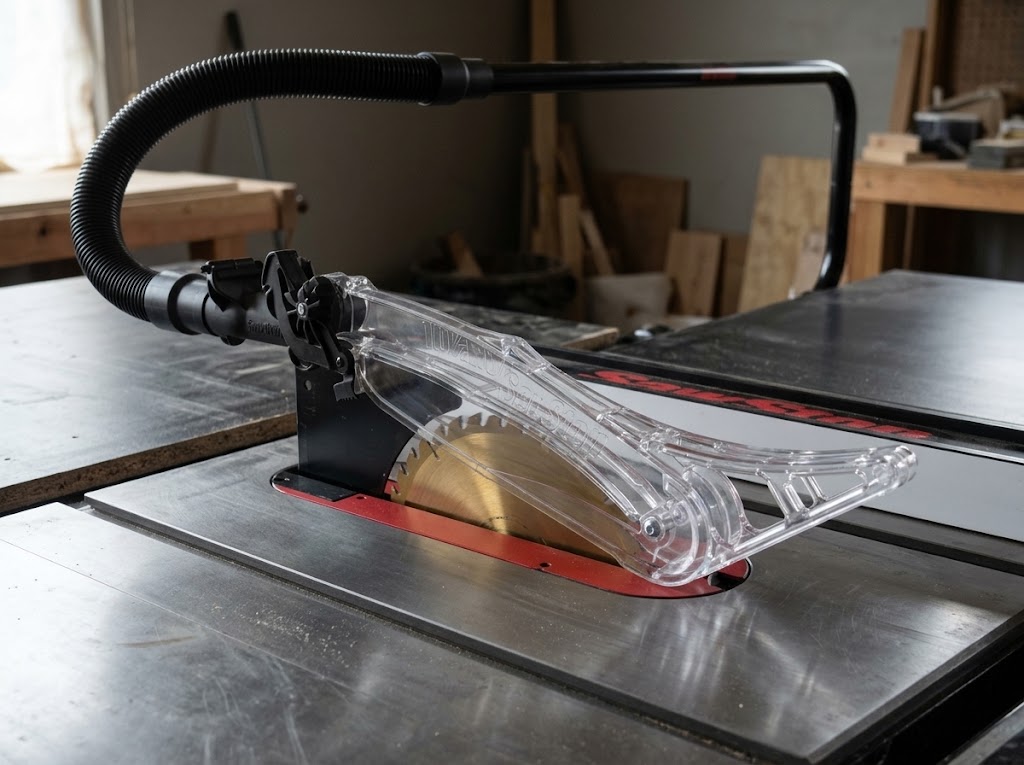
There isn’t just one way to collect dust above a table saw. The right design depends on your saw, available workshop space, dust collector, and the types of cuts you make.
1. Overhead blade guard with dust collection
An overhead blade guard with an integrated dust port combines two functions: guarding the exposed blade and collecting dust near the cutting area.
This is often the most convenient option when you want a purpose-built solution.
Advantages:
- Combines blade guarding and dust collection
- Keeps the pickup close to the blade
- Often includes height adjustment
- Can be easier to position consistently than a homemade hood
Disadvantages:
- Can be expensive
- May require a particular mounting arrangement
- Compatibility varies between table saw models
- Some designs can interfere with certain jigs or non-through cuts
Before buying one, check the manufacturer’s compatibility information, mounting requirements, hose connection, and airflow recommendations.
2. Floor-mounted overarm dust collector
A floor-mounted overarm system uses a vertical support and a horizontal arm to position a dust hood above the blade.
The arm can usually swing or move out of the way when you need access to the saw.
This design is useful for workshops where the saw is not positioned against a wall or where a ceiling-mounted support would be inconvenient.
Advantages:
- Can be adjusted for different workpiece thicknesses
- Can swing away when not needed
- Can accommodate different saw layouts
- May work with certain crosscut sleds, depending on the hood design
Disadvantages:
- Requires floor space
- Needs a stable support structure
- Hose movement must be managed carefully
- Poorly positioned arms can obstruct long workpieces
A floor-mounted system is worth considering if you regularly move between standard rip cuts and larger workpieces.
3. DIY overhead dust collection hood
A DIY overhead hood can be built using materials such as plywood, clear sheet material, a suitable dust port, a support arm, and flexible hose.
The design can be customized to fit an older table saw or a small workshop with limited space.
However, a homemade hood should be treated as a dust collection attachment—not as a safety guard unless it has been specifically designed, evaluated, and approved for that purpose.
Advantages:
- Can cost less than a commercial system
- Can be adapted to unusual saw layouts
- Allows custom hose and mounting arrangements
- Can be designed around your workshop space
Disadvantages:
- Requires careful measuring and construction
- May not provide adequate airflow
- Can interfere with workpiece movement
- Must not compromise blade guarding or operator safety
DIY Overhead Dust Collection for a Table Saw: What You’ll Need
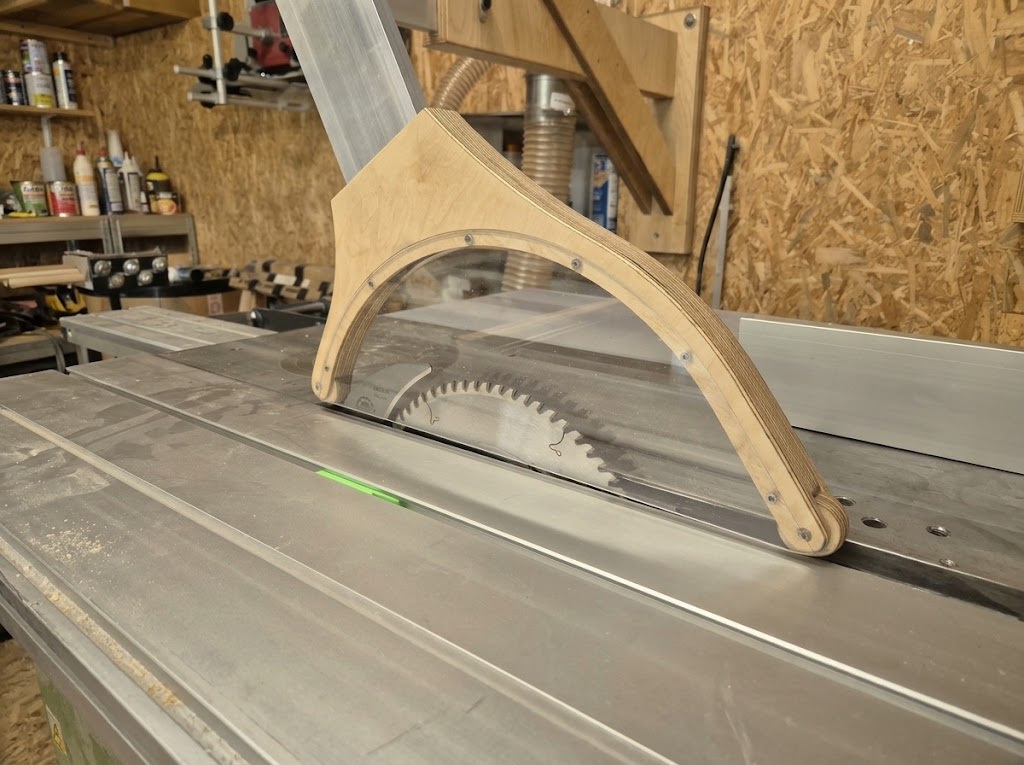
If you want to build a DIY overhead dust collection system, start by deciding where the hood will sit and how it will be supported.
Don’t begin by cutting plywood or buying fittings. First, check your saw’s guard arrangement, available mounting points, blade movement, and the space required for your workpieces.
The following materials are examples of components you may need. Exact dimensions depend on your table saw and chosen design.
| Material or component | What it does |
|---|---|
| Plywood or suitable sheet material | Forms the hood or mounting brackets |
| Clear, impact-resistant sheet material | Allows visibility through parts of the hood |
| Dust port or hose connector | Connects the hood to the extraction hose |
| Flexible dust collection hose | Connects the hood to the collector |
| Support arm or mounting post | Holds the hood above the blade |
| Adjustable brackets | Allow positioning and height adjustment |
| Clamps and suitable fasteners | Secure the assembly |
| Hose supports | Prevent the hose from pulling the hood out of position |
Choose materials and fasteners that can withstand normal workshop use. Avoid brittle materials, sharp edges, loose fittings, or any construction that could break or fall toward the blade.
Plan the hood before building it
The hood should be positioned close enough to capture dust without restricting the workpiece or interfering with the saw’s safety equipment.
Consider these questions:
- Can the hood move up and down as the blade height changes?
- Can it move out of the way for setup and maintenance?
- Does the support arm obstruct long boards?
- Can the hose move without pulling the hood?
- Can the design accommodate the factory blade guard?
- Does it leave enough clearance for the workpiece and normal cutting operations?
A design that works for one table saw may not work for another. Measure your own machine instead of copying dimensions from an unrelated project.
Commercial Blade Guards vs. DIY Dust Hoods vs. Floor-Mounted Collection Arms
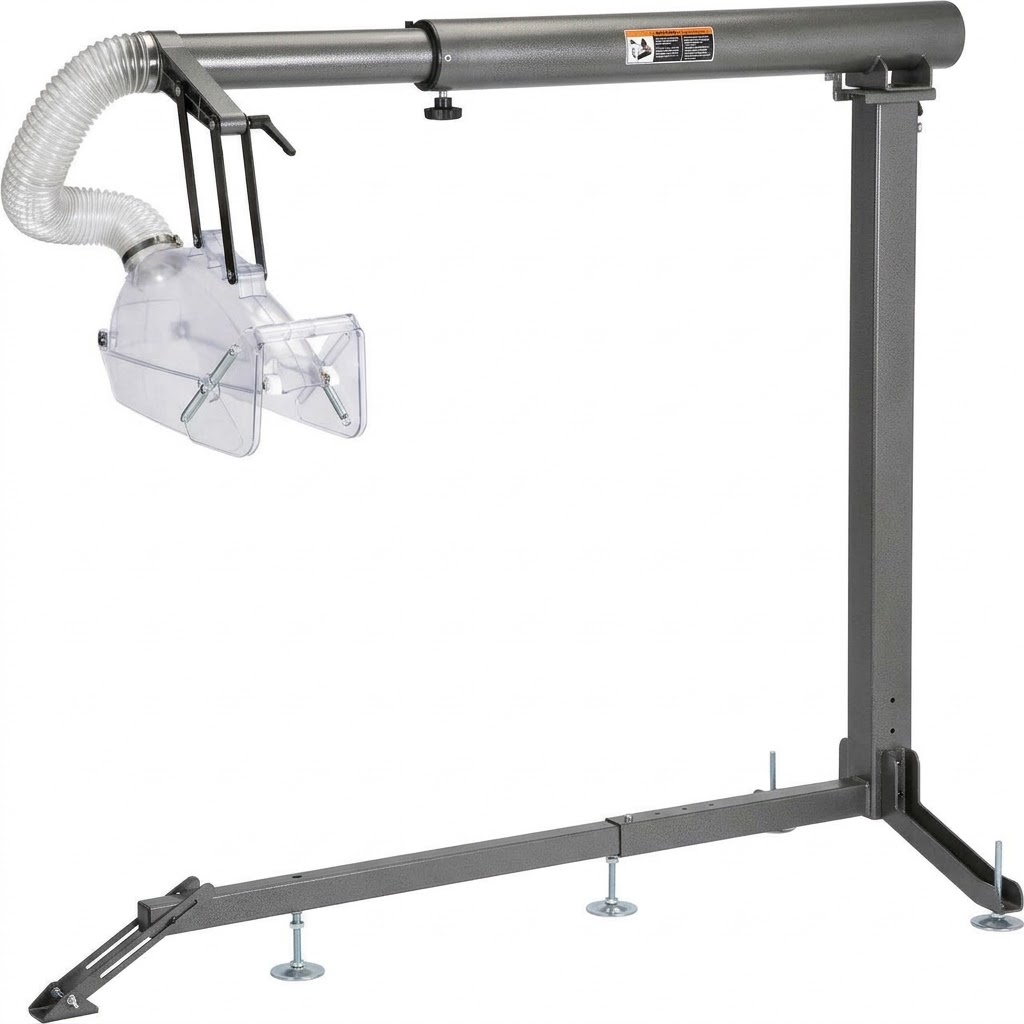
An overhead dust collection system can use several different designs to capture sawdust near the table saw blade. Commercial blade guards, DIY dust hoods, and floor-mounted collection arms all aim to collect airborne dust and fine particles, but they differ in installation, adjustability, cost, and compatibility.
The best option depends on your table saw, available workshop space, dust collector, and how often you change blade height or make angled cuts.
1. Commercial Overhead Blade Guards
Commercial overhead blade guards combine a protective blade guard with a dust collection port positioned above the saw blade. Many designs use a transparent enclosure so the operator can see the cutting area while the hood captures dust thrown upward by the blade.
Advantages:
- Designed specifically for table saw applications.
- Provides an integrated upper dust collection connection.
- Can offer good visibility through a transparent guard.
- Some models include adjustable mounting systems.
- Combines blade protection and overhead dust capture in one assembly.
Limitations:
- Can be more expensive than a homemade hood.
- May require a compatible mounting system or additional hardware.
- Compatibility varies between cabinet, contractor, and jobsite saws.
- Some designs may need adjustment when changing blade height or bevel angle.
Best for: Woodworkers who want an integrated overhead guard and dust collection solution and have a compatible table saw.
2. DIY Overhead Dust Hoods
A DIY overhead dust hood is a homemade enclosure or pickup positioned above the blade. It can be constructed from suitable sheet material, clear plastic, plywood, or other materials that maintain the necessary visibility and clearance.
A flexible hose connects the hood to a dust collector or suitable extraction system.
Advantages:
- Can be customized to fit an existing table saw.
- Offers flexibility in hood size and mounting position.
- May cost less than a commercial assembly.
- Can be adapted to unusual workshop layouts.
Limitations:
- Requires careful design and construction.
- Poor positioning can interfere with workpiece movement.
- An oversized or poorly designed hood may reduce effective airflow.
- Homemade construction does not automatically provide adequate blade protection.
Best for: Experienced DIY woodworkers who need a custom overhead collection solution and can maintain safe blade guarding and workpiece clearance.
3. Floor-Mounted Dust Collection Arms
A floor-mounted collection arm uses a freestanding support or weighted base to hold an overhead hood above the table saw. The arm positions the collection point near the blade without requiring a permanent attachment to the saw or ceiling.
Some systems use adjustable joints or telescoping sections to reposition the hood.
Advantages:
- Can be moved or repositioned around the workshop.
- Does not always require drilling into the table saw or ceiling.
- Can work with different table saw layouts.
- Useful in workshops where a permanent overhead installation is impractical.
Limitations:
- Requires enough floor space for the base and support.
- The arm must remain stable during operation.
- Poorly positioned supports can interfere with long workpieces.
- Flexible hoses can pull the hood out of position if not managed properly.
Best for: Workshops that need a flexible overhead collection arrangement or cannot install a permanent support.
Comparison: Which Overhead Dust Collection Design Is Best?
| Feature | Commercial blade guard | DIY dust hood | Floor-mounted arm |
|---|---|---|---|
| Installation | Depends on saw compatibility | Requires custom mounting | Requires stable floor support |
| Customization | Usually limited | High | Moderate to high |
| Initial cost | Often higher | Can be lower | Varies by support design |
| Portability | Usually limited | Depends on mounting | Often repositionable |
| Visibility | Often designed with clear panels | Depends on materials | Depends on hood design |
| Main advantage | Integrated guard and collection | Custom fit | Flexible positioning |
| Main limitation | Compatibility and cost | Design and safety responsibility | Floor space and stability |
Which Option Should You Choose?
Choose a commercial overhead blade guard if you want an integrated guard and collection assembly that is compatible with your table saw.
If you need a custom design and have the skills to build and position it safely then choose a DIY dust hood.
Choose a floor-mounted collection arm if you need a movable overhead pickup and have enough room to support it securely.
Regardless of the design, an overhead hood should supplement—not replace—the table saw’s required blade guard and riving knife. Never remove or modify safety equipment simply to accommodate a dust collection hood. Check the saw manufacturer’s instructions, maintain safe clearance around the blade and workpiece, and make sure the support and hose cannot interfere with operation.
An overhead collection system also works best when paired with effective dust extraction below the table. The upper hood captures dust thrown above the table, while the lower cabinet or blade-area pickup collects debris beneath it.
How to Build and Set Up a DIY Overhead Dust Collection System
The following process describes a general planning and installation approach. It is not a universal construction plan: the mounting method, dimensions, and materials must be adapted to your saw.
Step 1: Inspect your table saw
Start by identifying the existing dust collection and safety components.
Check:
- The location and size of the lower dust port
- The factory blade guard and riving knife arrangement
- The maximum blade height
- The bevel adjustment range
- The space available behind and beside the saw
- The position of the fence rails and other accessories
Also check whether the saw manufacturer permits the proposed mounting arrangement.
Do not drill into the saw cabinet, fence rails, or structural components without confirming that doing so is safe and permitted.
Step 2: Choose the mounting location
Decide whether the overhead hood will use a floor-mounted support, a suitable machine-mounted bracket, or another stable support arrangement.
The mounting structure should remain stable while the saw is operating.
Position it so that:
- The hood can be centered over the blade area.
- The operator has a clear working position.
- Long workpieces can pass without hitting the arm.
- The hose does not hang in the cutting path.
- The hood can be moved safely when necessary.
Avoid mounting a heavy hood to a lightweight or unstable structure.
Step 3: Design the overhead hood
The hood should capture dust without blocking the operator’s view or restricting normal workpiece movement.
A simple design may use an enclosure around the upper dust plume with a hose connection at the top or rear.
Consider a transparent section where it helps maintain visibility. Use material suitable for the application and avoid ordinary brittle plastic that could crack or break.
The hood must not create a new pinch point or interfere with the blade guard, riving knife, fence, or workpiece.
Step 4: Install the dust port
Choose a dust port that matches the hose and extraction system.
The connection should be secure and should not have unnecessary restrictions. Avoid making the opening so small that it severely limits airflow.
If you use a reducer, make sure it is appropriate for the collector and hood design. A larger hose does not automatically mean better collection if the collector cannot maintain adequate airflow through it.
Step 5: Attach the support arm
Secure the support arm according to the chosen mounting design.
Check that the arm:
- Holds its position without sagging
- Does not vibrate excessively
- Can be adjusted without entering the blade area
- Does not obstruct the fence or workpiece
- Cannot fall toward the saw if a fastener loosens
If the arm is adjustable, use a positive locking method rather than relying on friction alone.
Step 6: Connect the flexible hose
Connect the hood to a suitable dust collector or shop vacuum.
Route the hose so that it does not:
- Pull the hood out of position
- Drag across the workpiece
- Catch on the fence or support arm
- Hang near the blade
- Create a trip hazard
Use hose supports or a suitable boom arrangement if necessary.
Step 7: Check clearance and operation
Before switching on the saw, disconnect power and inspect the full range of movement.
Check the blade at its intended height and bevel settings. Confirm that the hood and hose do not interfere with the blade, workpiece, fence, guard, or riving knife.
Test the system using the saw manufacturer’s safe setup and operating procedures. Keep hands and test materials away from the blade path, and never reach over a moving blade to adjust the hood.
If anything interferes with normal operation, stop and redesign the arrangement.
What Size Hose Do You Need for Overhead Table Saw Dust Collection?
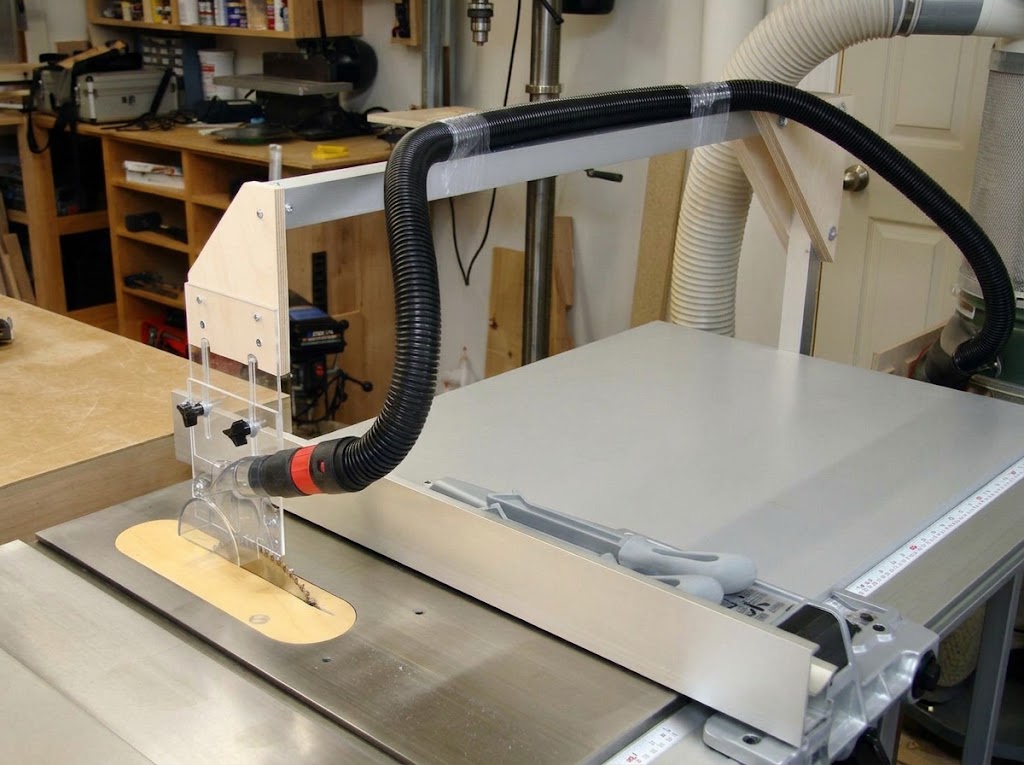
Hose size is an important part of an overhead dust collection system because the hood needs enough airflow to capture the dust plume.
There is no single hose diameter that works for every setup. The correct size depends on the hood’s port, collector performance, hose length, bends, and the manufacturer’s airflow requirements.
Common connections include:
| Hose size | Common application |
|---|---|
| 1.25 inches | Some compact shop-vac accessories |
| 1.5 inches | Some shop-vac and dust-extraction systems |
| 2.5 inches | Many shop-vac hoses and smaller dust pickups |
| 4 inches | Many dedicated woodworking dust collectors and larger guards |
These are common nominal sizes, not a recommendation that every overhead hood should use any particular diameter.
Can you use a shop vac for overhead dust collection?
A shop vacuum may work with an overhead hood designed around a smaller hose connection. However, it is not automatically suitable for every overarm guard.
Some commercial overhead guards use a 4-inch connection and require substantially more airflow than a typical shop vacuum can provide.
Before connecting a shop vac, check:
- The hood’s required airflow
- The hose and port diameter
- The vacuum’s performance under the actual hose and filter conditions
- Whether the manufacturer permits the proposed connection
A shop vac connected to a small-port hood may be practical for a compact setup. A larger hood may need a dedicated dust collector.
For more information, read our guide to Dust Collection System With Shop Vac.
Shop Vac vs. Dust Collector for an Overhead Dust Hood
Both shop vacuums and dedicated dust collectors can be useful, but they are designed around different airflow and pressure characteristics.
A shop vacuum generally provides strong suction through a relatively small hose. A woodworking dust collector is generally designed to move a larger volume of air through larger ductwork.
| Feature | Shop vac | Dedicated dust collector |
|---|---|---|
| Typical hose | Smaller diameter | Larger diameter |
| Airflow design | High suction through smaller passages | Higher-volume air movement |
| Best fit | Compatible small-port hoods | Compatible larger-port hoods |
| Portability | Usually easier to move | Depends on model |
| Main limitation | May not supply enough airflow for a large hood | Takes more space and may need ductwork |
Do not choose a collector based only on its advertised horsepower or maximum airflow figure. Check the performance requirements of the actual hood and consider airflow losses from hose length, fittings, filters, and bends.
If you plan to run the overhead hood and lower cabinet port from one collector, make sure the system is designed to supply both pickups adequately.
Can You Connect the Overhead Hood and Lower Dust Port to One Collector?
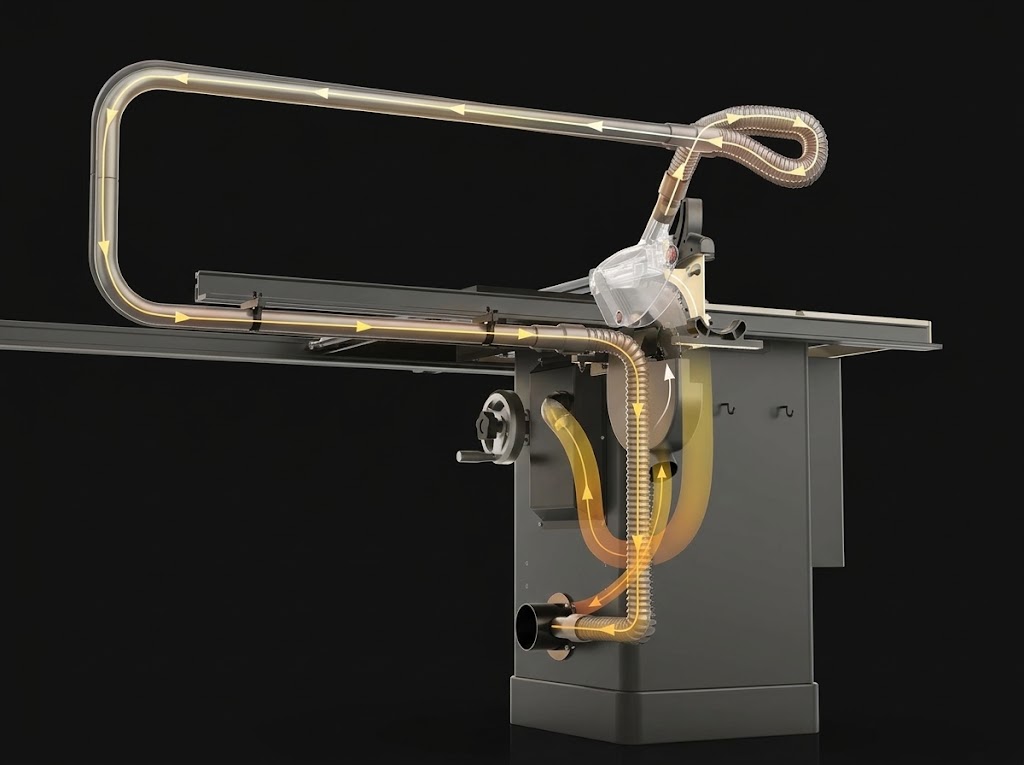
Yes, some setups can run both pickups from one dust collector.
A common arrangement uses a suitable Y-fitting or branch connection, with a separate blast gate for each pickup.
The blast gates allow you to control which branch is open.
However, simply connecting two hoses does not guarantee enough airflow at both locations.
When both branches are open, the available airflow is divided according to the resistance and design of each branch. If the collector is too small, the overhead hood may receive insufficient airflow, or the lower port may collect less effectively.
Before using a shared system, check:
- The collector’s actual airflow capability
- The airflow requirements of both pickups
- The diameter and length of each branch
- The effect of the Y-fitting and other restrictions
- Whether the manufacturer provides a recommended connection arrangement
For some small workshops, using a separate shop vacuum for a small overhead pickup and a dedicated collector for the cabinet port may be more practical.
How to Position an Overhead Dust Collection Hood
Positioning matters as much as the collector itself.
If the hood is too far from the blade, it may not capture the dust plume effectively. If it is too close or poorly aligned, it may interfere with the workpiece, guard, or operator.
Use the hood manufacturer’s installation instructions wherever available.
In general:
- Position the pickup over the area where dust escapes from the blade.
- Keep it as close to the source as the design safely allows.
- Make sure it can accommodate the intended workpiece thickness.
- Check clearance with the fence and any sleds or jigs you regularly use.
- Route the hose so it cannot pull the hood into the cutting area.
The hood should never obstruct your view of the cut or force you to adopt an unsafe hand position.
What about crosscut sleds and bevel cuts?
Some overhead guards work well for ordinary rip cuts but interfere with crosscut sleds, angled cuts, or other accessories.
If you regularly use a crosscut sled, look for a system that can move out of the way or has a design specifically intended to accommodate the sled.
For bevel cuts, verify that the hood and support arm have enough clearance throughout the saw’s permitted adjustment range.
Do not assume a system is compatible simply because it fits above the blade at a 90-degree setting.
Common Problems With Overhead Table Saw Dust Collection
Even a well-designed system can perform poorly if the hood, hose, or collector is not matched correctly.
1. Dust still escapes around the blade
Possible causes:
- The hood is too far from the blade.
- The hood opening is poorly positioned.
- Airflow is insufficient.
- The hood does not contain the dust plume effectively.
What to check:
Review the hood position and collector requirements. Make sure the hose is not kinked or blocked.
2. The shop vacuum seems weak
Possible causes:
- A clogged filter
- A full collection container
- A long or narrow hose
- Too many sharp bends
- A restrictive hood or adapter
What to check:
Inspect the filter, hose, fittings, and collector. Clean or replace filters according to the manufacturer’s instructions.
3. The hood moves while cutting
Possible causes:
- A loose mounting bracket
- An unstable support arm
- A hose that pulls on the hood
- Insufficient locking force
What to check:
Stop the saw, disconnect power, and inspect the support structure. Secure the mounting arrangement and add appropriate hose support.
4. The hose gets in the way
Possible causes:
- Poor hose routing
- An arm that is too short or badly positioned
- No hose support
- An unsuitable mounting location
What to check:
Reposition the hose and support arm so that the assembly moves freely without obstructing the workpiece or operator.
5. The system works for rip cuts but not crosscuts
Possible causes:
- The hood cannot move far enough.
- The support arm obstructs the sled.
- The hood is designed only for a particular guard arrangement.
What to check:
Consider a compatible swing-away design or a different hood. Never remove a required safety guard simply to make a dust collector fit.
Safety Considerations for Overhead Dust Collection
Dust collection is important, but it must never come at the expense of safe table saw operation.
A homemade overhead hood is not automatically a blade guard. Unless a product is specifically designed and approved as a guard for your saw, do not rely on it to protect your hands from the blade.
Follow these precautions:
- Keep the manufacturer’s blade guard and riving knife installed whenever the operation allows.
- Never remove a safety component simply to accommodate a homemade dust hood.
- Keep the hood, hose, and support arm clear of the blade and workpiece.
- Disconnect power before adjusting, cleaning, or repairing the assembly.
- Make sure the support arm and hood are securely mounted.
- Keep loose clothing, hands, and accessories away from the blade.
- Follow the saw and dust collector manufacturers’ instructions.
- Use appropriate respiratory protection when necessary; dust collection alone does not guarantee safe air quality.
Wood dust is a health hazard. OSHA identifies local exhaust ventilation—capturing dust close to where it is produced—as an important engineering control. Its woodworking guidance specifically recommends an upper hood integrated with the blade guard to improve table saw dust control.
Sources:
Also keep the collector and dust handling system suitable for the material and environment. Fine wood dust can create fire and combustible-dust hazards. Do not use compressed air to blow accumulated dust into the workshop.
Is Overhead Dust Collection Worth It for a Small Workshop?
For many small woodworking shops, an overhead dust collection system can be a worthwhile addition if the table saw regularly releases dust above the blade.
It is especially worth considering when:
- Your saw has only a lower dust port.
- Fine dust continues to escape during ordinary cuts.
- You use the table saw frequently.
- Your existing collector can support an additional pickup.
- You have enough room to install a stable overhead support.
It may be less practical if your workshop is extremely cramped, your saw’s layout does not allow safe mounting, or your dust collector cannot provide the airflow the hood requires.
You don’t necessarily need an expensive commercial system. A properly designed DIY hood may be an option, provided it does not compromise guarding, visibility, or safe operation.
Frequently Asked Questions
Does overhead dust collection really work on a table saw?
It can improve dust capture by collecting particles thrown above the blade. NIOSH laboratory testing found that its tested auxiliary exhaust hood reduced wood dust emissions by more than 90% on a typical table saw. Actual results vary with the hood design, collector, airflow, and installation.
Do I need overhead and under-table dust collection?
Using both is generally a better approach because the pickups address different dust sources. The lower port collects dust beneath the table, while the overhead hood captures dust escaping above the blade.
Can I make a DIY table saw overhead dust hood?
Yes. A DIY hood can be built around a suitable support structure, enclosure, dust port, and hose. However, it must be designed for your particular saw and must not interfere with the blade guard, riving knife, workpiece, or operator.
Can I use a shop vac with an overhead dust collection guard?
Sometimes. It depends on the hood’s port size and airflow requirements. A small-port hood may work with a compatible shop vacuum, while a larger 4-inch guard may require a dedicated dust collector.
What size hose is best for an overarm dust collector?
There is no universal best size. Match the hose to the hood’s connection and manufacturer airflow requirements. Also consider hose length, bends, fittings, and the collector’s actual performance.
Can I use an overhead dust collector with a crosscut sled?
Some designs can accommodate crosscut sleds, while others cannot. Check the hood’s clearance and movement before buying or building it. A swing-away support or specially designed hood may be necessary.
Does an overhead dust hood replace a table saw blade guard?
No. A dust hood is not automatically a safety guard. Keep the manufacturer’s blade guard and riving knife installed whenever the cutting operation permits, and use only a purpose-designed guard for protection.
Is an overhead dust collection system better than a lower dust port?
They perform different jobs. The lower port collects dust beneath the table, while an overhead pickup targets dust thrown above the blade. Using both can provide more complete collection.
Final Thoughts
Overhead dust collection can make a meaningful difference to a table saw’s dust control, particularly when the built-in lower port leaves fine dust escaping above the tabletop.
The most important decision is choosing a system that matches your table saw, dust collector, and workshop layout. A commercial overarm blade guard may offer a convenient integrated solution, while a carefully designed DIY hood can provide another option for small workshops.
Before building or buying anything, check the mounting arrangement, airflow requirements, hose compatibility, and clearance for your normal cuts. Most importantly, never sacrifice the table saw’s safety equipment just to improve dust collection.
For a complete dust-control approach, combine suitable overhead collection with an effective lower dust port, maintain the filters and hoses, and keep the workshop clean.
Related article you can read: