
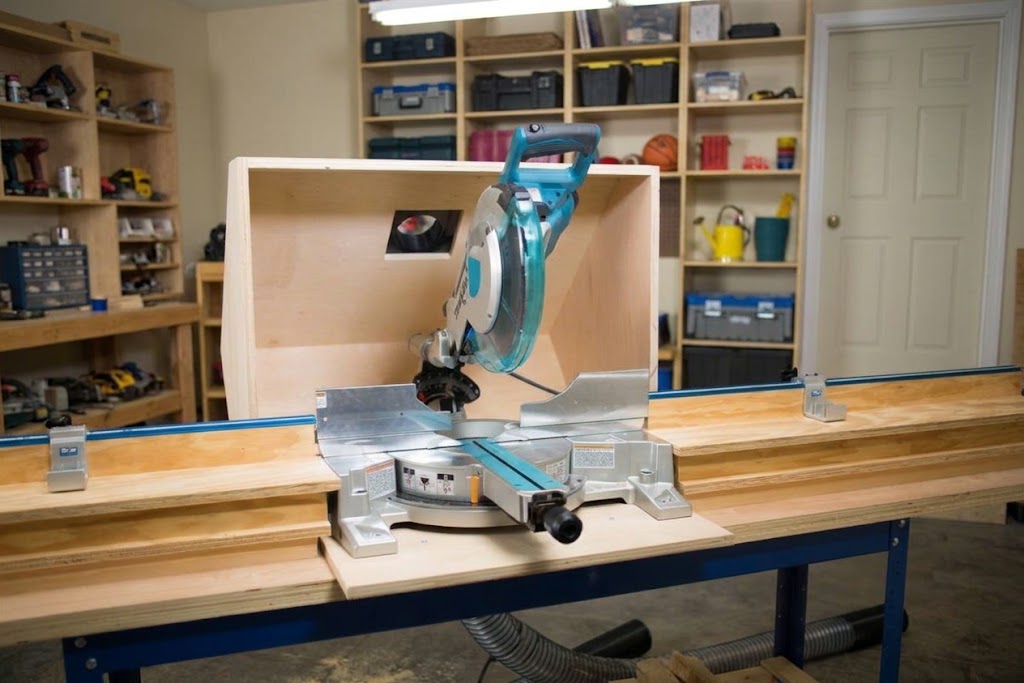
A miter saw dust collection hood DIY project can help control the large amount of sawdust that spreads around a woodworking shop during cutting. Even when a miter saw has a factory dust bag or extraction port, fine dust and wood chips often escape around the blade and scatter behind the saw. A properly designed rear dust collection hood provides a larger capture area to help contain that debris and direct it toward a dust collector or shop vacuum.
Building your own miter saw dust collection hood does not have to be complicated. With plywood, basic woodworking tools, a suitable dust port, and careful measurements, you can build an enclosure that fits your saw and workshop. The important part is designing the hood around the saw’s actual movement rather than simply building a box and placing it behind the machine.
In this guide, you’ll learn how to design, measure, and build a DIY miter saw dust collection hood, including material selection, example dimensions, construction steps, hose connections, and practical ways to improve dust capture.
Why Build a DIY Miter Saw Dust Collection Hood?
Miter saws are difficult woodworking machines to keep clean because their blades throw sawdust and chips in several directions. Unlike a table saw, which has a relatively enclosed blade area, a miter saw has an exposed cutting area and an open rear section.
The factory dust collection bag or port can capture some of the debris, but it may not collect everything. Dust can escape around the blade guard, behind the fence, and through the open sides of the machine.
A larger rear hood helps address this problem by providing an additional area where scattered sawdust can be contained.
Here are some advantages of building a DIY dust collection hood:
- Larger collection area: A rear enclosure can catch debris that escapes the factory dust port.
- Less workshop cleanup: Containing more chips and sawdust can reduce the amount that lands on the floor and nearby equipment.
- Custom dimensions: You can build the hood around your particular miter saw and workbench.
- Flexible dust collection: The hood can be connected to a compatible dust collector or extraction system.
- Expandable design: You can add adjustable panels, clear curtains, or sliding doors later.
However, a hood does not guarantee complete dust capture. Its performance depends on the saw, hood geometry, airflow, hose arrangement, and the way the machine is used.
How Does a Miter Saw Dust Collection Hood Work?
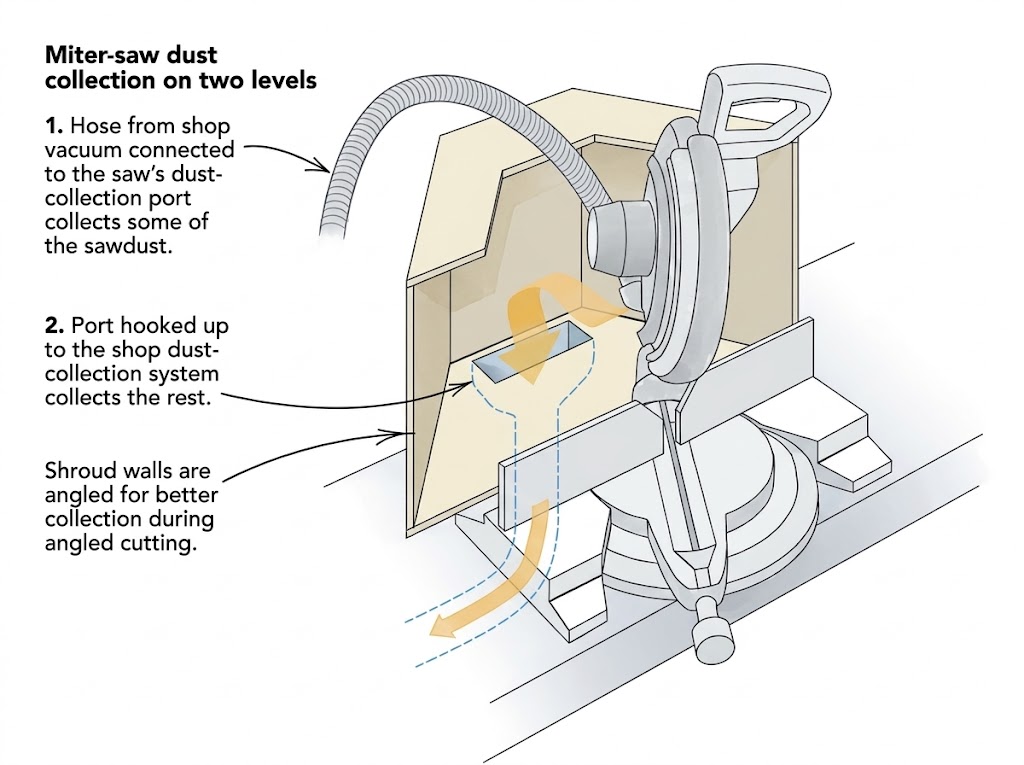
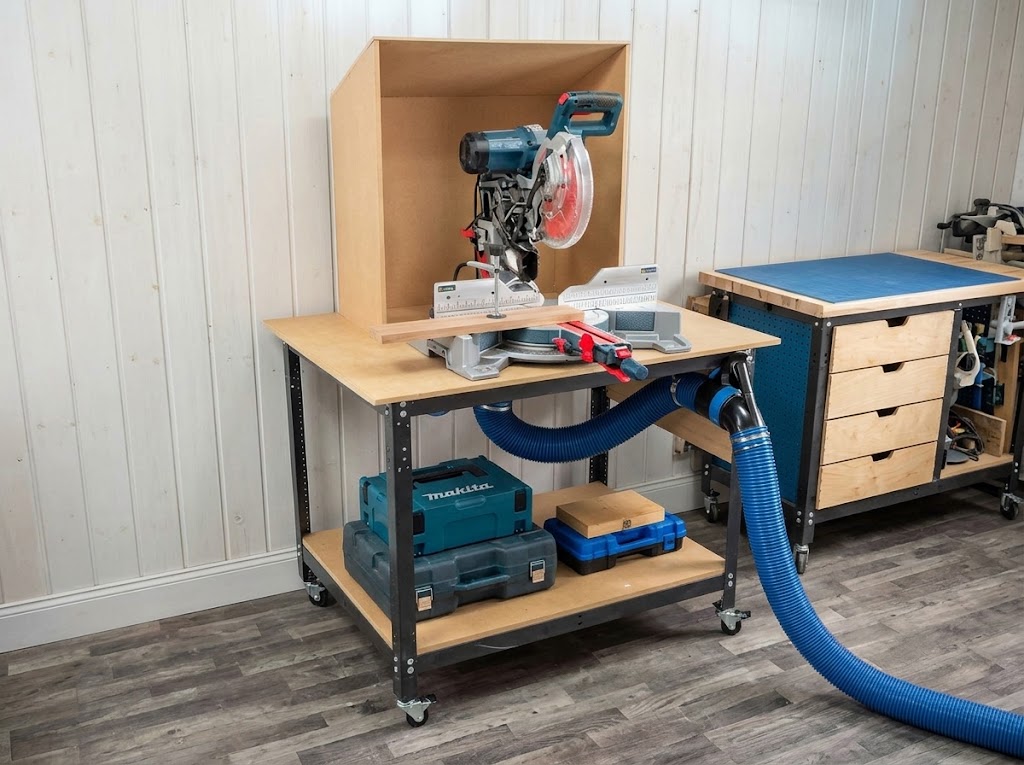
A DIY miter saw dust collection hood is generally an open-front enclosure positioned behind the saw.
When the blade cuts through wood, it throws chips and sawdust toward the rear of the machine. The hood provides a larger area to intercept this debris and directs it toward an extraction opening.
The basic system has four main components:
- Rear enclosure: A plywood structure that provides a collection area behind the saw.
- Side panels: These help contain debris that escapes toward either side.
- Dust collection port: An opening connected to a hose or duct.
- Dust collector or vacuum: The equipment that moves air and debris through the system.
The saw’s original dust collection port can remain connected as an additional collection point.
Different DIY Miter Saw Dust Collection Hood Designs
Before cutting plywood, decide which hood design best suits your saw and available workspace.
1. Simple Rear Box Hood
A simple rear box is one of the easiest designs to build.
It consists of a bottom panel, two side panels, a rear panel, and a top panel if needed. The saw remains in front of the enclosure, while the open area behind the blade provides a collection zone.
Advantages:
- Relatively simple construction.
- Requires basic woodworking materials.
- Suitable for many stationary workshop setups.
- Easy to customize.
Limitations:
- May not contain dust escaping toward the front or sides.
- Needs enough clearance for the saw’s movement.
2. Rear Hood With Side Wings
This design adds angled or extended side panels to the basic enclosure.
The side wings provide additional containment when the saw rotates for angled miter cuts. They can also help direct scattered debris toward the central collection area.
Advantages:
- Provides a wider capture area.
- Useful for compound miter cuts.
- Can be integrated into a permanent miter saw station.
3. Hood With Sliding or Hinged Panels
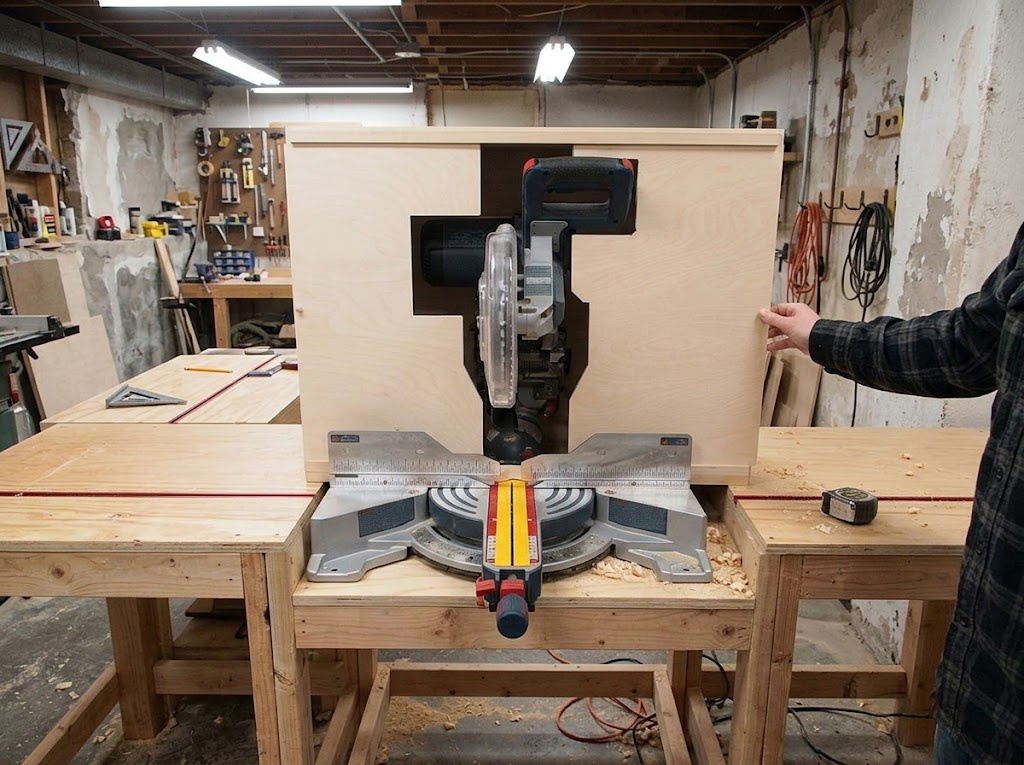
A more advanced design uses movable panels, sliding doors, or hinged covers.
These panels can help reduce the size of the open collection area while allowing access to the saw.
Advantages:
- Adjustable opening.
- Better containment when properly designed.
- Easier access for cleaning and maintenance.
Limitations:
- More complicated construction.
- Requires careful clearance checks.
- Moving panels must never interfere with the blade guard or cutting operation.
Materials and Tools Needed
For a basic plywood miter saw dust collection hood, you do not need an extensive collection of specialized woodworking tools.
Materials
| Material | Purpose |
|---|---|
| 3/4-inch plywood | Main hood structure |
| 1/4-inch plywood | Optional lightweight panels |
| Wood screws | Joining panels |
| Wood glue | Strengthening joints |
| Dust collection port | Hose connection |
| Dust collection hose | Air and debris transportation |
| Flexible sealing material | Closing selected gaps where appropriate |
| Wood cleats or support strips | Reinforcing joints |
| Clear sheet material | Optional inspection or access panels |
The exact material thickness depends on the design. Three-quarter-inch plywood is a practical choice for a sturdy stationary enclosure, while thinner plywood may be suitable for lightweight panels.
Tools
- Circular saw or table saw
- Jigsaw
- Drill and driver
- Measuring tape
- Combination square
- Pencil
- Clamps
- Sandpaper
- Safety glasses and hearing protection
A pocket-hole jig is optional but can make certain plywood joints easier to assemble.
How to Measure Your Miter Saw Before Building
This is one of the most important steps in the project.
Do not copy dimensions from another person’s hood without checking your own saw. A hood designed for a fixed-head miter saw may not accommodate a sliding compound model.
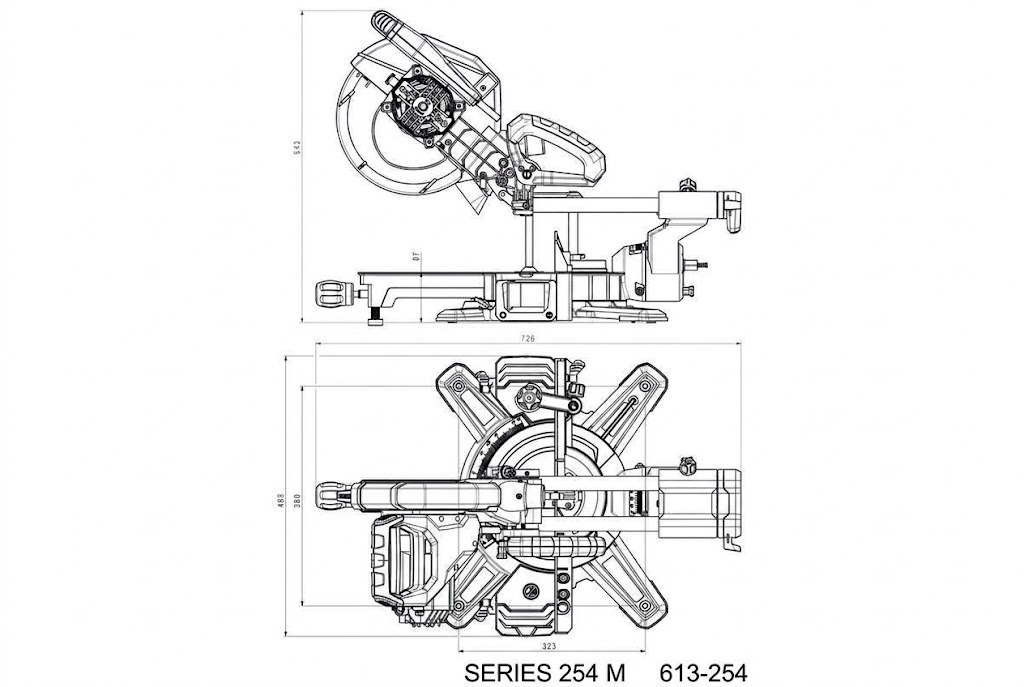
Before cutting any material, measure the saw in its actual operating positions.
1. Measure the Overall Width
Place the saw in its normal cutting position.
Rotate it fully to the left and right miter positions and measure the widest area occupied by the machine.
Include:
- Motor housing.
- Blade guard.
- Rear rails.
- Handles and adjustment controls.
- Any components that move with the saw.
The hood must provide sufficient clearance throughout the entire miter range.
2. Measure the Required Depth
For a sliding miter saw, move the saw head through its full sliding travel.
Check how far the rails and motor extend toward the rear.
The enclosure must accommodate the complete movement without contacting the machine.
3. Check the Bevel Range
If your saw supports bevel cuts, check the clearance at the maximum permitted bevel positions.
Pay particular attention to the motor housing, blade guard, and handle.
4. Check Workpiece and Fence Clearance
The hood should not interfere with long boards, the fence, workpiece supports, or the operator’s hands.
Make sure you can still position and secure workpieces comfortably.
DIY Miter Saw Dust Collection Hood Plans and Dimensions
There is no single universal dimension for a miter saw dust collection hood.
The appropriate dimensions depend on the saw model, blade size, sliding mechanism, miter range, and available workspace.
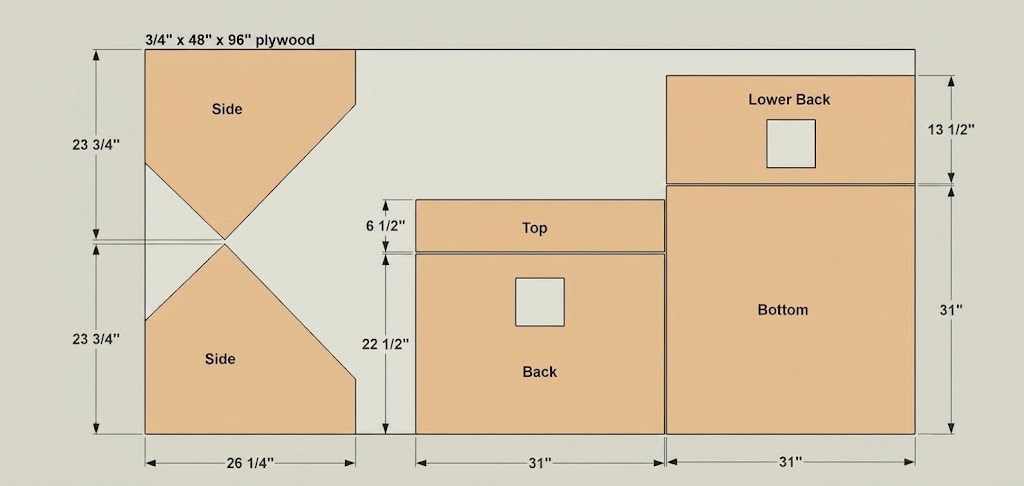
For a practical starting point, consider the following example from Kreg’s published DIY miter saw hood project. Its plan uses a design intended for a 10-inch sliding compound miter saw.
The published cut list includes:
| Component | Example dimensions |
|---|---|
| Side panels (2) | 3/4″ × 23 3/4″ × 26 1/4″ |
| Top panel (1) | 3/4″ × 6 1/2″ × 31″ |
| Back panel (1) | 3/4″ × 22 1/2″ × 31″ |
| Bottom panel (1) | 3/4″ × 31″ × 31″ |
| Lower back panel (1) | 3/4″ × 13 1/2″ × 31″ |
These are reference dimensions from that particular project, not universal measurements. Check the complete plan and verify every dimension against your saw before building.
Choosing Your Hood Width
The hood must be wide enough to accommodate the saw’s full left-to-right movement.
If the saw is wider at a particular miter angle, use that maximum measurement when planning the enclosure.
Choosing Your Hood Height
The hood should extend high enough to intercept the sawdust plume without interfering with the raised blade, motor housing, or guard.
A taller enclosure may provide more containment, but its performance also depends on airflow and the size of the front opening.
Choosing Your Hood Depth
The depth must accommodate the rear of the saw and its sliding mechanism.
A sliding miter saw may require considerably more space than a fixed-head model.
Choosing the Dust Port Location
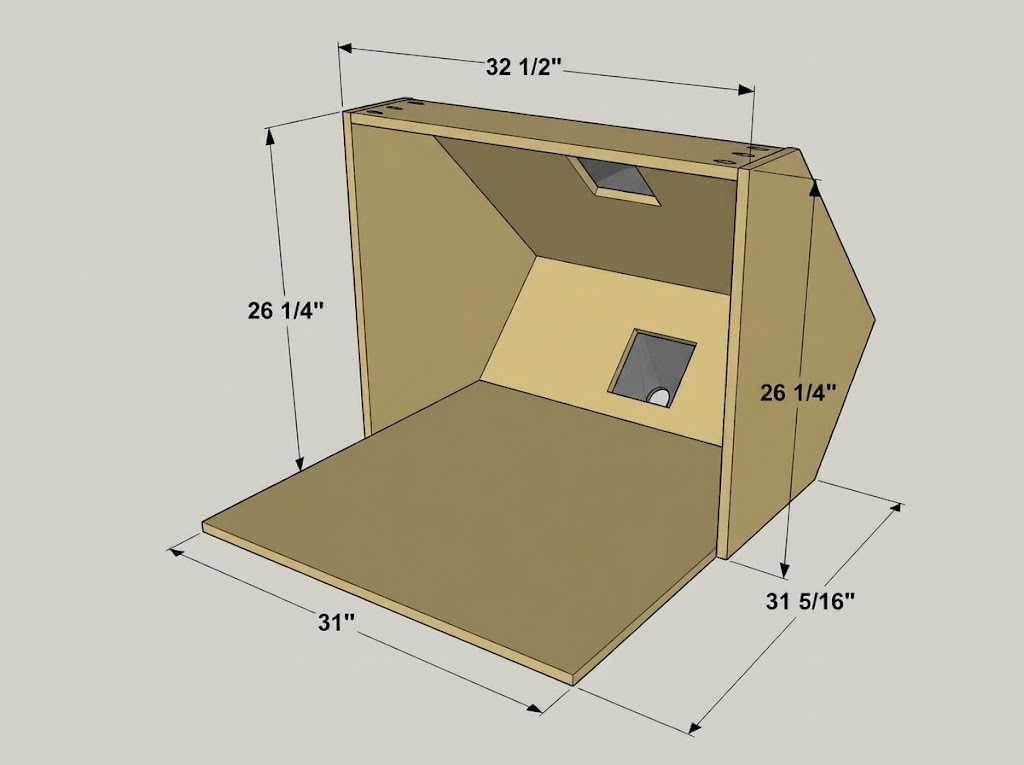
A low rear extraction opening is a practical starting point for many rear hood designs.
Its final location should account for the shape of the enclosure, the direction of the dust plume, and the extraction equipment.
Step-by-Step: How to Build a DIY Miter Saw Dust Collection Hood
Once you have finalized your measurements and design, you can start building the enclosure.
Step 1: Prepare the Plywood
Start by selecting straight, flat plywood without major warping.
Mark the panels according to your customized cut list.
For a basic enclosure, prepare:
- Two side panels.
- One rear panel.
- One bottom panel.
- One optional top panel.
- Additional support strips or cleats.
Cut the panels carefully and check that the corresponding pieces fit together.
Sand rough edges to reduce splintering.
Step 2: Cut the Dust Port Opening
Decide where the dust collection port will be installed.
Mark the opening according to the actual outside dimensions of your selected port fitting.
Drill a starter hole and use a jigsaw to cut the opening.
Test-fit the port before assembling the enclosure.
Do not assume every 4-inch dust fitting has the same mounting dimensions.
Step 3: Assemble the Rear Panel
Join the main rear panel and lower rear section if your design uses two pieces.
Wood glue and suitable screws can create a strong joint.
Check the corner with a combination square to keep the assembly aligned.
Step 4: Attach the Side Panels
Position the two side panels against the rear and bottom sections.
Apply wood glue to the mating surfaces and secure them using appropriate screws or cleats.
Use clamps while assembling the panels.
Check that both sides are aligned and that the enclosure remains square.
Step 5: Install the Top Panel
If your design includes a top panel, install it after checking the required clearance.
A removable or hinged top can make cleaning and maintenance easier.
Never position a panel where it could contact the saw’s motor, blade guard, or moving components.
Step 6: Seal Unnecessary Gaps
Inspect the joints and close unnecessary gaps with suitable sealing material.
However, do not completely enclose the saw or obstruct necessary ventilation, controls, or access.
The goal is to direct dust toward the collection opening while preserving safe operation.
Installing the Hood Behind Your Miter Saw
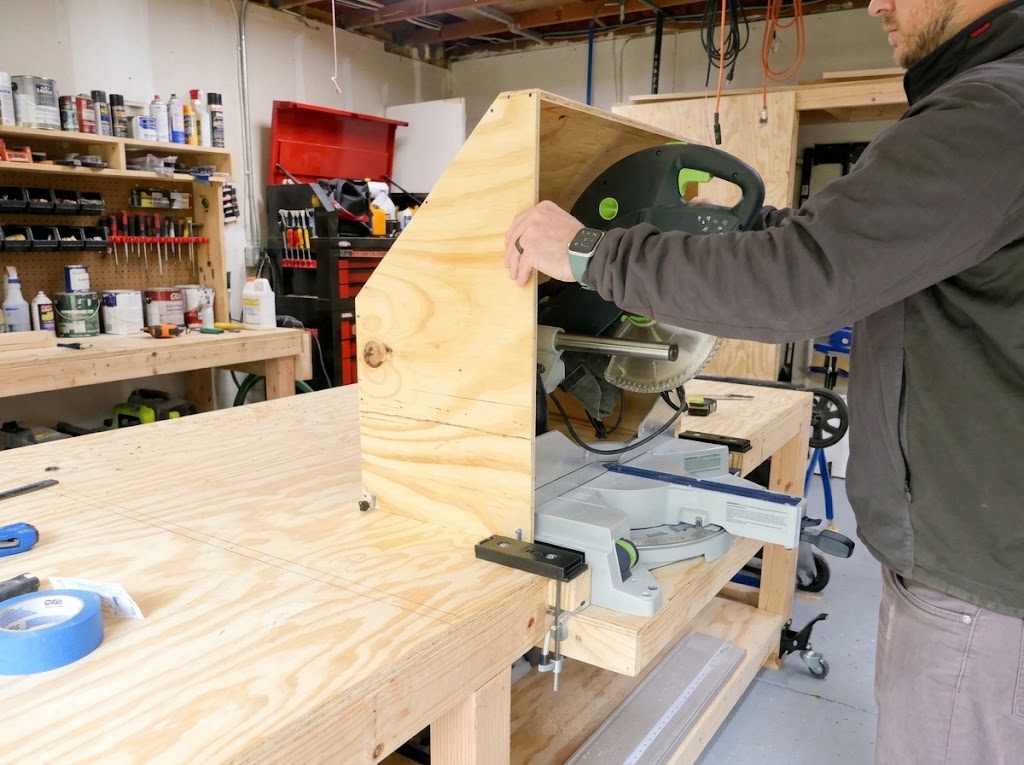
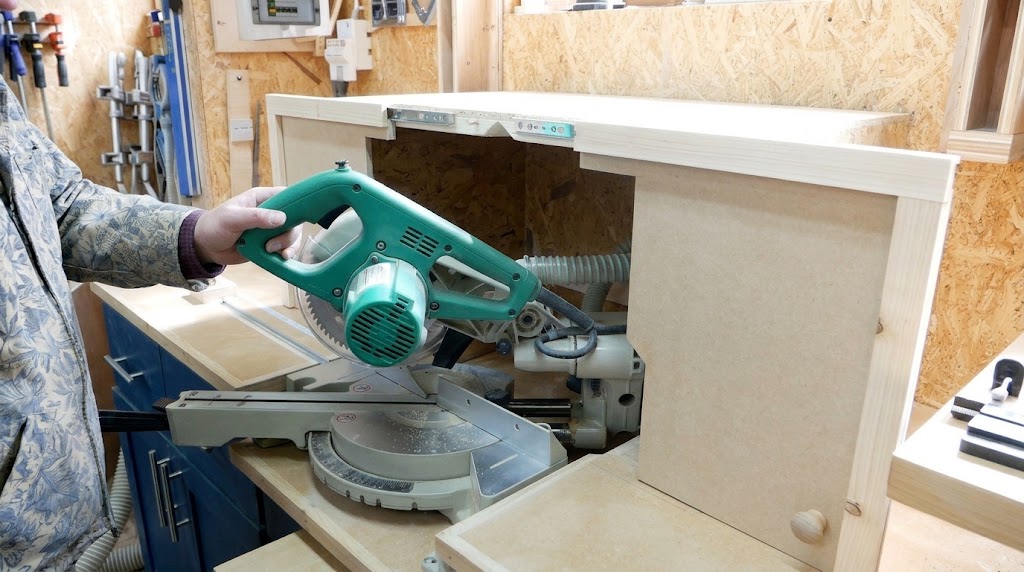
After assembling the enclosure, position it behind the saw or integrate it into your miter saw station.
The mounting method depends on your workshop layout.
For a permanent setup, the hood can be attached to a stable workbench or supported by a dedicated frame.
For a more flexible arrangement, you can design it as a removable enclosure.
Before permanently fastening anything, perform a complete clearance check.
With the saw disconnected from power:
- Move the saw head through its full sliding travel.
- Check the left and right miter positions.
- Check the permitted bevel positions.
- Raise and lower the saw head.
- Inspect the blade guard and handle clearance.
- Check workpiece and fence access.
- Confirm that the hose cannot become caught in the moving mechanism.
If any part contacts the enclosure, modify the hood before operating the saw.
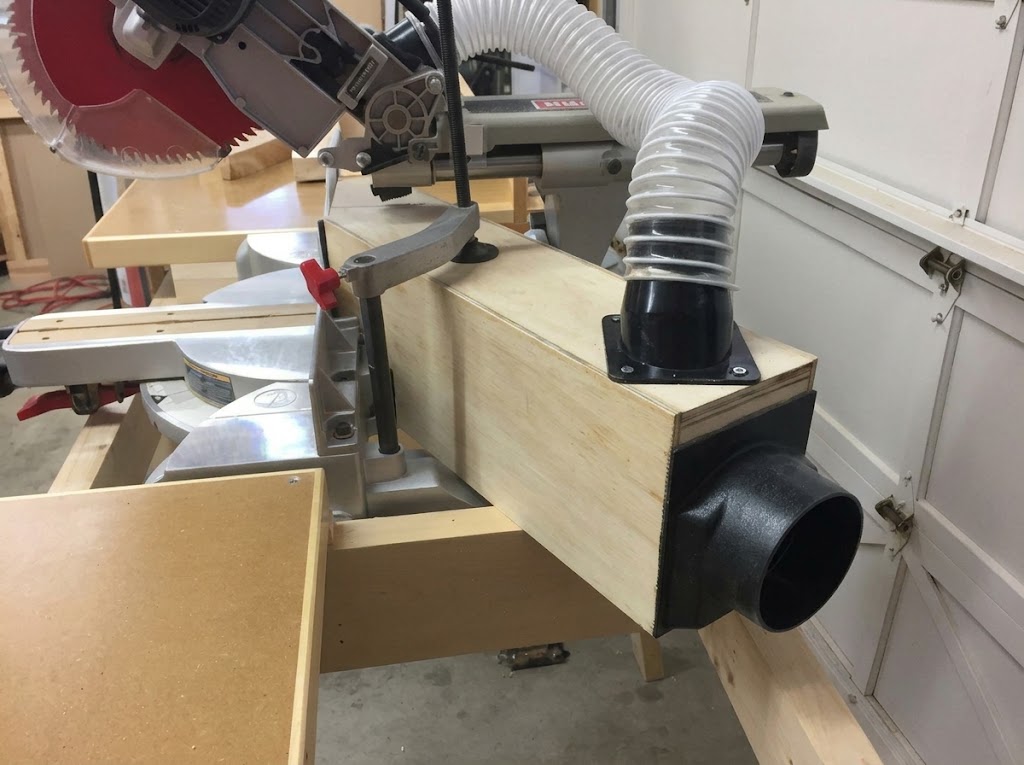
Connecting a Shop Vac or Dust Collector
The extraction equipment is an important part of the system.
A hood can contain sawdust, but it needs suitable airflow to transport that material through the hose and into the collection equipment.
There are two common connection options.
Option 1: Shop Vac
A shop vacuum is convenient for small workshops and portable setups.
You can connect it to the saw’s factory dust port using a compatible adapter.
However, a large rear hood has a much bigger opening than a typical vacuum hose. A shop vac connected only to a large enclosure may struggle to provide sufficient airflow across that opening.
For this reason, a practical configuration is to use the shop vac on the saw’s factory port and evaluate a separate extraction connection for the rear hood.
Option 2: Workshop Dust Collector
A workshop dust collector is often a better starting point for a larger rear hood because the system is designed to move larger volumes of air through larger ducts.
A suitable hose and port arrangement should be selected based on the collector’s actual airflow capability and the resistance of the ductwork.
A 4-inch port is common in woodworking dust collection setups, but simply installing a 4-inch fitting does not guarantee adequate airflow.
Consider:
- Hose diameter.
- Hose length.
- Number of bends.
- Duct restrictions.
- Collector performance.
- Filter condition.
How to Improve Dust Capture From Your DIY Hood
Building the enclosure is only part of the project. Its effectiveness also depends on how well the hood captures the dust produced during cutting.
Here are several practical improvements.
Add Angled Side Wings
Angled side wings can help contain sawdust when the saw rotates for miter cuts.
They can also guide scattered chips toward the rear collection area.
Use a Flexible Rear Curtain
A flexible curtain can help reduce the amount of dust escaping through selected openings.
Use suitable material that cannot enter the blade path or interfere with the guard, controls, or workpiece.
Keep the Hose Path Short and Smooth
Avoid unnecessary hose bends and sharp restrictions.
A shorter, smoother hose route can reduce airflow resistance.
Maintain the Factory Dust Port
Keep the original dust collection port connected whenever practical.
Check the adapter, hose, and internal passage for blockages.
Make the Hood Easy to Clean
Sawdust can accumulate inside the enclosure over time.
A removable panel or accessible cleaning opening can make maintenance easier.
Test the Setup
After completing the installation, test the collection system using representative cuts and materials.
Observe where dust escapes and make adjustments if necessary.
Do not assume a setup is effective simply because it collects visible wood chips. Fine airborne dust may still escape.
Common DIY Miter Saw Dust Hood Mistakes
Avoid these common problems when designing your enclosure.
1. Copying another hood’s dimensions without measuring
Different miter saws have different dimensions and movement requirements. Always measure your actual machine.
2. Making the front opening unnecessarily large
A large opening can make it more difficult to maintain useful airflow across the collection area.
3. Blocking the sliding rails
Sliding saws require sufficient rear clearance. An enclosure that restricts the rails makes the design unsuitable.
4. Ignoring the miter and bevel range
Check all permitted cutting positions before finalizing the hood.
5. Using an undersized or poorly routed hose
An unsuitable hose connection can restrict airflow and reduce collection performance.
6. Disconnecting the factory dust collection system
A rear hood should complement the saw’s existing collection system rather than automatically replace it.
7. Making the enclosure difficult to clean
An inaccessible enclosure can accumulate debris and become harder to maintain.
Safety Considerations
A DIY miter saw dust collection hood must never compromise the safe operation of the saw.
Before using the finished system:
- Keep the blade guard fully functional.
- Never remove, tie back, or modify the blade guard to accommodate the enclosure.
- Keep all moving components clear of the hood.
- Do not obstruct the saw’s cooling openings or electrical controls.
- Keep hands and workpieces away from the extraction opening.
- Make sure hoses cannot become caught in the sliding mechanism.
- Secure the hood so it cannot move during operation.
- Disconnect the saw from power before making adjustments or performing maintenance.
- Follow the manufacturer’s instructions for installation, operation, and dust extraction.
Wood dust can present respiratory and fire hazards. Use appropriate respiratory protection and suitable dust extraction. Fine dust that escapes the hood may require additional room air filtration.
Do not treat a DIY hood as a substitute for proper respiratory protection or a suitable dust control system.
Frequently Asked Questions
1. Does a DIY miter saw dust collection hood really work?
A properly designed hood can help capture sawdust and wood chips that escape the saw’s factory collection port. Its effectiveness depends on the enclosure design, airflow, and saw configuration. It will not necessarily capture all airborne dust.
2. What is the best material for a miter saw dust collection hood?
Three-quarter-inch plywood is a practical material for a sturdy stationary enclosure. Thinner plywood can also be used for selected panels when the design provides adequate support.
3. What size should a miter saw dust collection hood be?
There is no universal size. The width, height, and depth should be determined by measuring the saw’s full miter, bevel, and sliding movement. The hood must provide clearance for every operating position.
4. Can I use a shop vac with a miter saw dust hood?
Yes, but a shop vac connected to a large rear hood may not provide enough airflow for effective capture. It is often more practical to connect it to the saw’s smaller factory dust port and use an appropriately sized dust collector for the rear hood.
5. Should I use a 4-inch dust collection port?
A 4-inch port is a common option for a workshop dust collector. However, the correct port size depends on the extraction equipment, hose arrangement, and hood design. Port diameter alone does not determine collection performance.
6. Can I build a dust collection hood for a sliding compound miter saw?
Yes. The enclosure must be designed around the saw’s full sliding travel, miter range, bevel movement, and rear rail clearance.
7. Can I add sliding doors to a miter saw dust collection hood?
Yes. Sliding panels can help reduce the open area when designed correctly. They must not interfere with the blade guard, workpiece, controls, or saw movement.
8. Is a rear dust hood better than the factory dust bag?
A rear hood provides a larger containment area and can supplement the factory dust collection port. Using both systems together may provide better control than relying on the factory bag alone.
Final Thoughts
Building a DIY miter saw dust collection hood is a worthwhile workshop improvement if you regularly use your miter saw and struggle with scattered sawdust.
A plywood rear enclosure, correctly positioned extraction port, and suitable dust collection system can help contain much of the debris that would otherwise spread around your workshop.
The most important step is measuring your actual saw before building. Take the time to check its sliding, miter, and bevel movements, and make sure the enclosure never interferes with safe operation.
Start with a simple design, test the dust collection performance, and make improvements where necessary. A well-planned hood can become a useful part of a cleaner and more organized woodworking shop.